Connexion Pointe® Online Help
Pointe Savant® User’s Guide
Video Quickstart Guide
These 7 videos will help get you up and running with Pointe Savant® fast! If you need more information just scroll down to the easy-to-navigate user guide and search by keyword. Connexion Pointe® University videos are HERE.

What is Connexion Pointe®
So what is Connexion Pointe? How does it work? Why should candidates use it? Why should businesses use it? Here is an overview.
1. What is Connexion Pointe®?

Welcome to the new standard in cloud-based video screening. Connexion Pointe® is a cloud-based video screening tool for recruiters that also features a self-service video interviewing tool for candidates. Our platform has two coordinated applications: Pointe Savant® is for recruiters, and Pointe Profile® is for candidates.
Experts suggest that 70-85% of positions are filled through networking, which is why both of our applications feature a tool for creating and sharing asynchronous video interviews. Recruiters or candidates can initiate the screening process, recruiters can follow up, and everyone can get to a decision quickly.
1.1 Pointe Profile® is for candidates.

Pointe Profile® is our self-serve interviewing application for candidates. In addition to creating and sharing asynchronous video interviews, Pointe Profile® features tools for candidate self-development with an emphasis on behavioral and video interviewing, delivering other screening-related video content to Pointe Savant® users, and responding to their follow-up questions. Pointe Profile® provides candidates the best answer for automated Applicant Tracking Systems – networking and connecting with decision makers!
Pointe Profile® has a $1 sign-up fee and is otherwise free for life. The $1 fee is waived when candidates are invited to take an interview created by a Pointe Savant® user.
1.2 Pointe Savant® is for recruiters, businesses, and organizations.

Pointe Savant® is our recruiter/organizational application. In addition to creating and sharing asynchronous video interviews, Pointe Savant® features tools for managing online screening events, candidate evaluation, asking follow-up questions, and a robust database for managing video interviews submitted by Pointe Profile® users.
Pointe Savant® requires a monthly subscription for access to the service. An additional per-interview charge can be mitigated by allowing candidates to create and submit their own interviews.
Note: Pointe Savant® is not an automated-candidate-selection device! It does not contain a resume parser or technology to rank candidates via keyword-search or algorithm automatically, and it is not a replacement for real recruiters and hiring managers! Instead, Pointe Savant® is explicitly designed to help them maximize their valuable experience to screen a lot more candidates quickly.
1.3 Meet our virtual characters.

Our platform features multi-lingual virtual interviewers that are available 24/7/365 to simulate face-to-face interviews, keeping decision makers free to focus on evaluating excellent candidate content.
1.4 How does it work?

Our system generates a link for each screening interview created. The link can be shared via email, resume or even posted on a job board. Recruiter or candidate functionality is activated depending on the application used to create the interview.
2. Why should candidates use it?

With Pointe Profile®, candidates no longer have to wait for recruiters to start the screening process. Candidates can begin the screening process by interviewing themselves, sharing their interview with targeted recruiters users and providing a clear pathway for verifying the screening content presented. This creates a unique opportunity to stand out by lowering recruiters’ workload and costs without sacrificing quality. This also creates a strong incentive for recruiters to take a look.
3. Why should recruiters use it?

Until now, the screening process was a one-way street that began with organizational outreach or recruiters screening for talent. Organizations paid most of the costs associated with screening and faced the logistical challenges of screening ever-larger online candidate pools. With Pointe Savant®, recruiters can deploy asynchronous video interviews using our virtual army of multi-lingual interviewers capable of screening hundreds of candidates per hour and delivering the content to an easy-to-use online interface designed to help hiring teams make decisions quickly. Furthermore, inbound candidates can present themselves with excellent video screening interviews already done, efficiently leveraging their ambition to lower recruiters’ workload and screening costs.
As previously stated, Pointe savant® requires a monthly subscription for access to the service, and there is an additional per-interview charge. Mitigating the per-interview charge is easy because Pointe Savant® features the ability to accept candidate generated interviews and information.
3.1 What do you mean by “accept candidate generated interviews”?
Candidate generated interviews are interviews created by candidates at in the Pointe Profile® application. The interviews are designed at candidates’ discretion and not subject to the vagaries of recruiters. The candidate chooses the questions and can support the interview with additional video-based content.
4. How can Pointe Profile® interviews be useful if recruiters are not selecting the questions?
An excellent question!
The key is in how the interviews are created. The 800+ job titles in our Pointe Savant® Screening Event Builder™ and Pointe Profile® Interview Builder™ applications are based on the United States Standard Occupational Code. We’ve created recommendations for soft skills for many of these job titles (and we’re creating more as you read this).
This is important for a few reasons:
1. It gives everyone a similar starting point for building screening interviews,
2. It standardizes an organizationally acceptable format for the exchange of screening information,
3. It provides an easy-to-use automated framework for expanding your candidate pool to include similar job titles.
4.1 Competency-Based Interviews
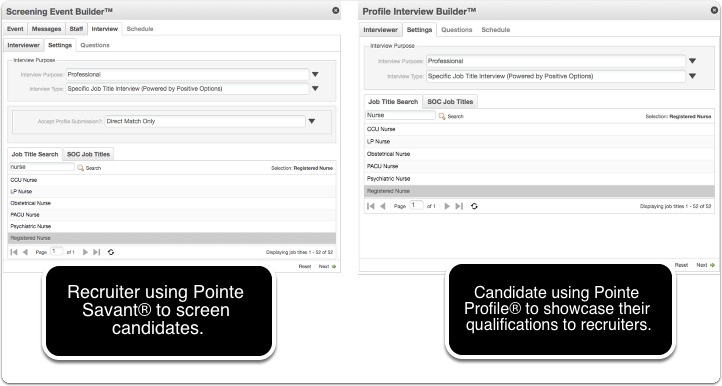
For this example, let’s use the job title of Registered Nurse. In the photo above, the Pointe Savant® user (on the left) is a hospital/recruiter looking to hire a Registered Nurse. The Pointe Profile® user (on the right) is a Registered Nurse looking for a position. They both log in to their respective applications and begin creating a screening interview for the Registered Nurse position.
4.2 Same starting point: everyone answers the same introductory questions.

The first two questions of the interview are the same, regardless of which application created the interview. These questions cannot be re-ordered, removed, revised or replaced. Each question offers every candidate an equal 2-minute opportunity to introduce themselves and lay claim to their desired position while giving hiring managers complete control over how much of the interview they review.
4.3 Standardized format: Competency-based behavioral interview questions
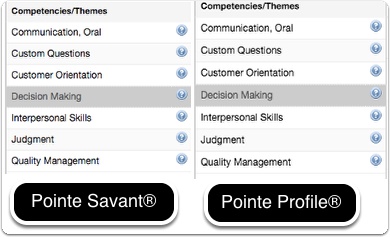
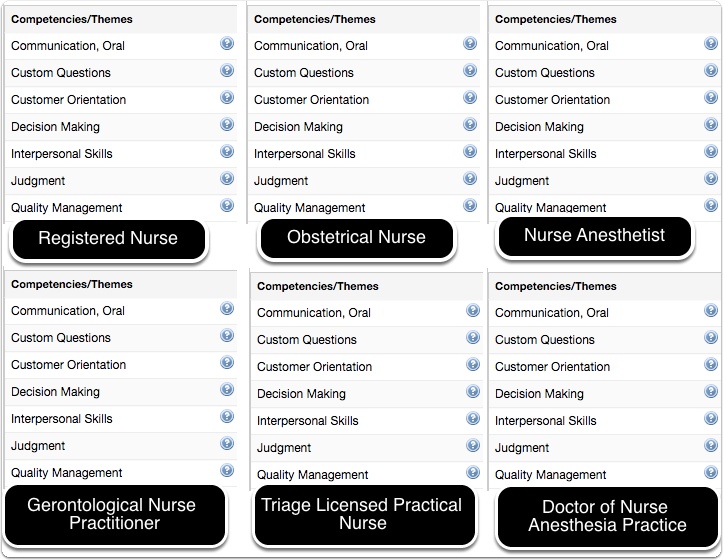
After selecting a job title, both of our interview builders present the same list of Competencies/Themes to each user.
4.4 Competency/Themes Definitions
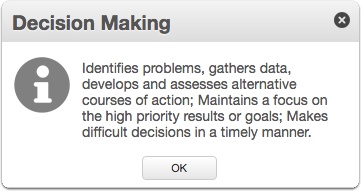
Each of these Competencies/Themes defines a job-relevant “soft-skill” for the position. Let’s use “Decision Making” for our example.
4.5 Question selections.
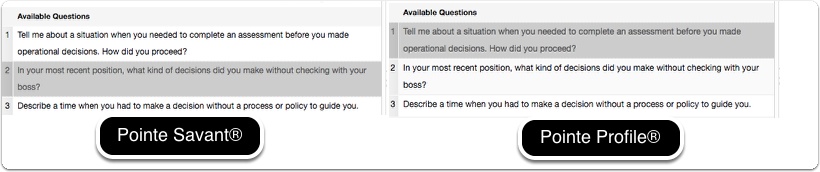
Even if the Pointe Savant® user chooses question #2 in this category, but the Pointe Profile® chooses question #1, both questions are job-related and directly relevant to an important soft skill (Decision Making) for the position. The Pointe Savant® users’ time is not wasted, and they can still ask their preferred question as a follow-up using Pointe AskMe™.
4.6 An easy-to-use automated framework for expanding your candidate pool.
In addition to matching Competency/Themes, Pointe Savant® Screening Event Builder™ features an easy-to-use tool that allows recruiters to expand the candidate pool by accepting similar job titles from other SOC categories. (Using this feature is easy, and there is a full step-by-step tutorial in our help guide).
4.7 Different job titles may have similar competencies/themes.
Even though some Pointe Profile® users in the expanded candidate pool will have different job titles, the overall Competencies/Themes for screening are remarkably similar. This gives Pointe Profile® users the ability to be considered for multiple positions with the same interview while hiring managers can increase their candidate pool without changing the essential focus of their screening event.
For many recruiters, screening questions become more organizationally specific as candidates advance through screening processes. Connexion Pointe® platforms natively support this practice. Everybody is on the same page – even before the first contact occurs.
I’ll show you how the system works now 🙂
Minimum System Requirements
Connexion Pointe® is designed to be user-friendly and deliver a similar experience for Mac® and Windows® users. This article details the minimum operating system and web browser requirements for Mac® and Windows®.
These requirements are subject to change without notice.
1. Mac

Operating System: OSX Yosemite version 10.5 or newer recommended.
Recommended Browser: Google Chrome – Version 60 or newer, other browsers may experience technical difficulties.
Webcam & Microphone – built-in microphone and webcam strongly recommended, but most external webcams and microphones should be fine.
Internet Connection – Video files are large! Wired high-speed internet connections yield the best results, but Connexion Pointe® has been tested to work well with strong wireless high-speed internet connections. Public wifi is not recommended, and weak internet connections may result in technical difficulties.
Known Issues – Having multiple webcams and microphones connected and active has been shown to cause intermittent problems while recording video interviews on Connexion Pointe®. It is strongly recommended that additional devices of this type be disabled while taking interviews on Connexion Pointe®.
Chat and online meeting software such as (but not limited to) Go To Meeting, WebEx, Join.Me and AnyMeeting are known to cause intermittent problems while recording video interviews with Connexion Pointe®. It is strongly recommended that such programs be disabled while taking interviews on Connexion Pointe®.
1.1 Webcam

If your computer has a built-in webcam, we strongly recommend that you use it. If your computer doesn’t have a webcam, you’ll need to go to a computer that does, or you’ll need to purchase a compatible webcam. Video interviewing is here to stay and gaining popularity by the day, so your investment in a quality webcam will be well worth the trouble. Most USB web cameras should be fine, but you’ll want to test to be sure. Portable camera’s like Flip, Zoom Q2N and GoPro are not supported or recommended for use with Connexion Pointe®. Next, you’ll need a microphone and headphones.
1.2 Apple® EarPods with Microphone

Headphones are required to record the best audio with Connexion Pointe® and avoid audio feedback. Apple® EarPods*** with the built-in microphone is highly recommended for this purpose but not required. Several headphones and microphones were tested, Apple® EarPods*** are widely available, work well on Mac® and Windows® operating systems and consistently delivered the best results. Be sure to test your headphone/microphone set of choice before taking important interviews on Connexion Pointe®.
***Apple®, EarPods, Mac® and Windows® are trademarks of their respective owners. All Rights Reserved. Connexion Pointe® is not affiliated with these brands in any way.
2. Windows

Operating System: Windows 8.1 or newer. Windows 10 has not been tested and is not supported for use with Connexion Pointe® applications at this time.
Recommended Browsers: Google Chrome – Version 52.0.2743.116m (64-bit) or newer. Using other browsers with Connexion Pointe® may result in technical difficulties.
Webcam & Microphone – built-in microphone and webcam strongly recommended, but most external webcams and microphones should be fine.
Internet Connection – Video files are large! Wired high-speed internet connections yield the best results, but Connexion Pointe® has been tested to work well with strong wireless high-speed internet connections. Public wifi is not recommended, and weak internet connections may result in technical difficulties.
Known Issues – Having multiple webcams and microphones connected and active has been shown to cause intermittent problems while recording video interviews on Connexion Pointe®. It is strongly recommended that additional devices of this type be disabled while recording interviews on Connexion Pointe®.
Chat and online meeting software such as (but not limited to) Go To Meeting, WebEx, Join.Me and AnyMeeting are known to cause intermittent problems while recording video interviews with Connexion Pointe®. It is strongly recommended that these or similar applications be disabled while recording interviews on Connexion Pointe®.
2.1 Webcam.

If your computer has a built-in webcam, we strongly recommend that you use it. If your computer doesn’t have a webcam, you’ll need to use a computer that does, or you’ll need to purchase a compatible webcam. Video interviewing is here to stay and gaining popularity by the day, so your investment in a quality webcam will be well worth the trouble. Most USB web cameras should be fine, but you’ll want to test to be sure. Portable camera’s like Flip, Zoom Q2N and GoPro are not supported and not recommended for use with Pointe Profile®. Next, you’ll need a microphone and headphones.
2.2 Headphones and Microphone

Headphones are required to record the best audio with Connexion Pointe® and avoid feedback. Apple® EarPods*** with the built-in microphone is highly recommended for this purpose but not required. While several headphones and microphones were tested, Apple® EarPods*** are widely available, work well on Mac® and Windows® operating systems and consistently delivered the best results. Be sure to test your headphone/microphone set of choice before taking important interviews on Connexion Pointe®.
***Apple®, EarPods, Mac® and Windows® are trademarks of their respective owners. All Rights Reserved. Connexion Pointe® is not associated with these brands in any way.
Set Up Owner Profile and Add Staff
Pointe Savant® is our dedicated screening solution for recruiters, head-hunters, and hiring managers. This section will cover how to log in and set up a Pointe Savant® account.
1. Session timeout.
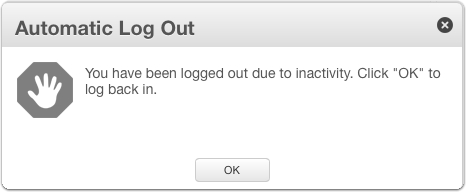
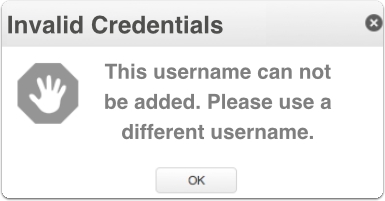
Before we get started, it’s important to note that long periods of inactivity will result in a timeout of your session for added security. If a session timeout occurs, you will need to log in again with a valid username and password. Click “OK.”
2. Log in.
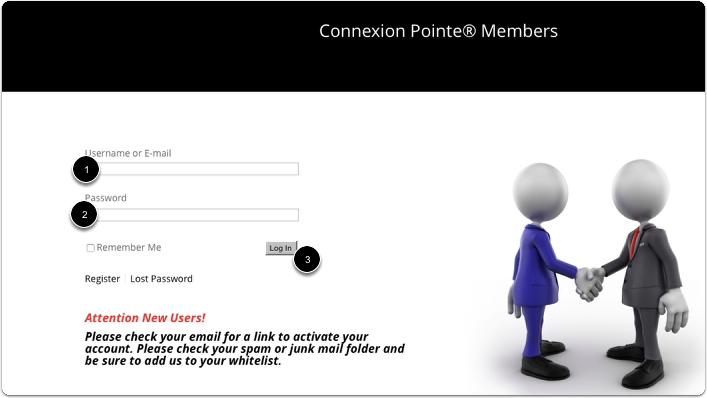
You will automatically redirect to the login page.
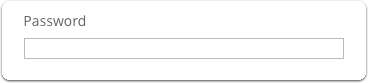
1. Enter your user name.
2. Enter your password.
3. Navigating Pointe Savant®.
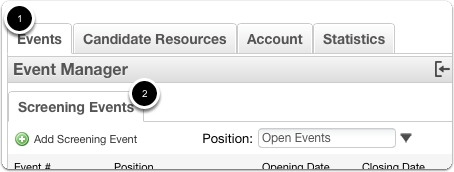
Navigating Pointe Savant® is easy. Each function is organized under 4 primary tabs. Simply click on tab to access it’s window and functions. If a tab has more than one sub-function, those sub-functions are accessible by a secondary group of tabs.
1. When you log in to Pointe Savant®, the primary “Events” tab is selected by default, and
2. The secondary “Screening Events” tab is below it.
We’ll discuss the “Events” tab and its functions shortly. Right now let’s get Pointe Savant® set up to do business!
3.1 Pointe Pointe Savant®™ Interface.
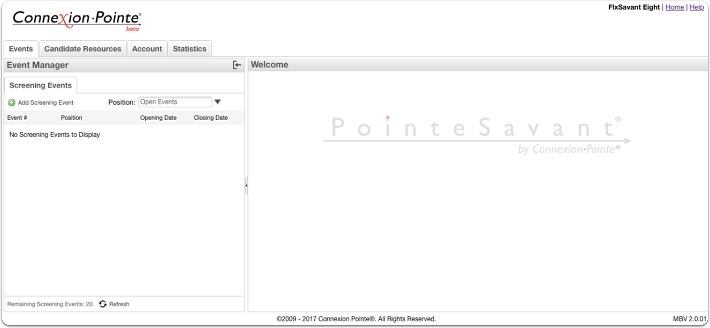
Once logged in, your screen should be similar to the photo above.
3.2 Logging Out and Getting Help.

Moving around and accessing functions within Pointe Savant® is easy.
1. At the top right corner of the screen, the users name appears.
2. To securely log out of your account click “Home”.
4. To access the Pointe Savant® help guide in a new browser tab or window, click “Help”.
4. Managing your password.
All account passwords can be changed on the login page, in the “Manage Account” area or from within the Pointe Savant® application while you’re logged in. I’ll show you how to use each method.
4.1 Forgot password?
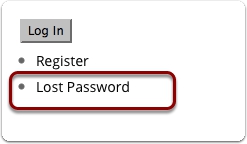
Changing your password often is a great way to keep your account secure. If you’d like to change your password or if you’ve misplaced or forgotten your password, Navigate to https://www.connexionpointe.com/login/ and click on “Lost Password.” Follow the on-screen instructions.
4.2 Password recovery
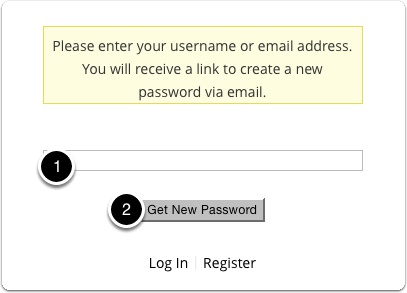
1 – Enter your email address or your username in the field and
2 – click the “Get New Password” button.
If your email address is in our system, an email will immediately send with a link to reset your password.
4.3 Check your email.
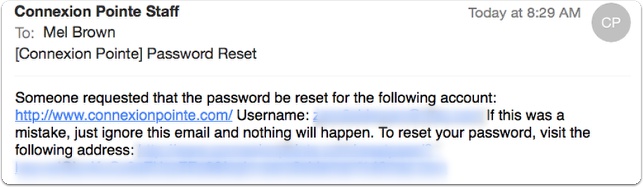
The email to reset your password will be similar to this. Click the reset password link provided.
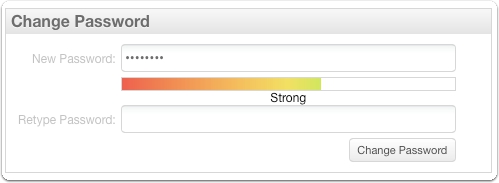
4.4 Reset Password
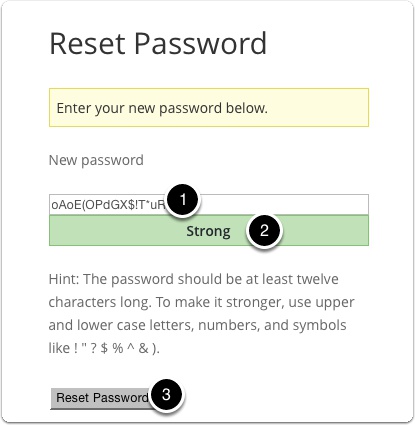
1 – The system will suggest a secure password for your account which we recommend using. You can also create a new password by entering it in the field.
2 – When the indicator presents the word “Strong,”
3 – Click the “Reset Password” button.
Follow the on-screen instructions, and log in again.
Note: It’s recommended that you wait a moment or two to allow your new password to be reset in the system.
4.5 Change Password in “Manage Account” Area
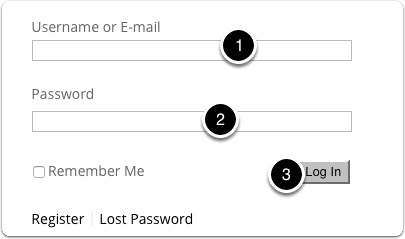
To change your password in the “Manage Account” area navigate to https://www.connexionpointe.com/login/, enter your credentials and click the “Log In” button.
4.6 Account Home Page
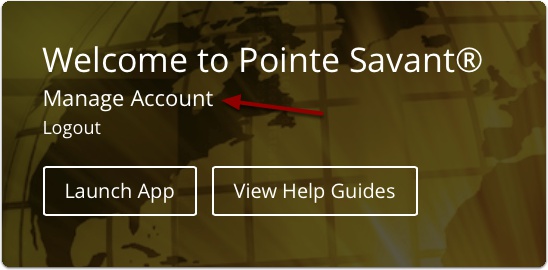
Once logged in, you should see a page similar to the photo above. Click the “Manage Account” link.
4.7 Edit Password and Account Details Link
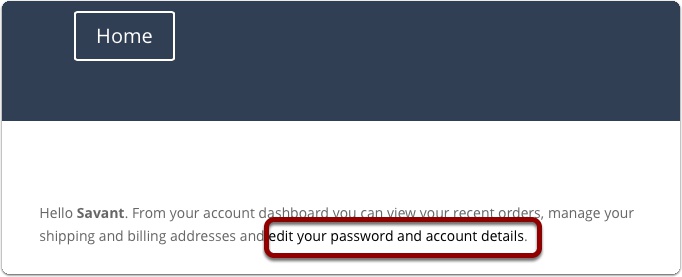
This the “My Account” page. To change your password click the words edit your password and account details to access the account editing functions.
4.8 Edit Account Details page
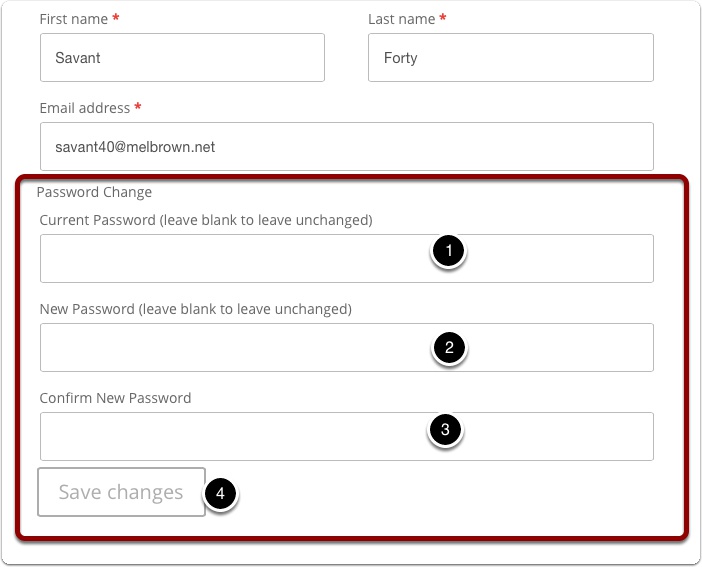
Locate the Password change fields as pictured above.
1 – Enter your current password.
2 – Enter your new password
3 – Confirm your new password by entering it again. The new passwords MUST MATCH before the change is accepted.
4 – Click the “Save changes” button.
4.9 Password change successful
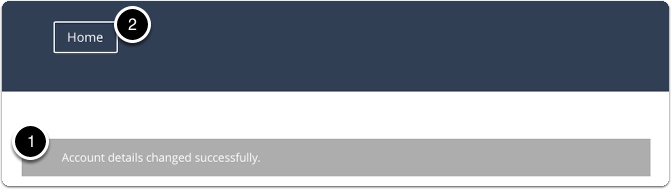
1 – The system will notify you that your update was successful, and will inform you of the change via email.
2 – To access the application or log out, click the “Home” button.
4.10 Account Home page.
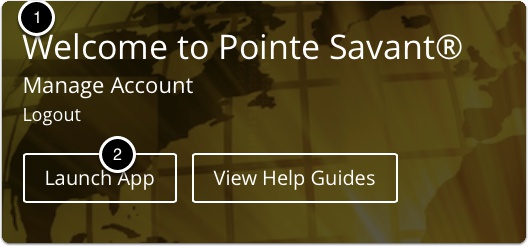
1 – You’ll be brought to the account home page where you can select your next action.
While we’re here let’s take a look at changing the password from within the Pointe Pointe Savant®™ application.
2 – To do this, click the “Launch App” button.
4.11 Pointe Savant® Application
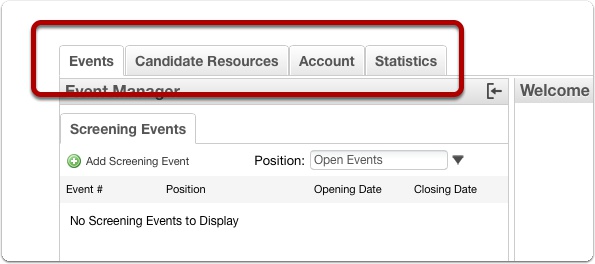
When the application opens, locate the four primary tabs.
4.12 My Info tab
To edit the account details,
1 – select the “Account” tab,
4.13 “Profile Details” and “Change Password” panes.
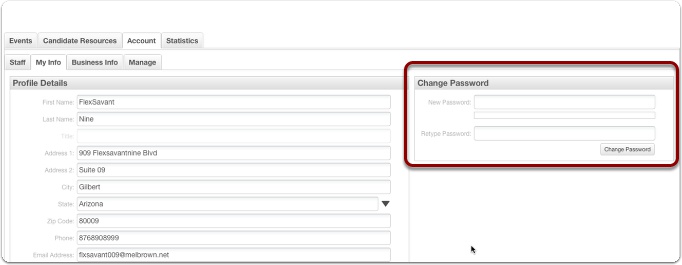
The “Profile Details” and “Change Password” panes become visible. To edit the password, we’ll use the “Change Password” pane.
4.14 Change password.
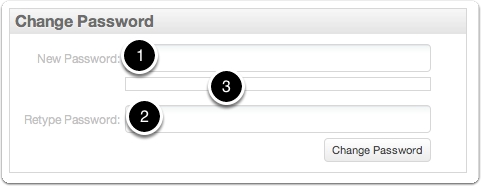
To change the account password,
1 – enter the new password in the required field,
2 – Confirm the new password by entering it again. The passwords MUST match to be accepted.
3 – Strong passwords are recommended. Password strength is evaluated by an indicator between the 2 fields. Click “Change Password”.
4.15 “Very Weak” Passwords.
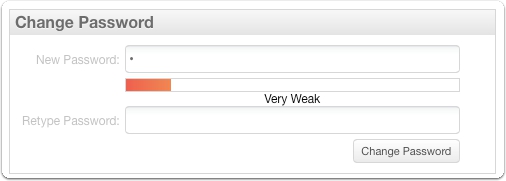
An indicator of password strength appears below the “New Password” field. “Very Weak” passwords are not recommended and can be strengthened by adding characters.
4.16 “Strong” Passwords.
“Strong” passwords are much better and can be strengthened further by adding characters.
4.17 “Very Strong” Passwords.
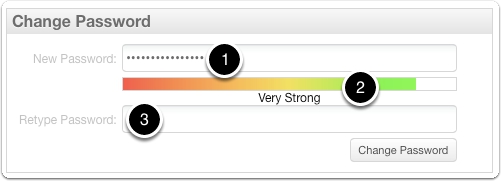
“Very Strong” passwords are highly desirable and recommended.
1 – Once you’re satisfied with your new password,
2 – and you’ve confirmed that it’s “Very Strong”,
3 – Confirm by retyping it and
4 – click the “Change Password” button and you’re done!
NOTE – Be sure to make a note of your password and keep it in a safe place! The system will not confirm your password change via email using this method!
5. Setting up Pointe Savant®.

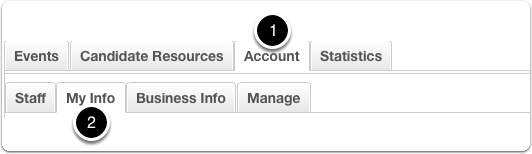
Before you start using the application, you should verify your information. You also can designate some other users to help you with your screening. Click the account tab.
5.1 Owner and User Profile Information.

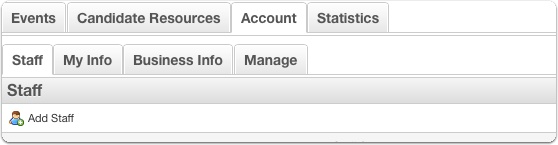
1. With the “Account” tab selected,
2. Four secondary tabs display: “Staff,” “My Info,” Business Info” and “Manage.” Let’s look at each of these tabs and add the required information.
6. Managing Staff
Depending on your subscription, Pointe Savant® supports a variable number of users on the same account. We refer to these additional folks as “Staff.” Staff can be added by the account owner to create screening events, evaluate candidates and “Wrap-Up” screening events when they’ve concluded.
6.1 The Staff Tab.
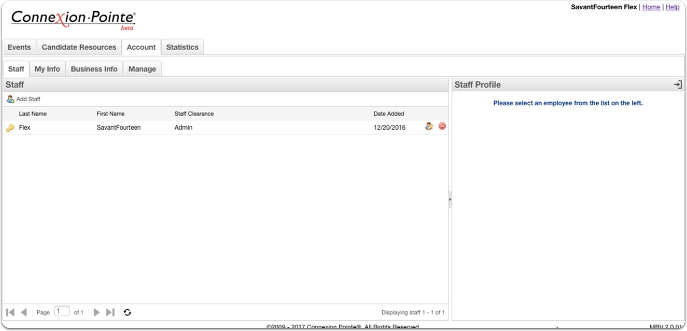
This is the staff window. Here is where you’ll manage who has access to the account and what functions are available to them. Anyone using your Pointe Savant® account must be added here by an administrator before they can participate in any screening activity. By default, the primary account holder is the first staff member. This person will have unrestricted access to all of the account information, (including statistics and financials) and has the ability to create other users on the account. (Use great care when creating other users with “Admin” clearance. They can not delete the original account owner but they can delete other users! New staff Admins don’t have access to the account financials.)
6.2 Staff Clearances – Owner.
Before adding staff to your account to help with screening, take a minute to consider exactly how you want their role defined. The photo above illustrates the four clearance levels offered by Pointe Savant®. Each colored box encompasses the functionality available to its corresponding label.
The OWNER has ADMIN clearance (by default) which grants full access to all of Pointe Savant®’s powerful functions. The original owner of the account can not be deleted, and their status on the account can not be transferred to anyone or changed. The owner may also add other users (including others with limited ADMIN clearance).
Please take a moment to understand what each clearance means in the context of your organization and screening strategy.
6.3 Staff Clearances – Limited Admin
Staff with the Admin can access all of the account functions within the orange square. This is mainly all of the account functions with the exception of financial transactions, which are reserved for the account owner only This is a useful setting for a top manager of screening who may not have access to the company credit card. Staff added with limited
Admin clearance on Pointe Savant® accounts will be able to see all of the screening events on the account.
Note: These clearances may change without notice as new functionality is added to the platform.
6.4 Staff Clearances – Lead Staff
Lead Staff members have access to all of the screening event functions enclosed listed in the green square above.
Lead Staff can only view or participate in screening events to which they’re assigned.
6.5 Staff Clearances – Regular Staff
Regular Staff is the most restricted user.
Regular Staff can only view the events they’re assigned to, evaluate candidates and initiate follow-up questions with Pointe AskMe™.
6.6 Adding Staff
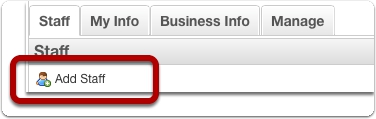
Let’s add some staff members who will screen candidates, build interviews and set up events. Start by clicking the “Staff” tab and the “Add Staff” button.
6.7 Add Staff Window
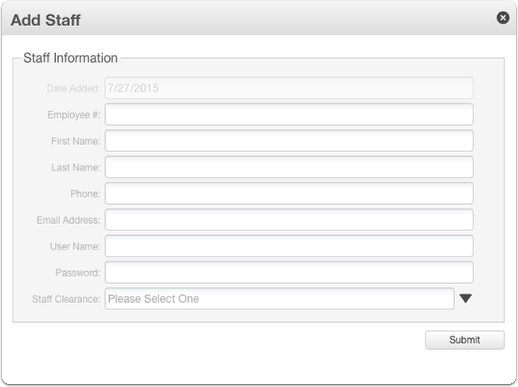
The “Add staff” window opens. Enter all of the relevant information for the staff being added. If specific fields don’t apply to your organization, you can choose a value of -0-. (This won’t affect functionality).
6.8 Staff Clearance

Choose the level of clearance for the staff member you’re adding. Use the Staff Clearances photo in the previous step as a guide. For this example we’ll assign “Admin” clearance to this new staff member.
6.9 Submit Added staff
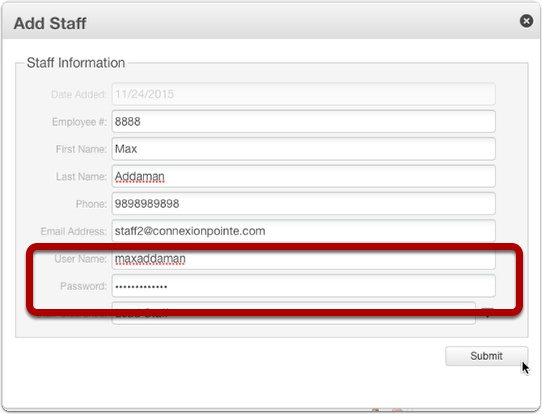
You must also select username and password is also for the new staff member.
Important: Make a note of these credentials! It is up to you to distribute the new login credentials to your added staff.
6.10 Click the “Submit” button.
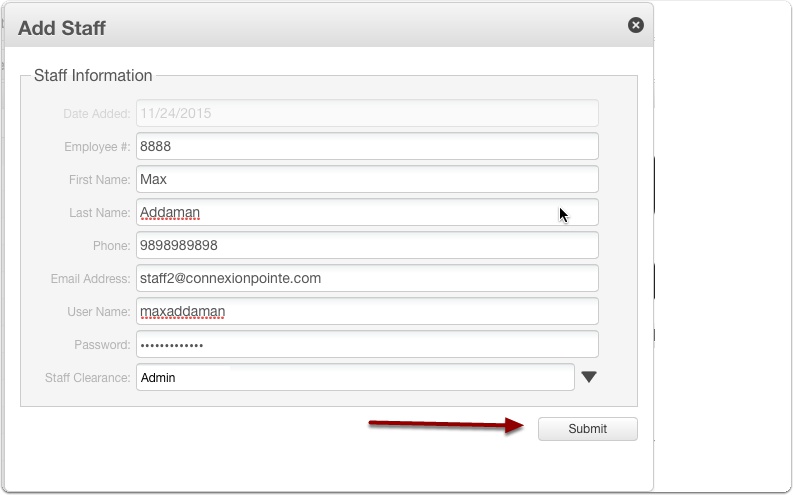
After all of the relevant information is entered, click the “Submit” button to add the staff to your Pointe Savant® account.
6.11 Staff Added

The staff’s name now appears in the list of personnel having access to the account. Notice the golden key icon to the left of the staff’s name. This indicates that Max Addaman has Limited ADMIN privileges on this Pointe Savant® account.
6.12 Editing Staff Info.
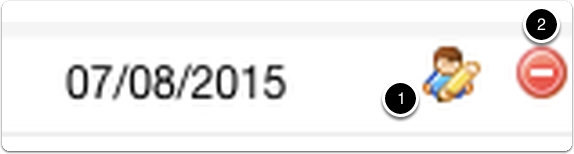
Next to the “Date Added” column of the staff name are two icons.
1 – The icon on the left is the “Edit Staff Member” icon and is for editing the staff information.
2 – The icon on the right is for deleting the staff from the account and revoking access.
6.13 Click Edit Staff Icon.
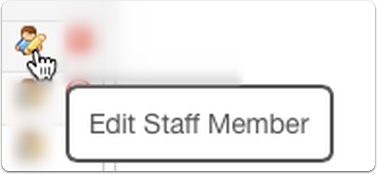
To edit this staffer’s information, click the icon.
6.14 Edit Staff Profile Window.
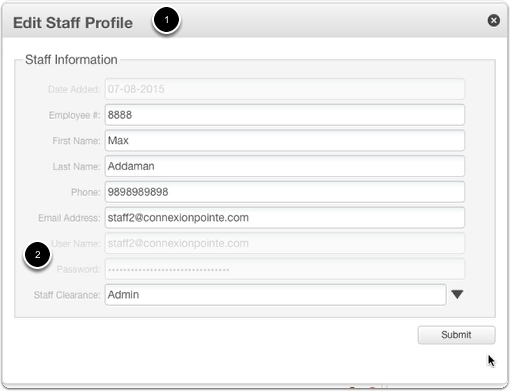
The “Edit staff Profile” window appears. Make any changes (including administrative access) here and click submit.
Note: Once a staff member has been added, an administrator does not have access to and can not change that staff members username or password. Usernames can not be changed, and only staff members can change their password. Other details may be edited, or the staff member can be deleted. Deleting the staff member does not erase the recorded history of the staff members activities.
6.15 Add Staff Photo
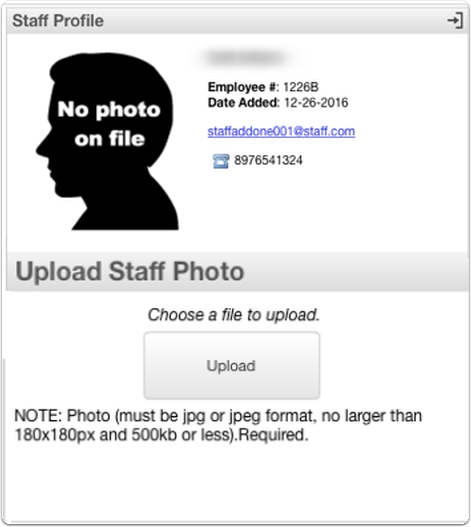
Selecting a staff name activates the staff Profile window. Adding an optional staff photo is easy. To begin, the administrator clicks “Upload.” Note the valid file types indicated at the bottom of the window.
6.16 Google Chrome: Upload Staff Photo Window

On Google Chrome, a window drops down from the top of the window.
1. Navigate to a photo on your hard drive and select it.
2. Google Chrome: To upload the photo, click “Open.”
6.17 Safari: Upload Staff Photo Window
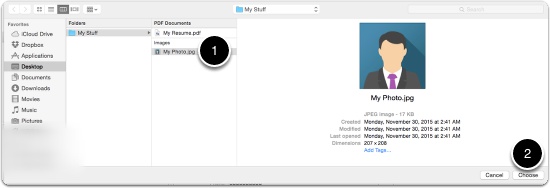
On Safari, a window drops down from the top of the window.
1. Navigate to a photo on your hard drive and select it.
2. Google Chrome: To upload the photo, click “Choose.”
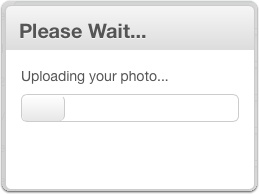
6.18 Photo Upload Progress
6.19 Photo Uploaded

And the green text lets you know that the photo was successfully uploaded.
Note: Staff photos are for your internal use only and can not be seen by anyone outside of your organization.
6.20 Deleting Staff Members
Now let’s take a look at how to delete staff members from your account.
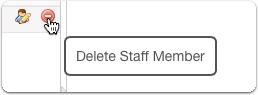
6.21 Deleting Staff Members

To delete a staff member and completely remove their access to the account click the red icon illustrated above.
6.22 Confirm Staff Delete.
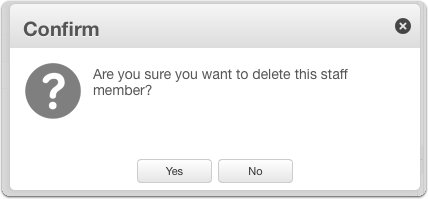
The “Confirm” window opens. Confirm the deletion by clicking “Yes.” Clicking “No” will close the “Confirm” window and the staff profile will remain unchanged.
6.23 Deleted Staff Access.

If a deleted staff attempts to sign in using their credentials, their access will be denied, and they will be redirected to the login page.
6.24 Re-Adding a Deleted Staff Member
IMPORTANT: A deleted staff can not be re-added to the account with the same username and password. A new username and password must be selected.
6.25 Populated Staff List
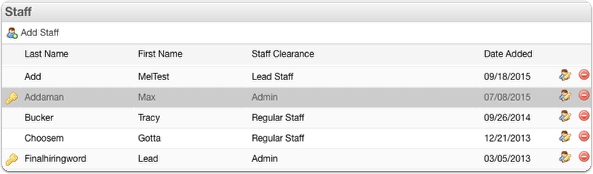
When you’ve added a few staff members, your staff list may look similar to the photo above. Notice that some staff members have administrative privileges and others do not.
6.26 Admin Staff View 1

When the original owner logs in logs in, will see all of the tabs and all of the buttons for all of the functions. Notice the “Add Screening Event” on the “Screening Events” tab.
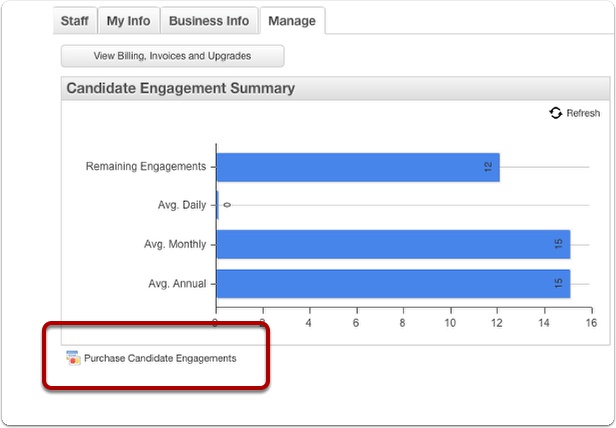
6.27 Purchase Candidate Engagements button.
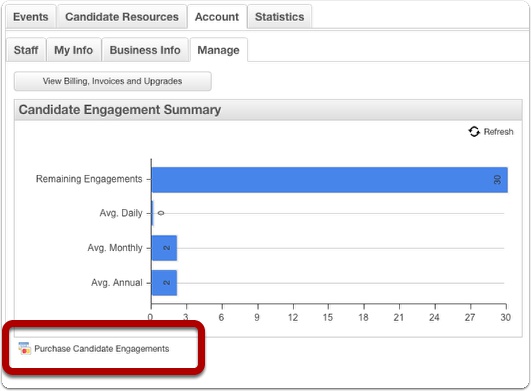
Select the “Account” tab, then select the “Manage” sub-tab. Notice there is a “Purchase Candidate Engagements” button. Note: “Purchase Candidate Engagements” button is only available to the account owner.
Candidate Engagements
The Connexion Pointe® platform and pricing is designed to encourage Pointe Savant users to allow proactive candidates to prepare interviews in Pointe Profile® for submission.
As a quick reminder:
Pointe Profile® is the Connexion Pointe® application that candidates use to create and share interviews with Pointe Savant® users.
Pointe Savant® is the Connexion Pointe® application that organizations use to create interviews for candidates, accept interviews produced by candidates, evaluate candidate responses, ask follow-up questions, notify candidates at the conclusion of the screening process, and store the candidate information for later use.
Each time a Pointe Profile user submits an interview to Pointe Savant users or records an interview at the Savant Gateway. It’s referred to as a “candidate engagement.”
1. Managing Candidate Engagements.
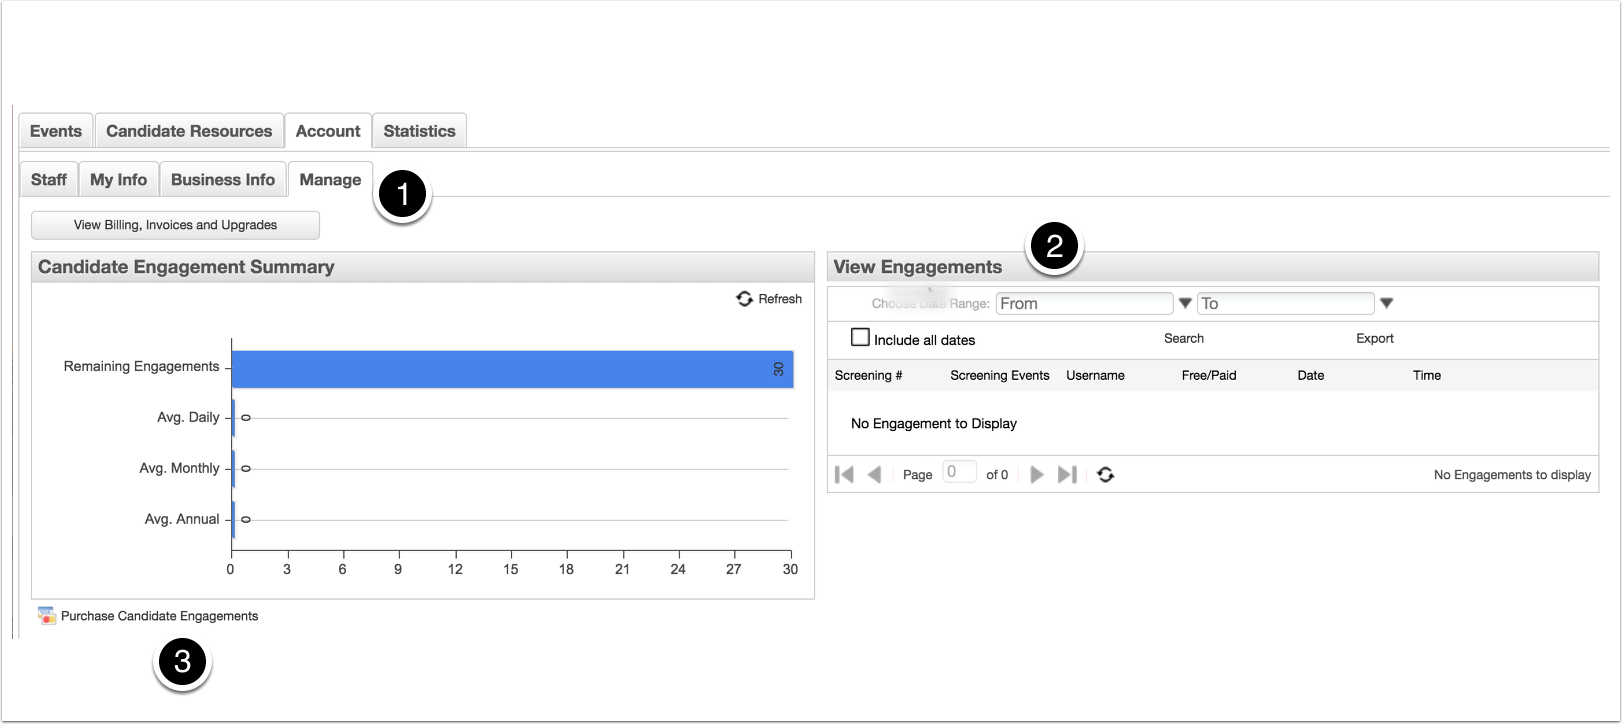
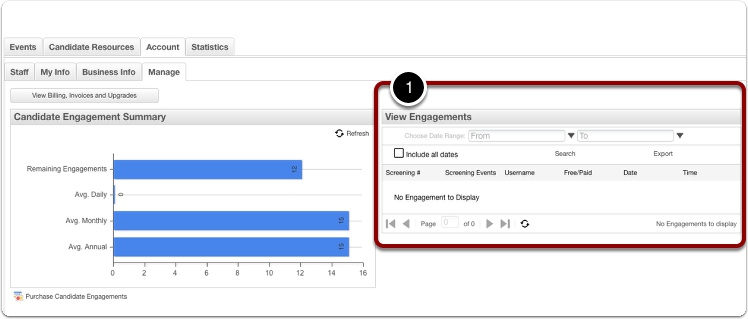
1 – Candidate engagements are managed on the “Manage” sub-tab – which is found under the “Account” tab.
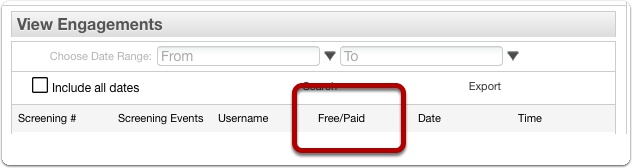
2 – Accounting of Free and Paid engagements on Pointe Savant® accounts can be monitored in (in real time) in the “View Engagements” window.
3 – The number of (paid) Remaining Engagements along with average daily, monthly and annual engagement consumption can be monitored in the “Candidate Engagement Summary” window.
2. 30 Complimentary Paid Candidate Engagements
Each Pointe Savant® account has 30 complimentary Paid engagements at sign up.
3. Candidate Engagements
There are two classifications of Candidate Engagements – “Free” Engagements and “Paid” Engagements.
Each time a Pointe Savant® user creates a screening event, they have the option of
A – Requiring candidates to record a spontaneous interview at the Savant gateway and barring the submission of interviews created in Pointe Profile® or
B – Offering candidates a choice of submitting an interview created Pointe Profile® interview -OR- recording a spontaneous interview at the Savant Gateway.
Submitting an interview created in Pointe Profile® always results in a “Free” engagement.
Recording a spontaneous interview at the Savant Gateway always results in a “Paid” engagement.
4. The “Manage” sub-tab.
Free Engagements do not reduce the number of Remaining Engagements. Each Paid Engagement reduces the amount of Remaining Engagements by 1.
Managing candidate engagements in Points Savant® is easy. Just select the “Account” tab and then select the “Manage” sub-tab.
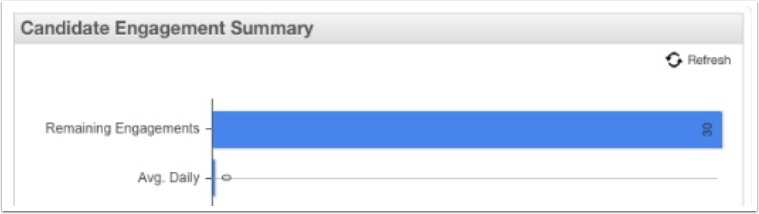
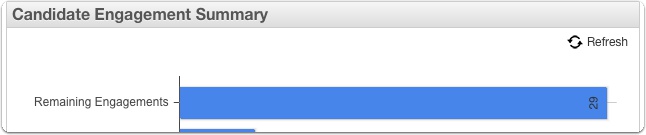
5. Candidate Engagement Summary
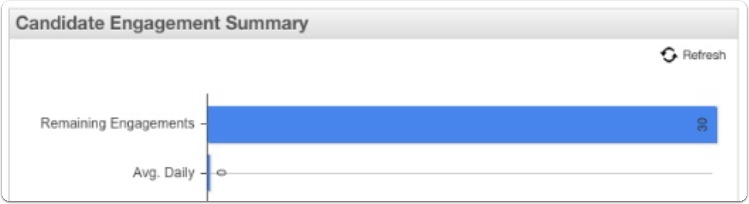
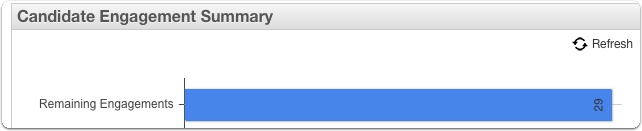
To screen candidates, Candidate Engagements must be purchased. Every new Pointe Savant® account receives 30 complimentary engagements, which can be monitored in the “Candidate Engagement Summary” window (pictured above).
To view this window log in>select the “Account” tab>select the “Manage” tab.
6. Free Candidate Engagements
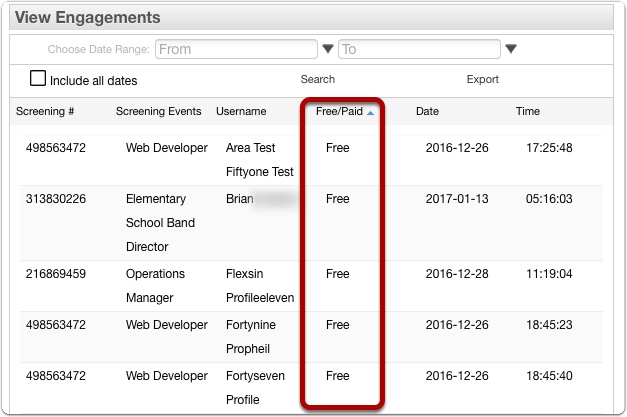
Generally speaking, if an interview was created in the Pointe Profile® application and accepted by a Pointe Savant® user, the engagement is “Free” for the Pointe Savant® user, and does not reduce the number of Remaining Engagements. All of the engagements in the photo above are Free for this Savant user and did not reduce the number of Remaining Engagements.
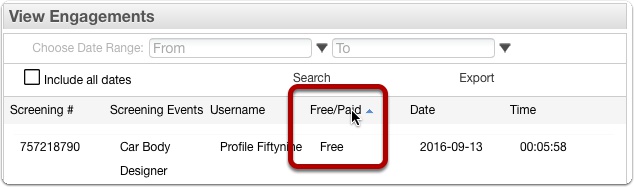
7. Paid Candidate Engagements
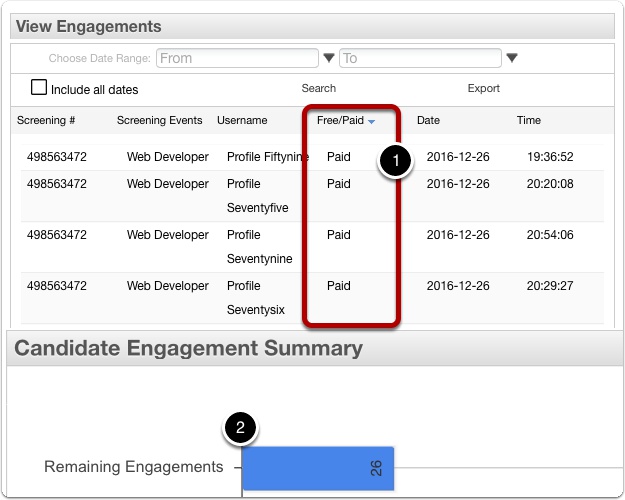
If a candidate records an interview at the Pointe Savant® Gateway, the engagement is “Paid.” Each Paid Engagement reduces the number of Remaining Engagements by 1.
1 – All of the engagements in the photo above are Paid Engagements – each one of them reduced the number of Remaining Engagements in this Pointe Savant® user’s account by 1.
2 – Since each Pointe Savant® account starts with 30 complimentary engagements, this account would have 26 Remaining Engagements.
8. Purchase Engagements Notification
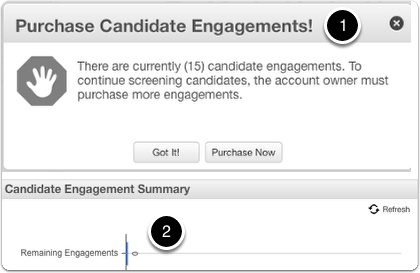
1 – Pointe Savant® will notify you when the number of Remaining Engagements needs to be replenished. When there are 15 or less Remaining Engagements, this warning will appear at login.
2 – When the number of Remaining Engagements reaches -0-, the “Purchase Candidate Engagements” dialog box cannot be closed, and the account can not be accessed until more engagements are purchased. To purchase more engagements, the account owner must log in and click the “Purchase Now” button.
Note: The “Purchase Now” button is not available to anyone except the account owner! Only the account owner can purchase candidate engagements!
9. Screening Event Paused | Connexion Pointe®
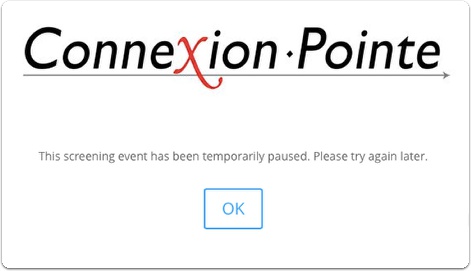
Note: When the number of Remaining Engagements reaches -0-, Candidates are also prevented from recording interviews or submitting their iPointe Profile® interviews until more engagements are purchased.
10. Pointe Savant® Interviews

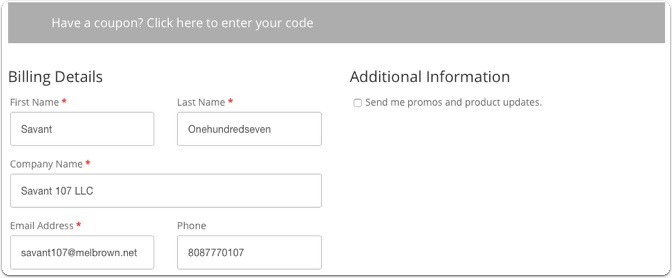
When the owner clicks the “Purchase Now” button, the purchase Pointe Savant® Interviews page opens. The form should already be pre-filled with the account owners’ information.
11. Purchase Engagements – Block Sizes
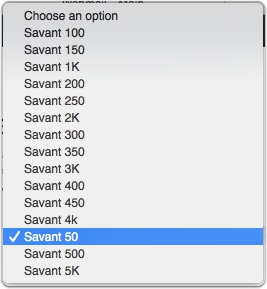
Engagements can be purchased in blocks of 50 up to 5000. After the transaction, the number of engagements purchased is added to the Remaining Engagements indicator.
12. The “Purchase Candidate Engagements” button.
The “Purchase Engagements” dialog box is not the only mechanism available to replenish your Remaining Engagements. The owner can log in to the account, Select the “Account” tab, select the “Manage” sub-tab and click the “Purchase Candidate Engagements” button
13. Pointe Savant® Interviews
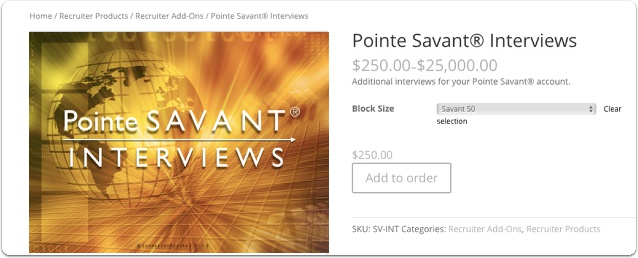
Again, the purchase Pointe Savant® Interviews page opens.
14. Pre-filled purchase form.
The form should already be pre-filled with the account owners’ information. After the transaction is complete, the number of purchased engagements is added to the “Remaining Engagements” total.
Note: You must log in after purchases.
Creating Screening Events
This article will cover building a “Screening Event” within Pointe Savant®.
1. The Event Manager Window
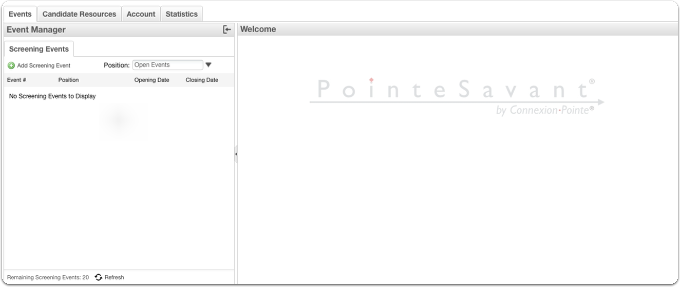
When you log into the Pointe Savant® dashboard, your screen should be similar to the photo above.
2. Select the “Events” Tab

The “Events” tab is selected by default. If it is not selected, click to select it.
2.1 The Screening Events tab.
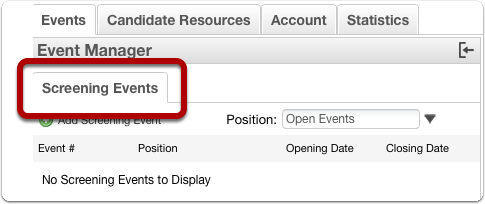
When the “Events” tab is selected, one sub-tab labeled “Screening Events” is available.
A “Screening Event” is an interview created in the Pointe Savant® application.
This chapter will discuss how to create a screening event with Pointe Savant®.
With Pointe Savant®, creating, scheduling, and managing these events is easy. Pointe Savant® also features the ability to accept interviews created by candidates using our Pointe Profile® application.
Note: Original owner, Limited Admin, or Lead Staff clearance must build Screening Events in Pointe Savant®. The “Add Screening Event” button is not available to Regular Staff members.
2.2 Add Screening Event Button.

To build a Screening Event, click the “Add Screening Event” button.
2.3 Screening Event Builder™ application.
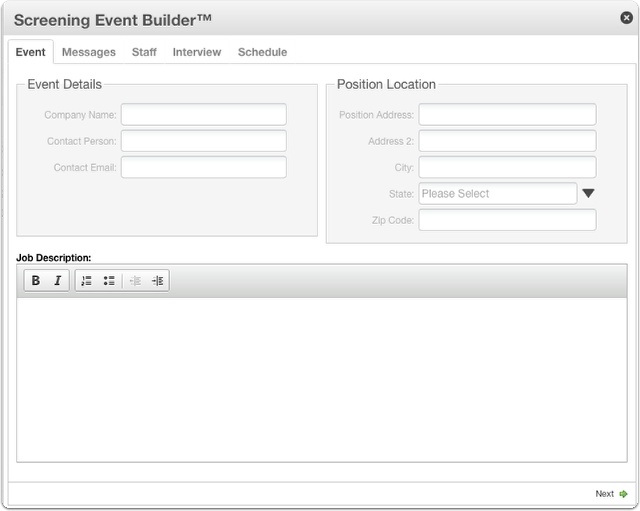
The “Screening Event Builder” opens.
2.4 Building a Screening Event – an Overview

You’ll notice five tabs pictured above. These tabs represent a simple 5-step process to creating your screening event. Let’s get started!
2.5 Add Event Details.
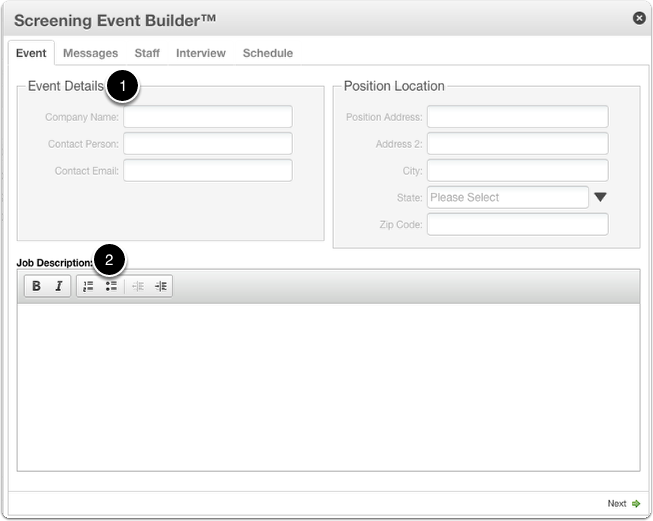
1 – First, enter the relevant Event Details and Position Location details in the available fields.
2 – Enter a Job Description in the field. Pointe Savant® provides light formatting functionality. Note that this description is for your internal use only – it is not displayed outside of your account. It should match any external materials posted about the position.
2.6 Add Event Details.
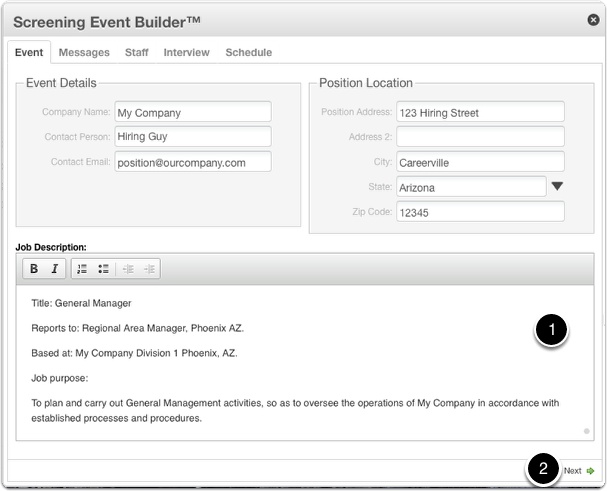
1. Your screen should look similar to the photo above when you’re done. Once the Screening Event Details are complete, review your entries and
3. Compose messages for automated candidate feedback.
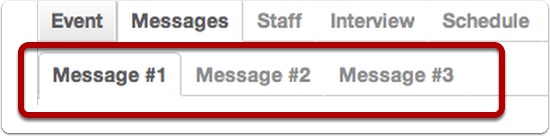
Pointe Savant® streamlines your record-keeping and candidate feedback by automating this activity. Our next step is creating three messages that designated candidates will receive after the screening process concludes. These three messages are indicated by the three sub-tabs illustrated above.
3.1 Create an “Advancing” Message
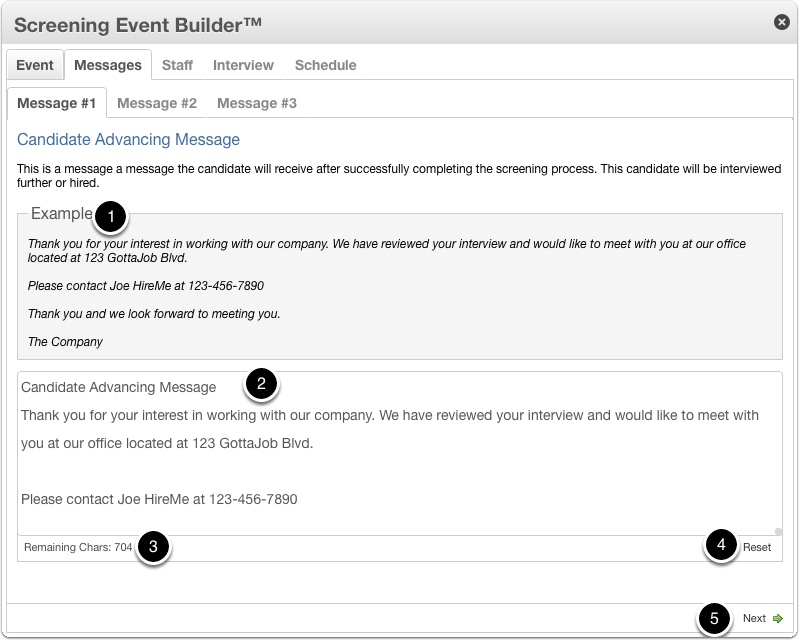
First, let’s create a message for those candidates that have captured your interest and will be advancing to the next round of screening.
1. Pointe Savant® provides an example of such a message that you can copy and paste into the available field (2.)
2. You may edit the message to suit your needs, or you may compose a message in this window.
3. A character counter tracks the number of available characters for your message. This character count cannot be exceeded.
4. To erase your message and start over, click the “Reset” button.
5 When you’re satisfied with your message, click “Next.”
3.2 Create a “Save for Later” Message

Next, we’ll create a message for the candidates that aren’t advancing to the next round of interviews, but we’d like to keep them in mind for future positions.
1. Pointe Savant® provides an example of such a message that you can copy and paste into the available field (2.)
2. You may edit the message to suit your needs, or you may compose a message in this window.
3. A character counter tracks the number of available characters for your message. This character count cannot be exceeded.
4. To erase your message and start over, click the “Reset” button.
5. When you’re satisfied with your message, click “Next.”
3.3 Create a “Non-Acceptance” Message
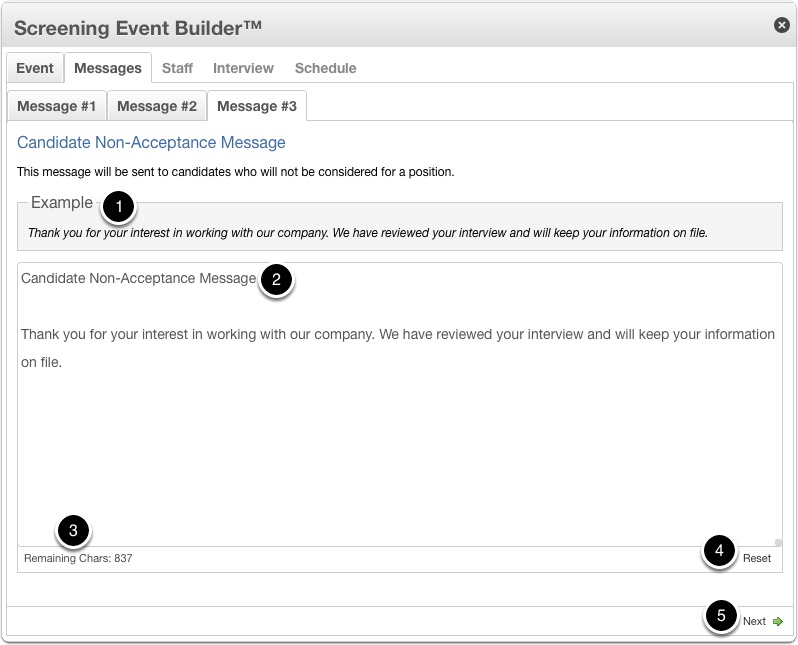
Finally, we’ll compose a message for those candidates that will be politely rejected. These are candidates that will probably not be considered for any position under any circumstances.
1. Pointe Savant® provides an example of such a message that you can copy and paste into the available field (2.)
2. You may edit the message to suit your needs, or you may compose a message in this window.
3. A character counter tracks the number of available characters for your message. This character count cannot be exceeded.
4. To erase your message and start over, click the “Reset” button.
5 When you’re satisfied with your message, click “Next.”
4. Assigning Staff Roles on Screening Events
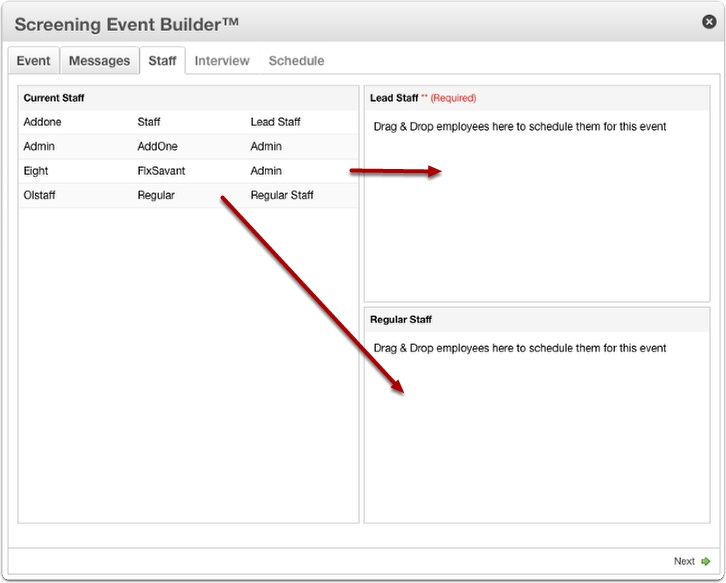
Pointe Savant® makes it easy to delegate screening responsibilities to members of your team.
Non-admins must be assigned to a screening event to view it. Staff members must be added to the Pointe Savant® account before they can be scheduled to participate in a screening event.
If you have not added staff members, you can review the process for doing so HERE.
We’ve already added staff members for this example. All of the available staff members appear in the list labeled “Current Staff.” Now we’ll assign those staff members to their roles in this screening event.
4.1 Pointe Savant® Business Dashboard
Staff members can serve one of two roles in a screening event:
2. Lead Staff Role- reviews all of the recommendations and notes, then makes the final decision on this screening event to advance the candidate, save the candidate for later, or reject the candidate.
3. Regular Staff Role- views candidate interviews, evaluates, and scores the candidates’ responses, then provides notes and makes a recommendation for each candidate. The advice can be “Advance,” “Save For Later,” or “Reject.” Regular Staff members can not see evaluations completed by other staff.
Assigning staff member roles is easy – just drag and drop the staff member’s name to the appropriate role.
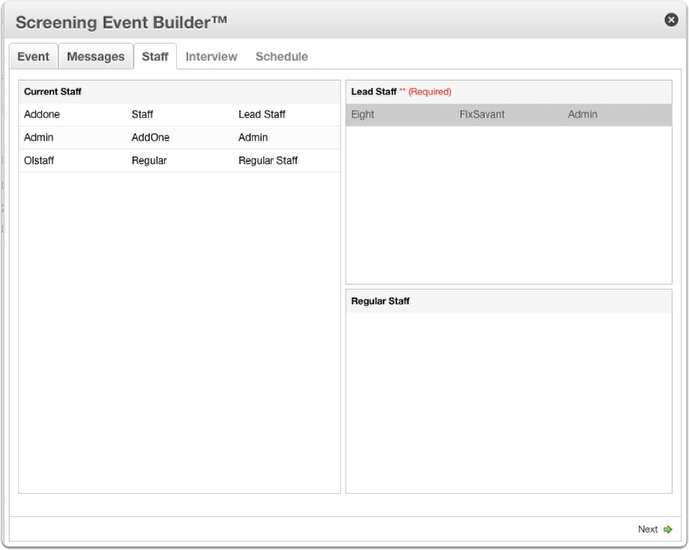
4.2 Lead Staff Assignment Error
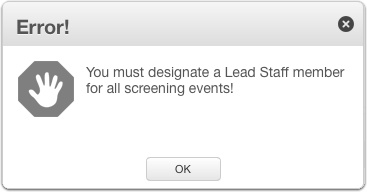
Every screening event must have someone assigned to the Lead Staff role.
Note: If only one person is screening candidates and making the final screening decisions on the event, drag that person’s name to the LEAD STAFF list.
4.3 Lead Staff Clearance Error.
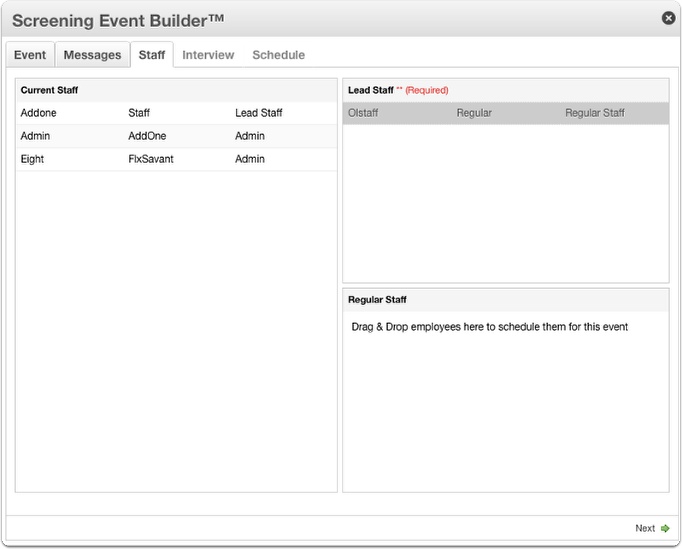
To be assigned the Lead Staff role on a screening event, the staff member MUST have Admin or Lead Staff clearance.
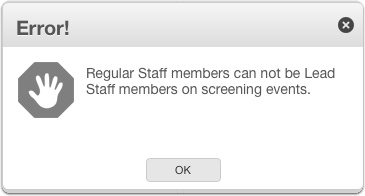
In the photo above, Regular Olstaff, a staff member with Regular Staff clearance, has been assigned to the Lead Staff role in the event. This is incorrect because the Original owner, Limited Admin, or Lead Staff clearance must be the designated Lead Staffer on screening events.
4.4 Pointe Savant® Business Dashboard
This will immediately trigger an error, and the system will remove the name from the Lead Staff role in the event.
4.5 One Lead Staff Role per Screening Event.
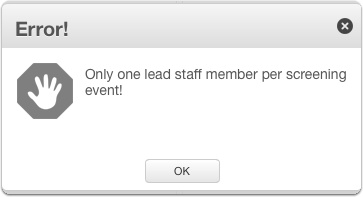
Only one person may be assigned to the Lead Staff Role per screening event.
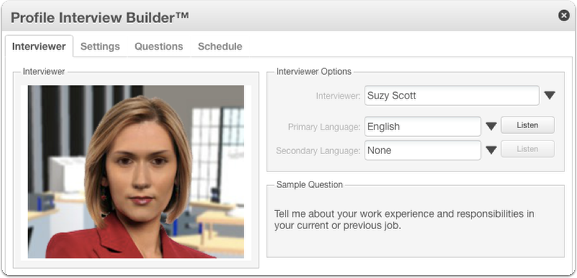
5. Choose Interviewer.
Pointe Savant® employs virtual characters to simulate face-to-face interviews. There are 10 multi-lingual interviewers from which to choose.
5.1 Choose Interviewer. In this example, we’re going to use a realistic character available in future versions of the software.
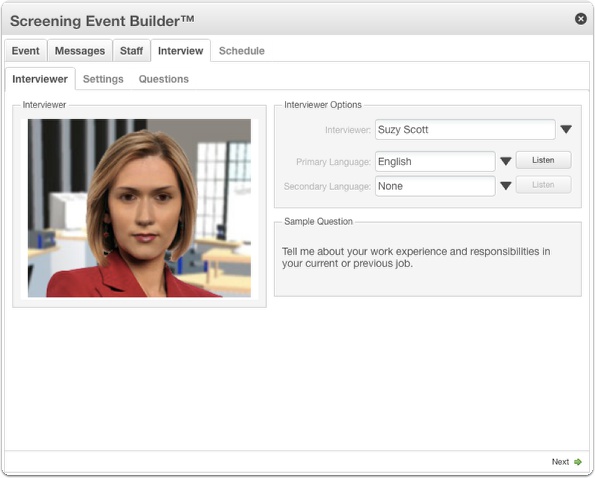
Selecting an interviewer for your interviewer is easy. Interviewer Barbara Paul is selected by default.
5.2 Interviewer Options

To choose a different interviewer, first, locate the “Interviewer Options” pane.
5.3 View available Interviewers
To select a new interviewer,
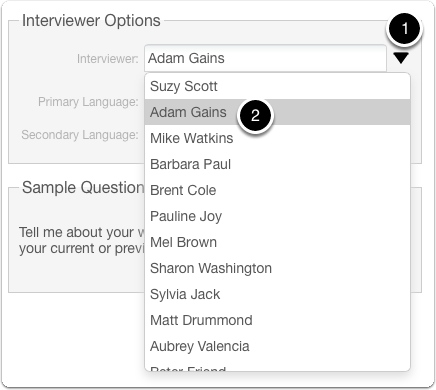
1. Click the drop-down menu with Suzy Scott’s name to see a list of available interviewers.
2. Select another interviewer.
5.4 Meet Adam Gaines
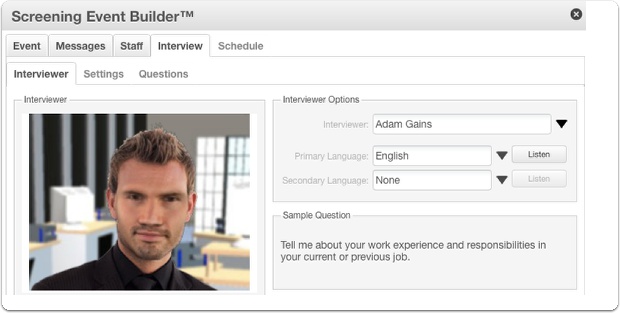
A new interviewer appears in the interviewer’s pane. Repeat the process to select another interviewer. We like Adam Gaines, and we’re testing him for future versions of our product, so we’re going to have him ask the interview questions. Now let’s choose a language for our interview.
6. Interview Language – English is Required

Note: Connexion Pointe® is an American company, and English is our screening platform’s default language. An interview may be administered in one additional language, but an English-language interview is required.
After selecting an interviewer, a secondary language may be chosen.
1. English is the primary language selected by default and can not be changed.
2. To hear a sample of the interviewer asking a question in the selected language, click the “Listen” button.
3. The text of the sample question being spoken by the interviewer appears here.
6.1 (Optional) Add a Secondary Language
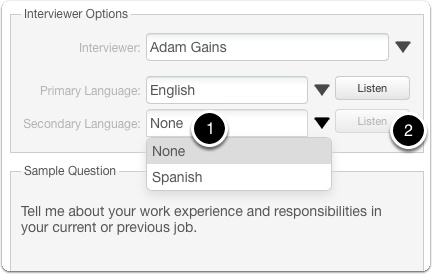
Any Pointe Savant® interview can be administered in one or two languages. If you’d like this interview to be conducted in more than one language,
1 – select the second language by clicking the “Secondary Language” drop-down menu.
2 – To hear a sample of the interviewer asking the sample question in the secondary language, click the “Listen” button.
6.2 Single Language Interviews
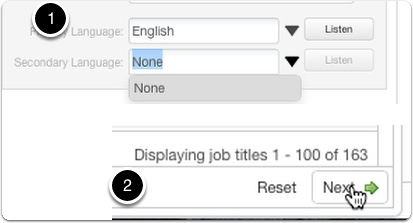
1 – To administer your English interview only, select “None” in the Secondary Language drop-down menu.
2 – After making your language selections here, click the “Next” button in the bottom right corner.
Interview Purpose & Types
Before choosing an interview type, let’s take a look at the various interview types available. Pointe Savant® can guide you in building a structured behavioral interview or a custom interview for virtually any purpose or position.
1. Pointe Savant® Interview Purpose Pane
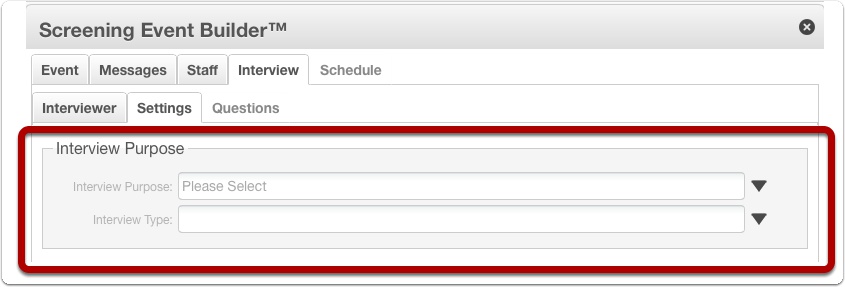
After selecting an interviewer and language(s) for your screening event, it’s time to select an Interview Purpose and Interview Type.
1.1 Pointe Savant® – Interview Purpose Pane
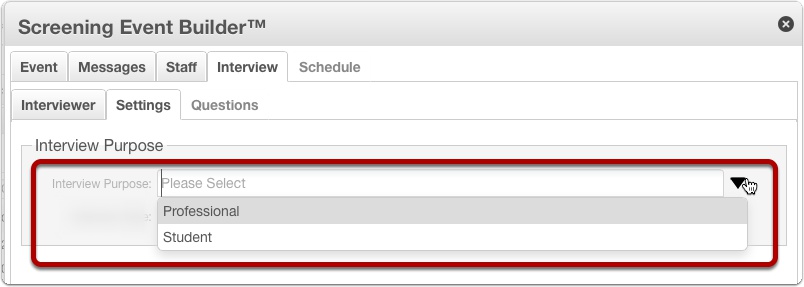
Pointe Savant® currently supports Professional and Student interviews, but the ability to add your custom questions makes it ideal for virtually any situation where screening is appropriate. As the name suggests, Professional interviews serve the purpose of connecting employers or organizations with candidates. Student interviews serve the purpose of connecting educational institutions and students.
If you are NOT screening students, select “Professional.” I’ll show you the Professional interviews first.
2. Professional Interview Types

Selecting the appropriate questions for professional screening interviews can be challenging. The Interview Type setting in Screening Event Builder™ can help you get started. There are four types of Professional interviews in Pointe Savant®. Each type represents a unique collection of competencies/themes, each having a collection of corresponding screening questions from which to choose.
You can add your custom questions to any interview! Our first collection is the “General Interview (Powered by Positive Options).” The General Interview represents a competency skill-set for candidates preferred by CEOs.
3. Professional Interviews – General Interview.
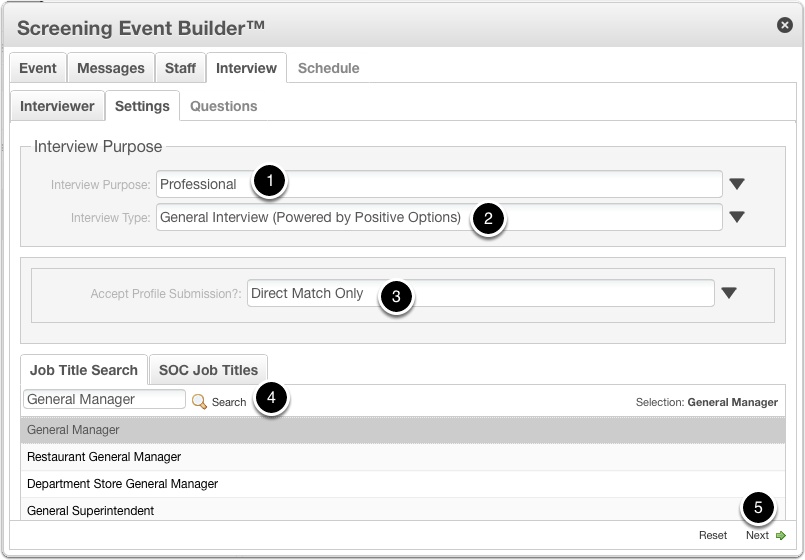
To view the competencies and questions in the General Interview (Powered by Positive Options) collection,
1 – Select “Professional” as the Interview Purpose.”
2 – Select “General Interview (Powered by Positive Options)” for the Interview Type.
3 – Make any selection in the “Accept Profile Submission” box and choose a job title. We’ll discuss this setting in detail later, but you can just choose any one of the options here for now.
4 – Enter “General Manager” for the Job Title and click “Search.” When your list is populated, choose “General Manager.” (For this example, we are using “General Manager” as the Job Title. To appreciate the differences between each competency/theme collection, I recommend that you use the same job title to compare and contrast.)
3.1 Professional Interviews – General Interview.
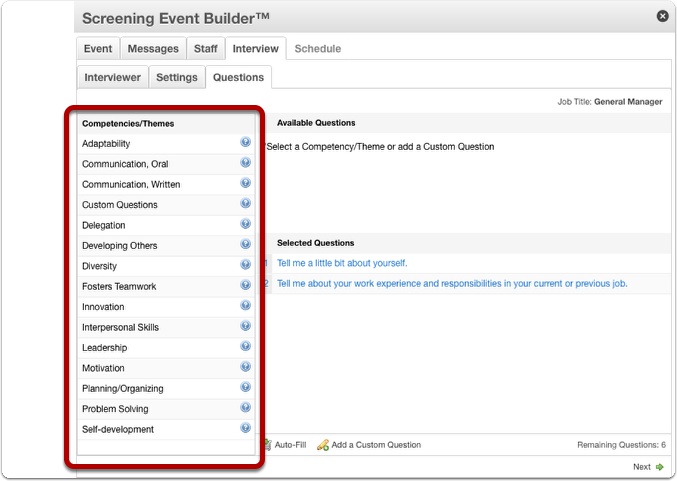
This will advance you to the “Questions” tab of Screening Event Builder™, where the collection of surveyed CEO’s preferred Competencies/Themes appears on the left side of the screen.
3.2 Professional Interviews – General Interview Competencies/Themes
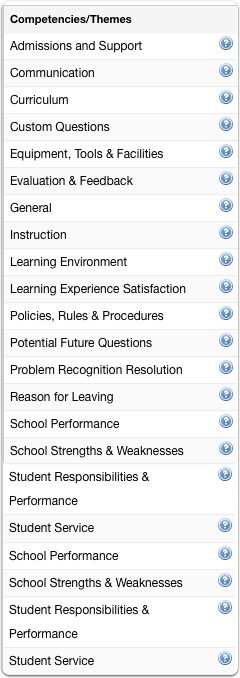
Here’s a look at the list of Competencies/Themes up close. To see the definition of each competency, click the blue question mark next to it. Note: This collection is intended to suggest where to start in creating your screening interview and not a definitive guide.
4. Professional Interviews – Specific Job Title Interview (Powered by Positive Options)
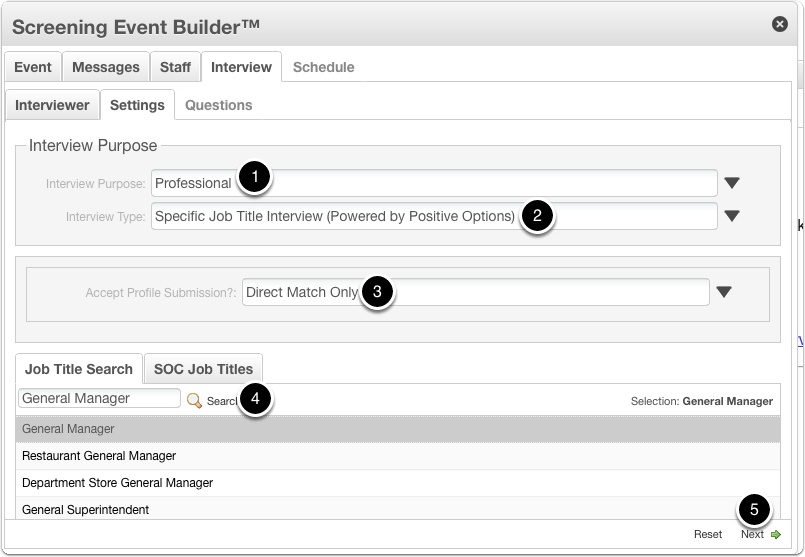
The next Interview Type is the “Specific Job Title Interview (Powered by Positive Options).” This interview presents Competencies/Themes relevant to specific job titles based on the Standard Occupational Classification (SOC) system. When this type is selected, the job title directly drives the competencies/themes presented. Let’s use our General Manager job title again to see the difference.
To view the competencies and questions in the Specific Job Title Interview (Powered by Positive Options) collection,
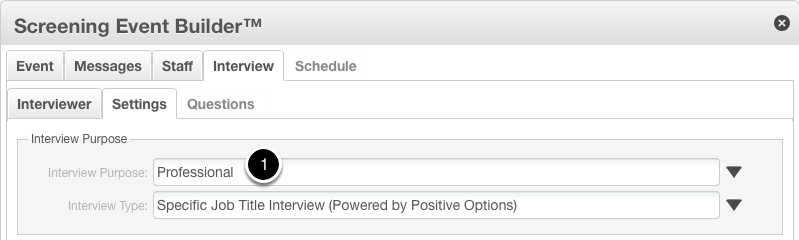
1 – Select “Professional” as the Interview Purpose.”
2 – Select “Specific Job Title Interview (Powered by Positive Options)” for the Interview Type.
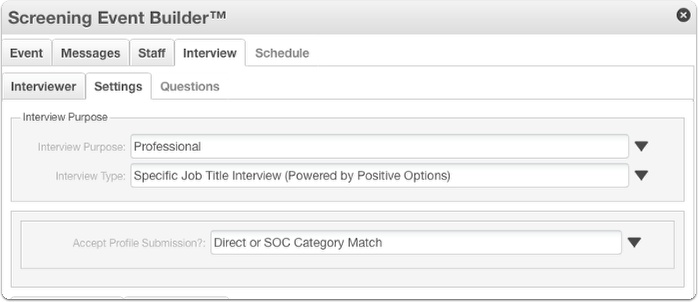
3 – Make any selection in the “Accept Profile Submission” box and choose a job title. We’ll discuss this setting in detail later, but you can just choose any one of the options here for now.
4 – Enter General Manager for the Job Title and click “Search.” When your list is populated, choose “General Manager.” (Again, for this example, we are using “General Manager” as the Job Title. To appreciate the differences between each competency/theme collection, I recommend that you use the same job title to compare and contrast.)
5 – When the progress bar stops turning, click “Next.”
4.1 Professional Interviews – Specific Job Title Interview (Powered by Positive Options)
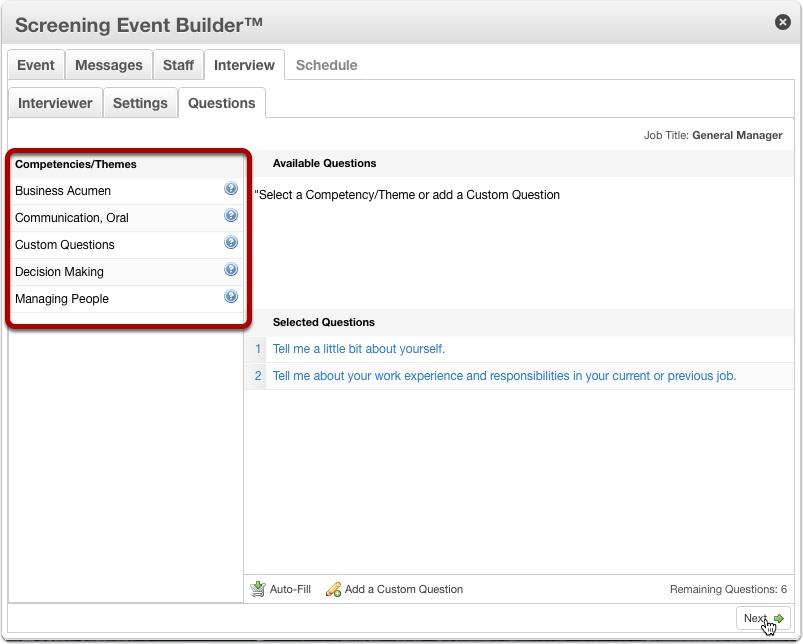
You’ll immediately notice that the list of Competencies/Themes is smaller than the General Interview setting.
4.2 Professional Interviews – Specific Job Title Interview (Powered by Positive Options) Competencies/Themes

As previously stated, selecting appropriate screening questions can be challenging. Using the Specific Job Title Interview (Powered by Positive Options) setting provides a way of “honing in” on a core set of Competencies/Themes directly related to the job title you selected. Again it’s important to note that this collection is intended to suggest where to start in creating your screening interview and not an exhaustive or definitive guide. Note that your custom questions can be added.
5. Professional Interviews – Custom Interview
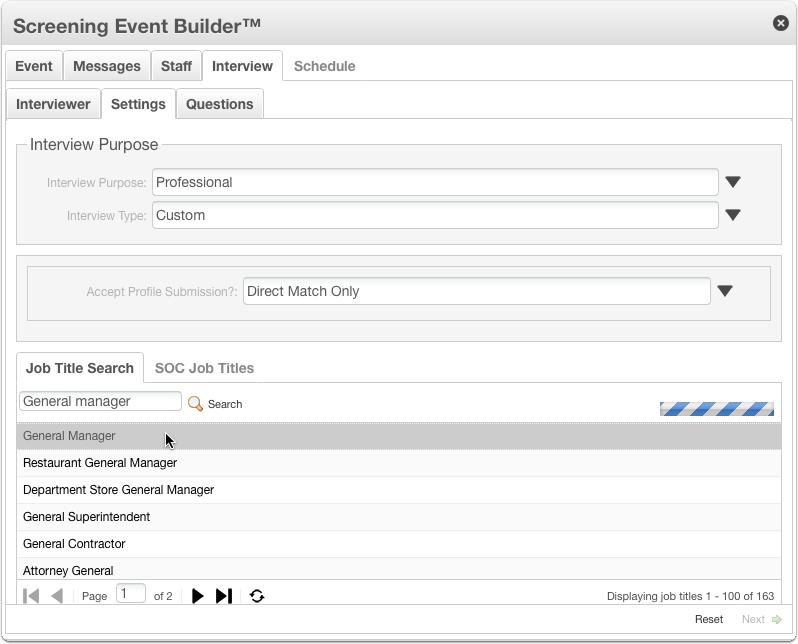
Now let’s take a look at the “Custom” interview type. To build a completely custom interview using our “Commonly Asked Screening Questions” database, choose “Custom.” With this setting, you can create your interview entirely from scratch or use commonly asked screening questions from various themes.
NOTE: Connexion Pointe® does not assume any liability or responsibility for the job-relatedness or outcomes of any kind resulting from the use of our software. Please refer to your end-user agreement for more information.
Let’s use our General Manager job title again to see the difference.
To view the Competency/Themes and questions in the Custom interview collection,
1 – Select “Professional” as the Interview Purpose.”
2 – Select “Custom” for the Interview Type.
3 – Make any selection in the “Accept Profile Submission” box and choose a job title. We’ll discuss this setting in detail later, but you can just choose any one of the options here for now.
4 – Enter General Manager for the Job Title and click “Search.” When your list is populated, choose “General Manager.” (Once more, I’m using “General Manager” as the Job Title. To appreciate the differences between each Competency/Theme collection, we recommend that you use the same job title to compare and contrast.)
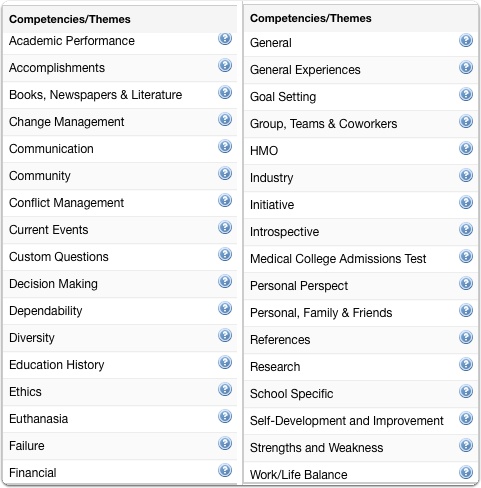
5.1 Professional Interviews – Custom Interview Competencies/Themes
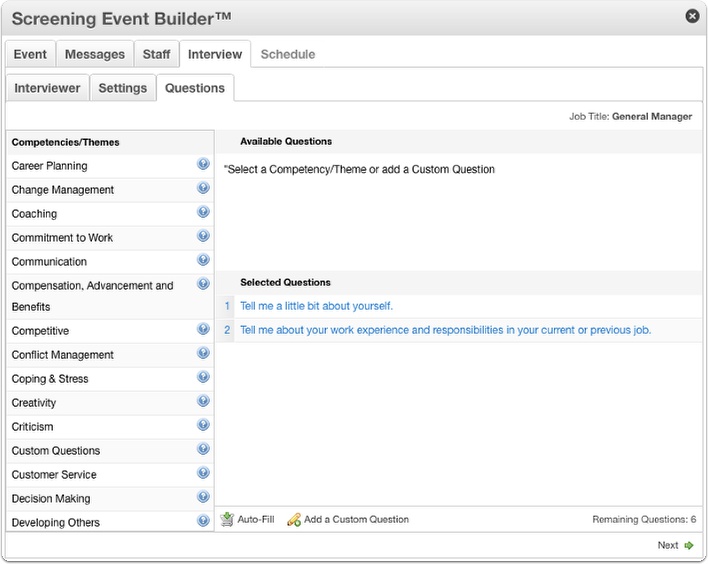
You’ll immediately notice that the Competency/Theme collection for this setting is the most extensive.
5.2 Professional Interviews – Custom Interview Competencies/Themes
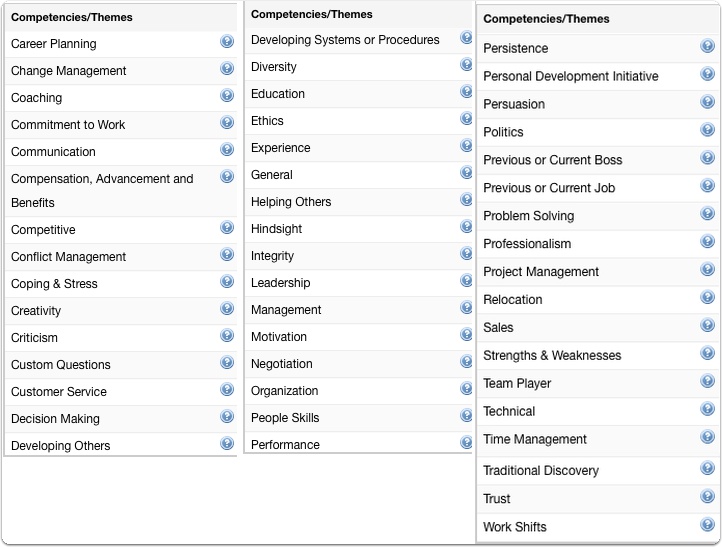
Here is the entire collection of Competencies/Themes for the Custom interview type. As with the other interview types, this collection is intended to offer suggestions of where to start in creating your screening interview and not a definitive guide. Note that custom questions can be added here too!
6. Professional Interviews – Exit Interview
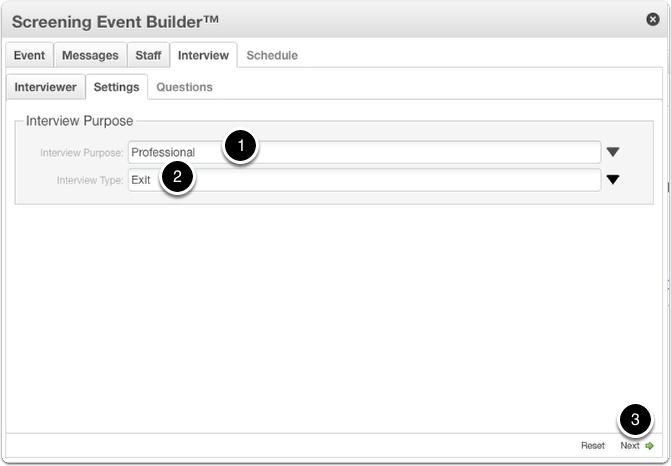
The next professional interview type is the “Exit Interview.” To see this Competency/Theme collection,
1 – select “Professional” for the Interview Purpose.
2 – Select “Exit” for the Interview Type.
3 – In this setting, the Accept Profile and Job Title fields should disappear, so selections for those settings are unnecessary. Just click the “Next” button to advance to the Competency/Themes tab of Screening Interview Builder.
6.1 Professional Exit Interview
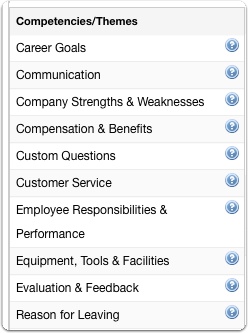
This is the Professional Exit Interview Competencies/Themes collection. This Competencies/Theme collection features salient questions to gain insight and feedback from departing associates.
Ok! That covers all of the “Professional” interview types.
7. Student Interviews
Now let’s take a look at Student interviews. Like professional screening interviews, selecting the appropriate questions for screening students can be challenging. Screening Event Builder™ can help. Like Professional Interviews, each Interview Type represents a unique collection of Competencies/Themes and corresponding screening questions from which to choose. There is also space provided for your own custom questions. The first student interview type is Student Admissions.
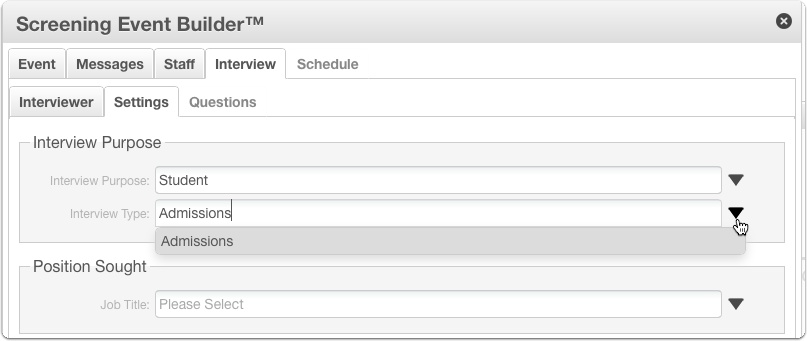
8. Student Interviews – Admissions
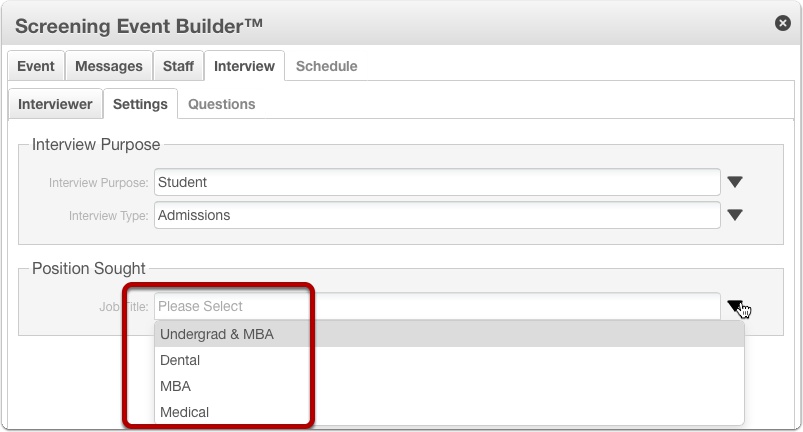
There are four collections of Competency/Themes related to student admissions: Undergrad & MBA, Dental, MBA, and Medical. Choosing one of these settings is required, and it provides a way of “honing in” on a core set of Competencies/Themes that are directly related to the level of study selected. It’s important to note that this collection is intended to suggest where to start in creating your screening interview and not a definitive guide. It should also be noted that there will be considerable overlap between the Competencies/Theme sets.
9. Student Interviews – Undergrad & MBA
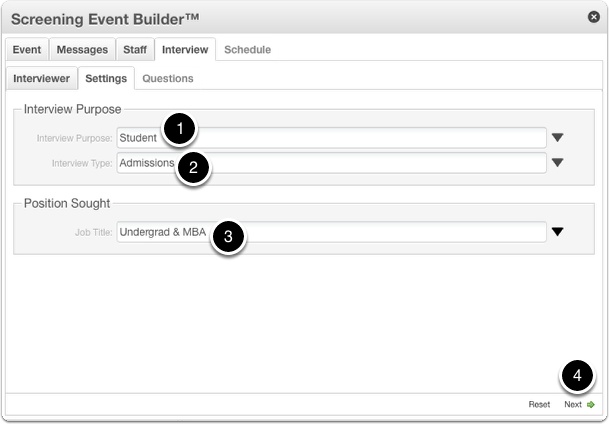
Let’s have a look at the Undergrad & MBA setting first.
1 – Select “Student” for Interview Purpose,
2 – Select “Admissions” for Interview Type, and then
3 – Select “Undergrad & MBA” in the Job Title Field,
4 – click the “Next” button to advance to the Competency/Themes tab of the Screening Interview Builder.
9.1 Student Interviews – Undergrad & MBA
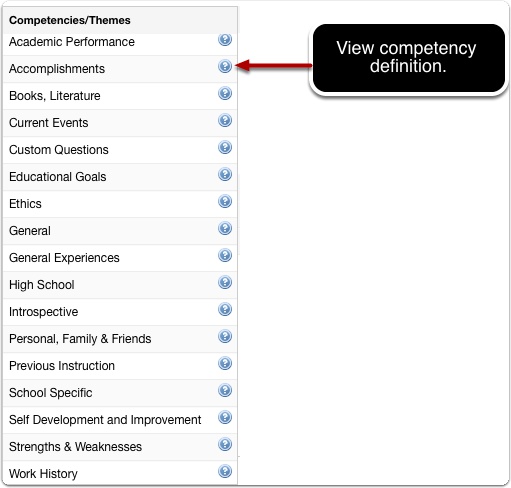
Here’s a look at the list of Competencies/Themes up close. To see the definition of each competency, click the blue question mark next to it. Note that many of these Competencies/Themes are self-explanatory, and no further explanation is necessary.
10. Student Interviews – Dental Interviews

The next Competencies/Themes collection is for Dental.
1 – Select “Student” for Interview Purpose,
2 – Select “Admissions” for Interview Type, and then
3 – Select “Dental” in the Job Title Field,
4 – click the “Next” button to advance to the Competencies/Themes tab of the Screening Interview Builder.
10.1 Student Interviews – Dental Interviews
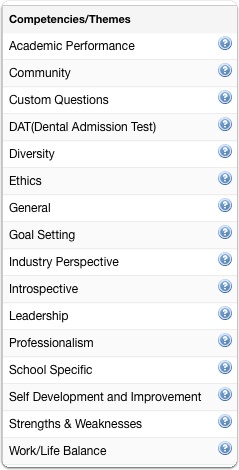
Here’s a look at the list of Competencies/Themes up close. To see the definition of each competency, click the blue question mark next to it. Note that many of these Competencies/Themes are self-explanatory, and no further explanation is necessary.
11. Student Interviews – MBA Interview
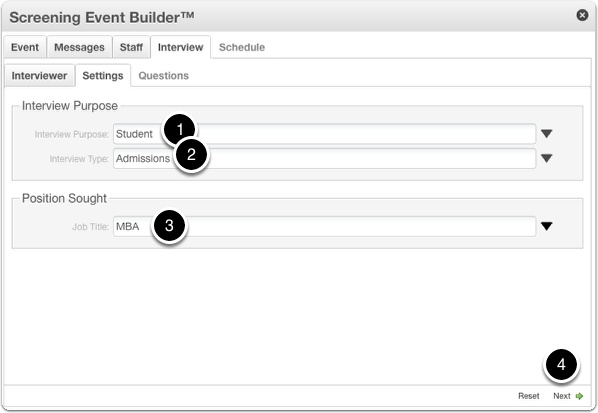
The next Competencies/Themes collection is a great starting place for an MBA or similar graduate study.
1 – Select “Student” for Interview Purpose,
2 – Select “Admissions” for Interview Type, and then
3 – Select “MBA” in the Job Title Field
4 – click the “Next” button to advance to the Competencies/Themes tab of the Screening Interview Builder.
11.1 Student Interviews – MBA Interview
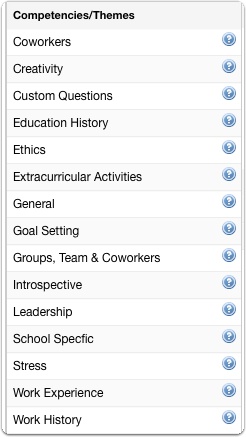
Here’s a look at the list of Competencies/Themes up close. To see the definition of each competency, click the blue question mark next to it. Again, please note that many of these Competencies/Themes are self-explanatory, and no further definition is necessary.
12. Student Interviews – Medical Interview

The next competency/theme collection is a great starting place for pre-med or other similar study programs.
1 – Select “Student” for Interview Purpose,
2 – Select “Admissions” for Interview Type, and then
3 – Select “Medical” in the Job Title Field
4 – click the “Next” button to advance to the competency/themes tab of Screening Interview Builder™.
12.1 Student Interviews – Medical Interview
Here’s a look at the list of Competencies/Themes up close. To see the definition of each competency, click the blue question mark next to it. Again, please note that many of these Competencies/Themes are self-explanatory, and no further definition is necessary.
13. Student Interviews – Student Exit Interview
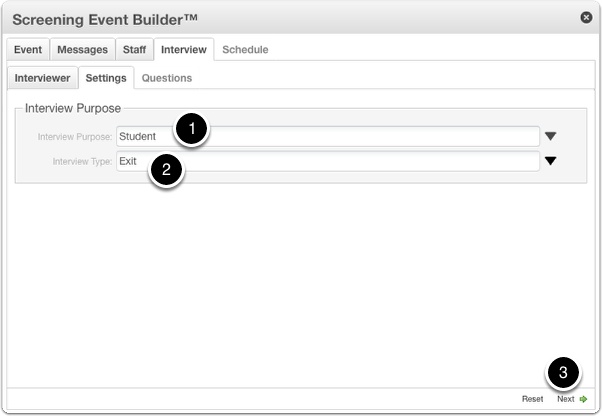
The next collection will be helpful for Student Exit Interviews.
1 – Select “Student” for Interview Purpose,
2 – Select “Exit” for Interview Type, and then
3 – Job Title Field should disappear on this setting, so no “Job Title” selection is necessary. Just click the “Next” button to advance to the Competencies/Themes tab of Screening Interview Builder™.
13.1 Student Interviews – Student Exit Interview
This is the Student Exit interview Competencies/Themes collection. This Competencies/Themes collection features salient questions to gain insight and feedback from students departing from educational institutions. To see the definition of each competency, click the blue question mark next to it.
That’s it! Selecting an interview type is a great place to start picking great screening questions for your interviews!
Accept Profile Submission Setting
The Accept Profile Submissions setting can have an enormous impact on your screening cost and workflow, so it’s essential to have a solid understanding of what it does. To fully understand the power of the “Accept Profiles” setting, you should also review the “Candidate Engagements” section to fully understand how Candidate Engagements affect the cost of screening with Pointe Savant®.
1. Accept Profile Submissions Setting

The Accept Profile Submissions setting is selected after choosing a purpose for your interview.
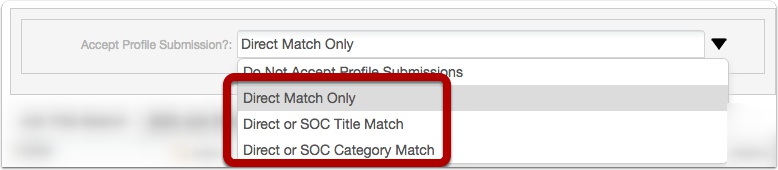
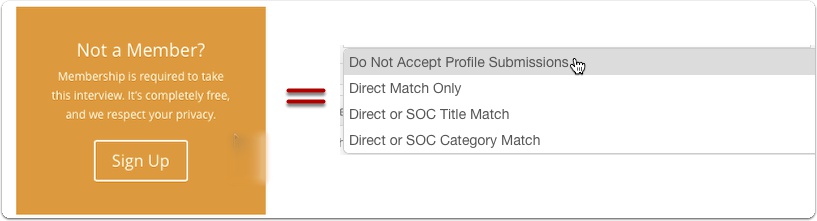
1.1 Do Not Accept Profile Submissions Setting
![]()
The Accept Profile Submissions drop-down menu has four settings, the first of which is “Do Not Accept Profile Submissions.” This setting means that everyone participating in your screening event must respond to your specifically chosen questions by recording their interview at the Pointe Savant® gateway. No interviews created in the Pointe Profile® application will be accepted.
If you would like to specify the questions being asked to candidates, choose this setting to prevent candidates from submitting their Pointe Profile® interviews.
On the other hand, since Pointe Profile® users have access to the same interview building tool, you should carefully consider accepting interviews created by them. They may not select the same questions you choose, but the interview questions’ overall quality and relevance are comparable.
Note: Candidates cannot create exit interviews.
1.2 Accept Profile Settings
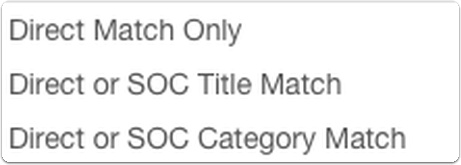
The next three settings are for accepting interviews. Each parameter relaxes the criteria for accepting interviews created by candidates in the Pointe Profile® application.
1.3 Accept Profile Settings = Larger or Smaller Candidate Pool.
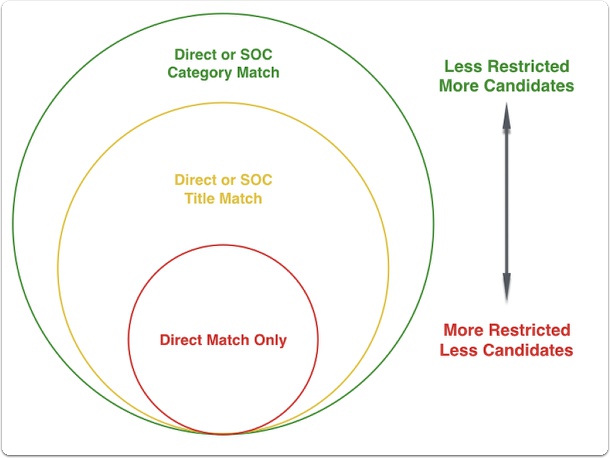
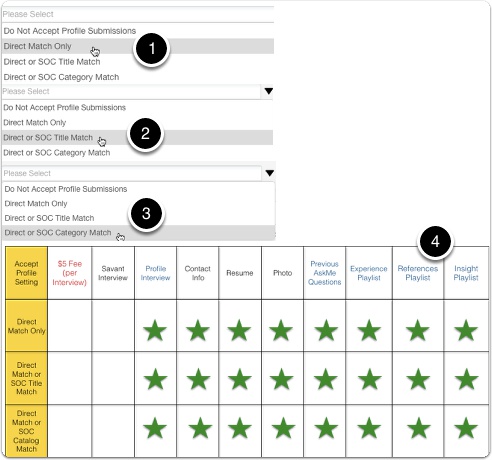
This diagram gives a visual example of how these settings function. The “Direct Match Only” setting requires that interviews created in the Pointe Profile® application must have the EXACT job title to be accepted into your screening event. This is the most restrictive setting and will yield the most candidates specifically focused on screening for your chosen job title.
1.4 Direct Match Only” setting – Standard Occupational Code Titles and Categories
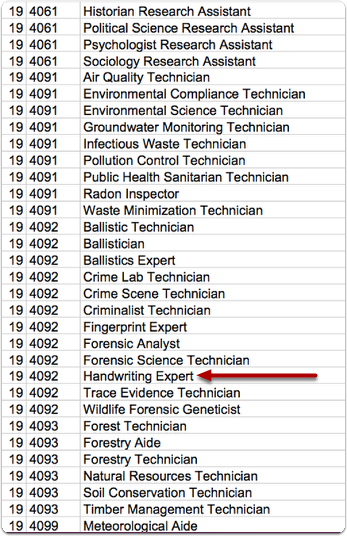
Let’s look at an example with some actual job titles. Let’s assume we are screening for a Handwriting Expert and select the “Direct Match Only” setting. Candidate generated interviews must have this EXACT JOB TITLE to be accepted with this setting. Otherwise, they must take the interview prepared by your team.
1.5 “Direct or SOC Title Match” – Standard Occupational Code Titles and Categories
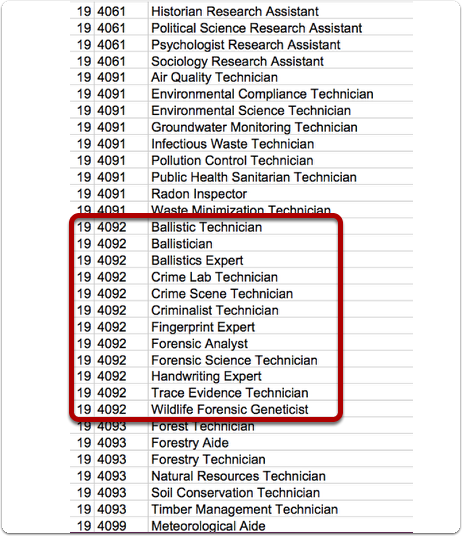
If we selected the “Direct or SOC Title Match” setting, The system would accept exact matches and interviews created for all of the positions indicated within the red square in the photo above. If the candidate does not have one of the titles above, they must take the interview prepared by your team.
1.6 “Direct or SOC Category Match” – Standard Occupational Code Titles and Categories
If we selected the “Direct or SOC Category Match” (this is the least restrictive setting), the system would accept interviews created for all of the positions indicated in the photo above. Our database is based on the Standard Occupational Code – so there may be hundreds of other acceptable titles with this setting.
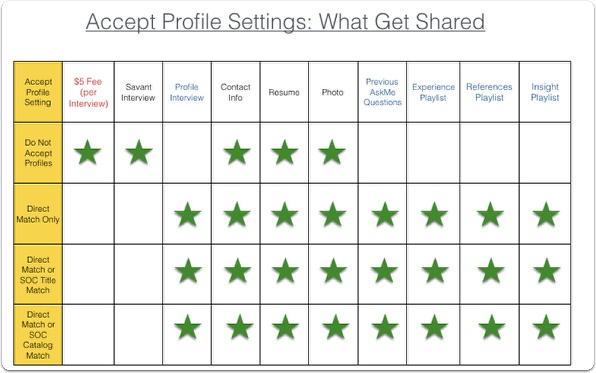
2. Accept Profile Settings: What Gets Shared
Here’s a chart that illustrates what gets shared at a glance. I’ll describe how each setting affects the amount of information you acquire for your screening events.
3. The Savant Gateway

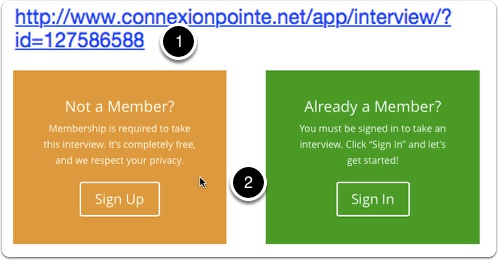
When a Pointe Savant® user creates an interview (also referred to as a “screening event”), a link is established to give candidates access to the interview.
3.1 The Pointe Savant® Gateway
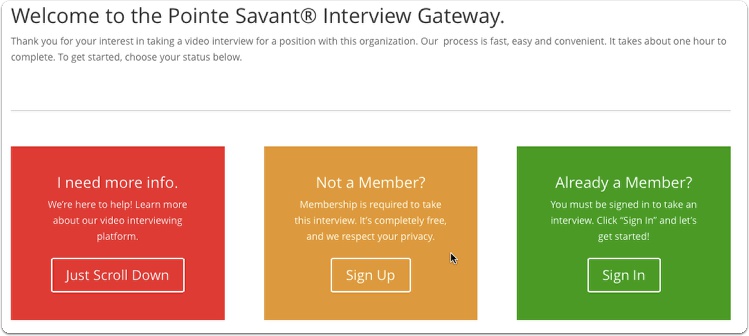
Potential candidates click the link, and they’re directed to the page pictured above, called the Pointe Savant® Gateway. Everyone participating in a Pointe Savant® screening event must go through the Pointe Savant® Gateway. Candidates must be members of Connexion Pointe® and have an active Pointe Profile® account to participate. If they’re not members, they can sign up here. If they’re already members, they sign in here.
Note: Pointe Profile® accounts established through this gateway are not subject to a signup fee.
4. What does each setting look like in practice?

I’ll go through each “Accept Profile” setting now to give you a step-by-step example of how they work. The Pointe Savant® user chooses this setting while creating interviews in the Screening Event Builder™ module. The Pointe Savant® user has two choices:
Do Not Accept Profile Submissions
OR
Accept Profile Submissions at 1 of 3 levels.
Here’s a step-by-step description of what happens in each of these settings.
4.1 1st Choice – Do Not Accept Profile Submissions
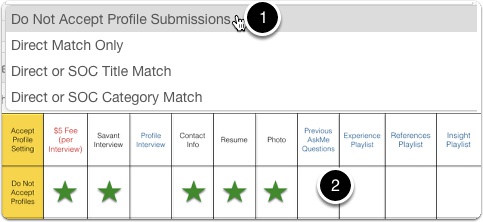
1 – Do Not Accept Profile Submissions means that the Pointe Profile® users must respond to interview questions chosen by the Pointe Savant® user by recording their responses at the Pointe Savant® Gateway. Pointe Profile® users cannot submit an interview they created in the Pointe Profile® application for this screening event.
2 – This is the information that gets shared from the Profile user to the Pointe Savant® user.
Note: Each time a candidate records their interview at the Pointe Savant® Gateway for this screening event, the number of Remaining Candidate Engagements will decrease by 1. Please make sure you have an adequate reserve of Candidate Engagements to accommodate your candidates!
4.2 Savant Interview Link

When a potential candidate clicks the Pointe Savant® Screening Event Link,
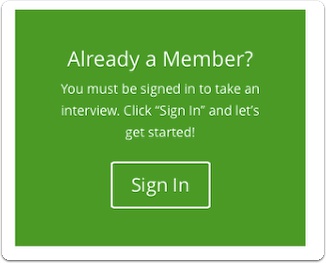
4.3 Pointe Savant® Gateway
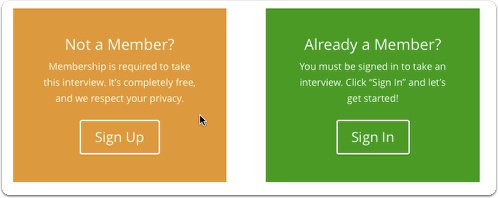
They are brought to the Savant Gateway, where they must sign up or sign in.
4.4 Pointe Savant® Interview
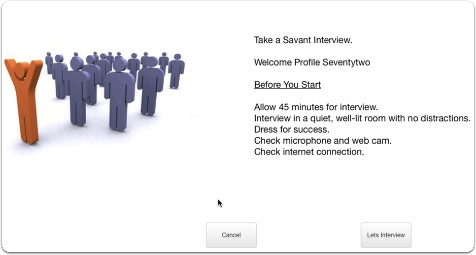
After signing in or signing up, they’re directed to this page where they can start the Pointe Savant® Interview.
4.5 Pointe Savant® Interview
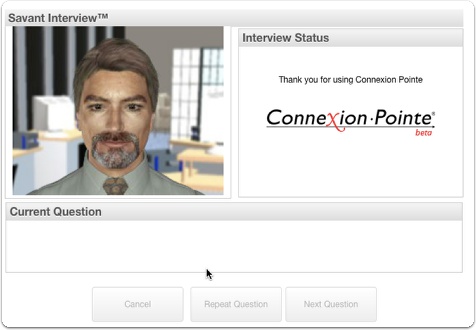
The interview starts, and the candidate answers the questions selected by the Pointe Savant® user. When the interview process is complete, several things happen.
4.6 Candidate Screening List
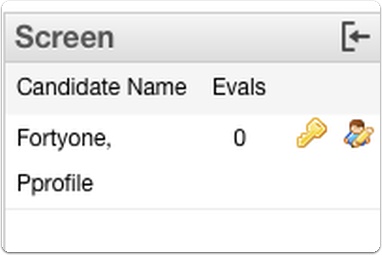
This candidates’ name appears on the Candidate Screening List. Their name appears in BLACK TEXT, as illustrated in the photo above.
4.7 Remaining Engagements
The number of ‘Remaining Engagements” decreases by “1”. There are 30 complimentary engagements in every Pointe Savant® account when it opens. More engagements can be purchased (see Purchasing Engagements).
4.8 Screening Event Paused
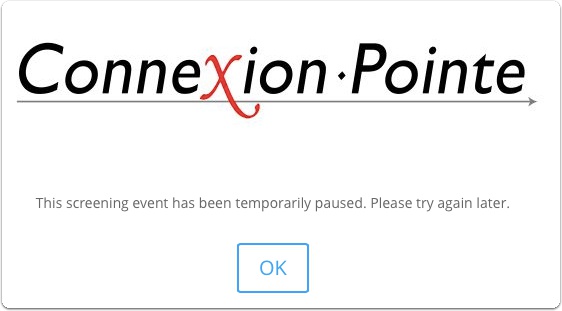
Note: When the number of Remaining Engagements reaches -0-, Candidates are also prevented from recording interviews or submitting their Pointe Profile® interviews until more engagements are purchased.
4.9 Profile User Categorized as Paid
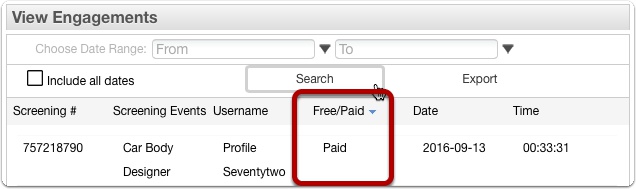
The candidates’ name appears in the “View Engagements” window and is classified as “Paid.”
4.10 What Gets Shared – Savant Interview
The candidate’s interview is saved in the screening event.
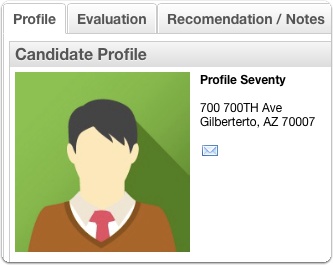
4.11 What Gets Shared – Photo & Contact Info
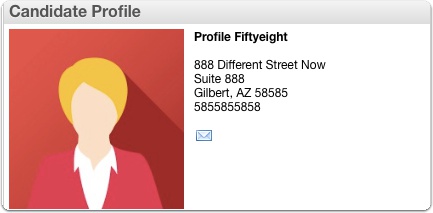
The candidates’ photo and contact information are shared with the Pointe Savant® user.
4.12 What Gets Shared – Resume
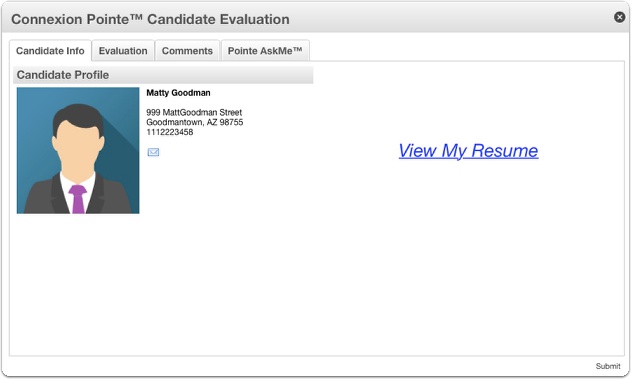
The candidates’ resume is shared with the Pointe Savant® user. When the “View My Resume” link is clicked, the resume opens in a new tab or window.
That’s it! That’s what happens when the “Do Not Accept Profile Submissions” setting is selected.
4.13 These Steps Are Identical
This is a great time to mention that the steps you just saw for the “Do Not Accept Profile Submissions” setting are the same when the Profile user gets to the gateway and clicks “Sign Up.” The only difference is that the user must complete a sign-up form and upload a photo and resume.
5. Accept Profile Settings
Take a look at the photo above at numbers 1, 2, and 3. Even though there are 3 Accept Profile Submission settings, the steps to execute them are the same. Take a look at #4 above and note that the information that gets shared is precisely the same for all three settings.
You may notice that a LOT MORE information is potentially shared with these three settings than the “Do Not Accept Profile Submissions” setting. As previously described, this additional information serves as an incentive to allow candidates to submit a screening interview created in the Pointe Profile application.
Here again, is a step-by-step guide and what gets shared:
5.1 Pointe Savant® Gateway
1 – A potential candidate clicks the link and is directed to
2 – the Pointe Savant® Gateway where they must sign up or sign in.
5.2 Members Only
The Accept Profile Submissions setting applies to members only. As I mentioned in step 5.12, non-members NEVER HAVE ACCESS TO “THE BRING YOUR OWN INTERVIEW PAGE.” (When they sign up, they’re taken directly to the interview.)
5.3 BYOI Page
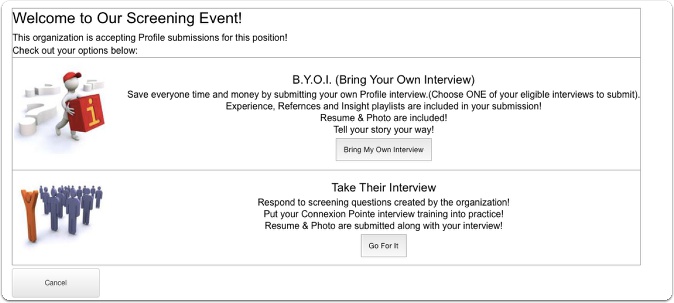
Once signed in, the candidate is brought to the Bring Your Own Interview (BYOI) page. This is where existing Pointe Profile® users/members have the OPTION to submit an interview they created in the Pointe Profile application along with a lot more video-based screening content than if they elect to take the Pointe Savant® interview. I’ll explain each option.
5.4 “Take Their Interview Option.”

If the Pointe Profile® user/member does not feel confident that their own interview will win them the position they’re seeking, they can opt to take the Pointe Savant® user’s interview. When they click the “Go For It” button, steps 4.2 to 4.12 will happen as previously described.
5.5 Bring Your Own Interview (BYOI)

If the Pointe Profile® user/member has an eligible interview recorded and ready to share, they can click the “Bring My Own Interview” button.
5.6 Choose Your Own Interview
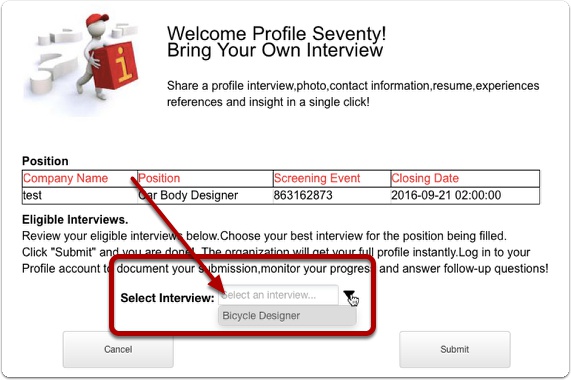
The BYOI submission page appears. The Pointe Profile® user/member clicks the drop-down menu and selects one interview to be submitted.
Note: Interviews that don’t match the screening criteria do not appear in this drop-down list.
5.7 Confirm Interview Submission
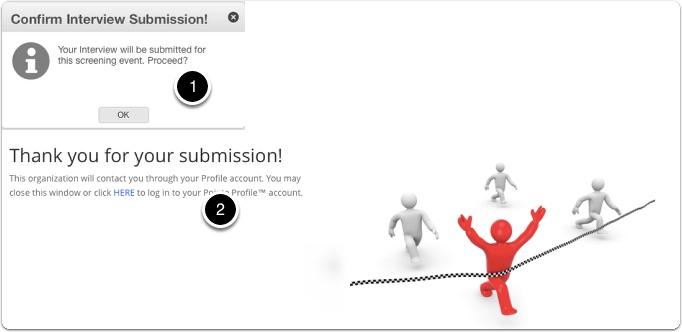
1 – The The Pointe Profile® user/member confirms their interview selection,
2 – the system thanks them for their submission.
Now I’ll show you what happens next.
5.8 Candidate Screening List

The Pointe Profile® user’s name appears in the Candidate Screening List. It displays in BLUE TEXT. The blue text indicates that this is a Pointe Profile® submission, and the questions they selected are likely to be different from those chosen by the Pointe Savant® user.
5.9 Remaining Engagements Unchanged
Because this is a submission of an interview created in the Pointe Profile® application, there is no “pre-interview” assessed to the Pointe Savant® user to accept it. The number of “Remaining Engagements” does not change.
5.10 View Engagements
The Pointe Profile® user’s name appears in the “View Engagements” window and is classified as “Free.”
5.11 What Gets Shared – Profile Interview

The interview created by the Pointe Profile® user is saved in the screening event, where it can be evaluated, and comments about the candidate can be saved.
5.12 What Gets Shared – Photo & Contact Info
The Pointe Profile® user’s photo and contact info are saved in the screening event.
5.13 What Gets Shared – Resume
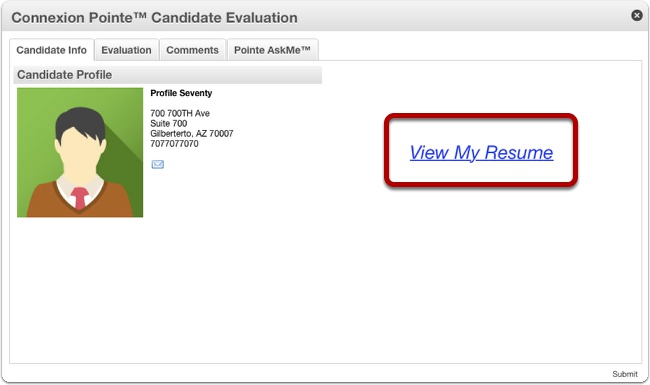
The Pointe Profile® user’s resume is saved in the screening event. When the “View My Resume” link is clicked, the resume opens in a new tab or window.
5.14 What Gets Shared – Experience, References & Insight Playlists
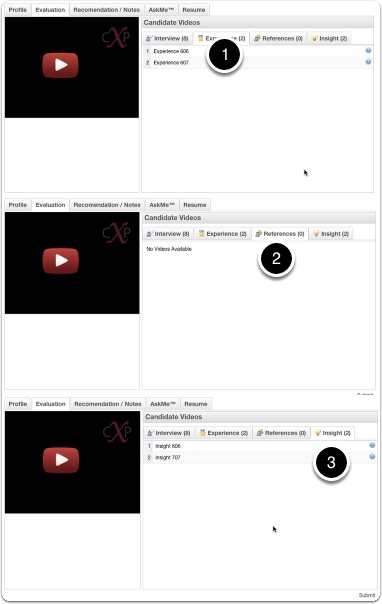
The Experience, References & Insight Playlists are saved in the screening event. These are short presentations created by the candidate with PowerPoint®, Keynote®, or any number of other applications and presented here in video format.
1 – Experience playlist with videos
2 – References playlist with videos
3 – Insight playlist with videos
These are not shared when the Profile user records their interview at the Pointe Savant® Gateway.
NOTE: Content for these playlists is optional and not required for Pointe Profile® users.
5.15 What Gets Shared – Previous AskMe Questions
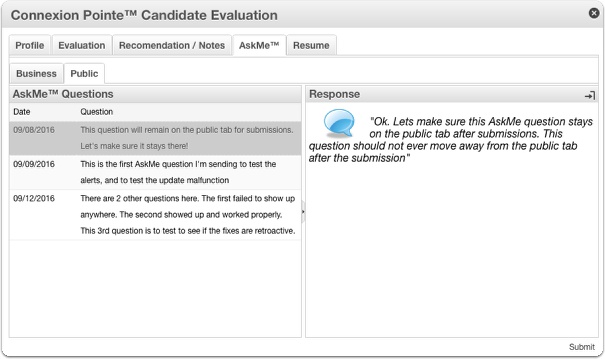
Previous Pointe AskMe™ questions appear on the “Public” sub-tab of the AskMe tab. These are not shared when the Pointe Profile® user records their interview at the Pointe Savant® Gateway.
That’s it! As you can see, accepting Pointe Profile® interviews can be a great way to lower your screening cost while maintaining quality and gathering additional relevant screening data!
Selecting a Job Title
This tutorial will demonstrate selecting a job title for your Pointe Savant® screening event.
1. Select an Interview Type
Now Let’s select a Job Title. We’ll begin by choosing an Interview Purpose and Interview Type.
1. For this example, We’re building a “Professional” interview. We will choose “Specific Job Title Interview (Powered by Positive Options)” and build an interview that targets a specific job title.
2. Choose any setting here (just for now).
We discussed the “Accept Profile Submission” in another section. For this tutorial, you can select any one of the settings.
3. Job Title Search Method
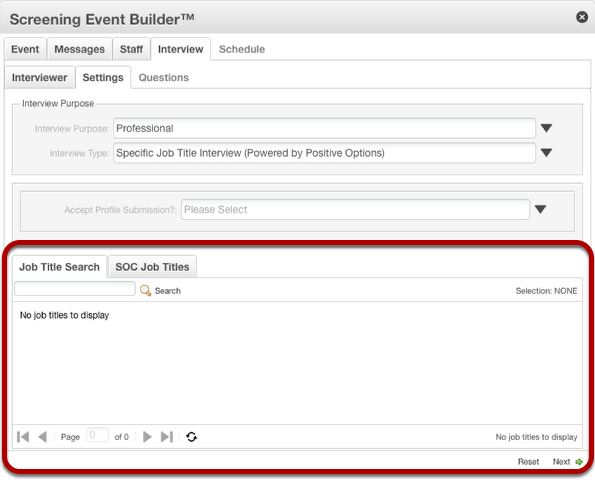
After selecting “Specific Job Title Interview (Powered by Positive Options).” The “Job Title Search window” appears. The selection process is based on the Standard Occupational Classification (SOC) system to cover as many job titles as possible. There are two ways to search for a suitable job title.
3.1 Title Search Field
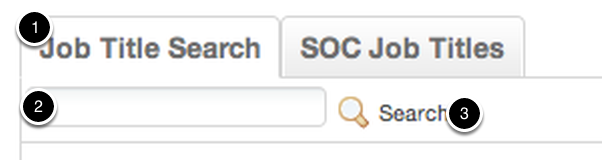
The first and simplest option is to use the automated Job Title Search feature.
1. Select the Job Title Search tab.
2. Enter a job title in the Job Title Search field. (This field accepts text and numerical values.)
3. Click “Search.” The list available and similar titles will be displayed below the search field.
3.2 Search for a Specific Job Title (continued)
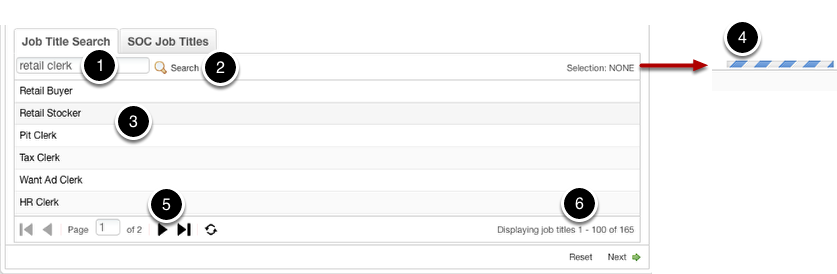
Let’s assume our goal is to build an interview to screen candidates for a check out clerk position at a retail store. To get started, we will enter “Retail Clerk” as our job title.
1. enter “Retail Clerk” in the field and
2. click “Search” to view a list of available titles.
3. Select a suitable title from the list. If no appropriate title appears in the list, go to the next step. The list above does not indicate a position that matches our check-out clerk position, so let’s try again.
4. A progress bar appears while the system retrieves your selection.
5. Some lists may be several pages. Use the controls here, along with the scroll bar on the right, to navigate and view the pages.
6. The total number of titles in your search results is indicated here.
3.3 Search for a Specific Job Title (continued)
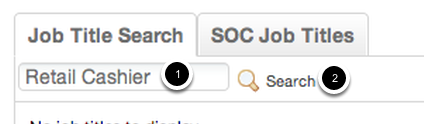
Our search for “Retail Clerk” did not yield a matching title. Try another similar job title if necessary. In the above example, notice we entered “Retail Cashier” instead of “Retail Clerk.”
3.4 Choose an exact match or a similar title.
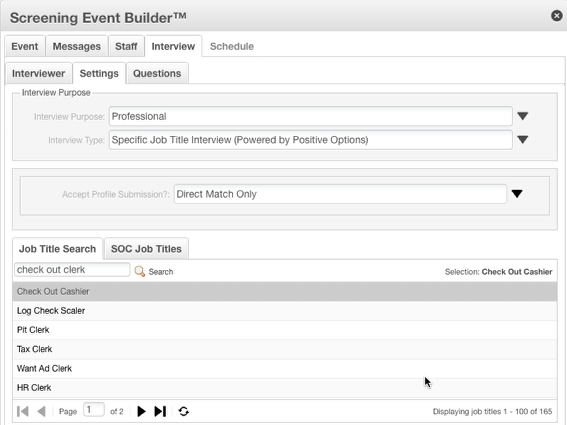
We see on this list that the “Check Out Cashier” job title appears. This is a close-enough match for our desired position.
1. Click the “Check Out Cashier” title in the list to select it.
2. A progress bar appears as the system loads a Competency/Themes set for your selection. Note that your selection is indicated in the top right corner of the window.
3. When the system is ready, the “Next” button becomes available. Click “Next” to go to the next step.
Let’s take a quick look at another option for locating a suitable job title.
4. Searching with the SOC Job Titles tab
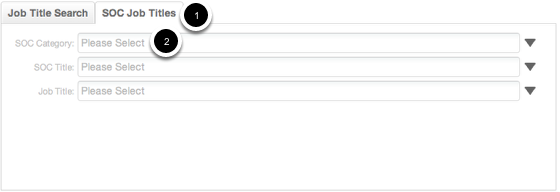
As mentioned earlier, “SOC” stands for Standard Occupational Classification. The SOC system is listing job titles recognized by the US Dept. of Labor and organized into 24 categories. Pointe Savant® users familiar with using the SOC database can use this feature to find a suitable job title. To get started, select the “SOC Job Titles” tab. Once selected, we’ll choose a SOC category from the drop-down menu.
4.1 Choose a SOC Category
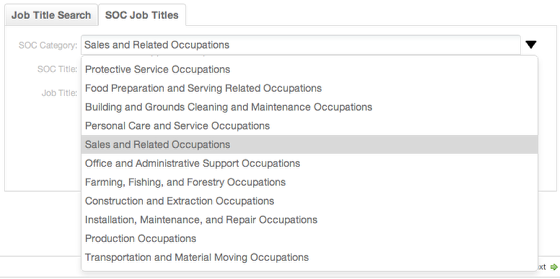
Select SOC Category. If you’re not sure which category to choose, select a category that closely describes the position you are looking for. Remember, you can always go back and change your category and search again. Using our Check Out Clerk example, let’s choose “Sales and Related Occupations” – a category that basically describes the job title we are looking for.
4.2 Choose a SOC title.
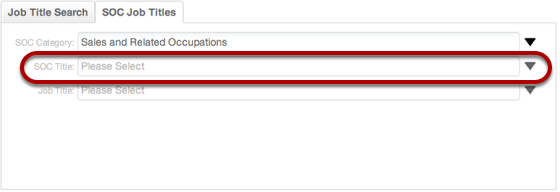
Next, we’ll choose a SOC Title from the drop-down menu.
4.3 SOC Title Drop-Down Menu
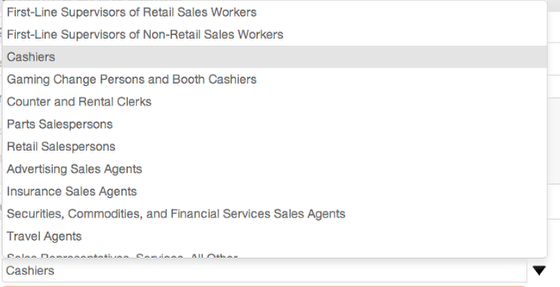
Scroll down the list of available titles and choose a group that may contain your desired title. For this example, we selected “Cashiers.” If you do not find a suitable group on this list, consider changing your SOC Category selection and searching again.
4.4 Select a Job Title.
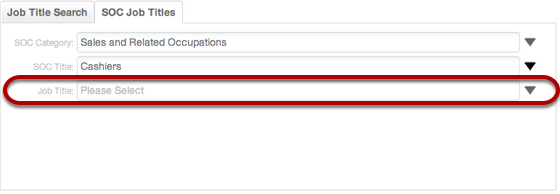
Now we’ll select a Job Title from the drop-down menu.
4.5 Job Title Drop-Down Menu
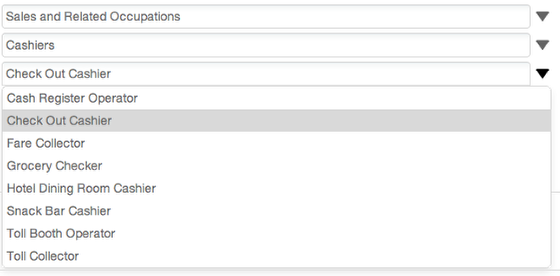
Finally, we’ll locate a suitable title in the “Job Title” drop-down menu. For our example, we selected “Check Out Cashier.”
4.6 Selections complete
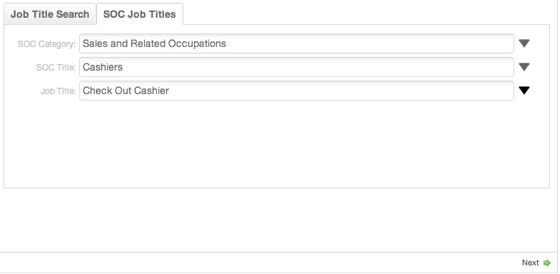
After all of the selections are made, your screen should look similar to this. If you’re satisfied with your choices, click “Next.” If not, revise your search by selecting a different SOC Category, and then “drill down” to a suitable title in the SOC Title and Job Title lists.
NOTE: These three fields are automatically filled in when you use the Job Title Search method. Now that our interview settings are complete, let’s click “Next” and move on to selecting interview questions!
Selecting Interview Questions
This tutorial will demonstrate how to select interview questions for your Pointe Savant® screening event”.
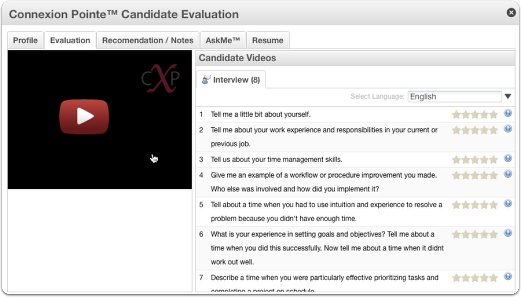
1. Selecting Interview Questions: Mandatory Questions
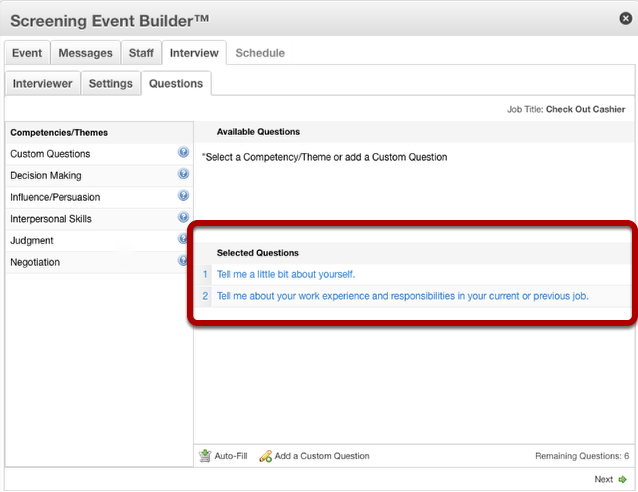
Every Connexion Pointe® interview begins with two of the most commonly asked questions:
1. “Tell me a little bit about yourself,” and
2. “Tell me about your work experience and responsibilities in your current or previous job.”
Having these questions at the beginning of every interview gives hiring managers or stakeholders a consistent, relevant, and manageable introduction to each candidate while offering a clear pathway forward to explore and engage further if desired. These questions cannot be revised, re-ordered, removed, or replaced in any interview.
1.1 Auto-Fill Function
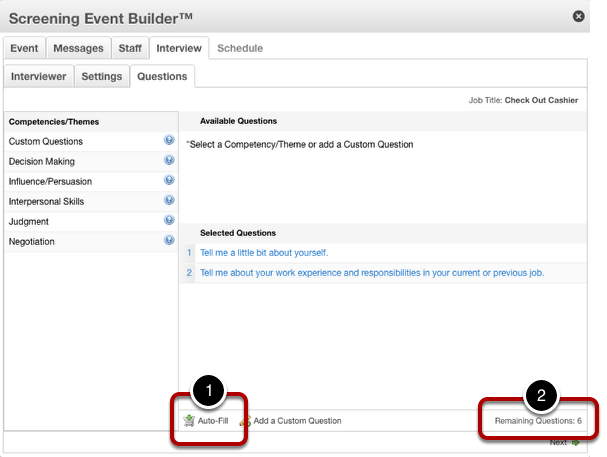
The Auto-Fill function is a quick and easy way to build an excellent interview. Pointe Savant® Interviews consist of 2 mandatory questions and six user-selected questions. The Auto-Fill function selects six queries and adds them to the Selected Questions list.
1. The Auto-Fill button is near the bottom of the window, as illustrated above.
2. “Remaining Questions” indicator displays the remaining number of user-selected questions.
NOTE: Custom questions are not automatically included when using the Auto-Fill function. They must be manually added.
1.2 Auto-Fill Complete.
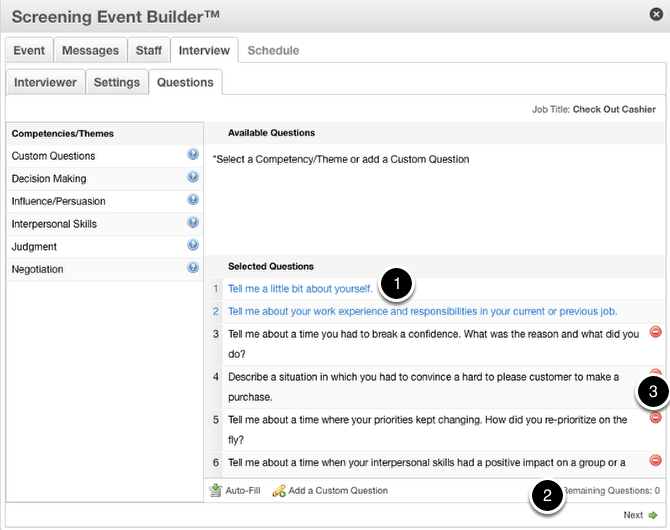
Click the Auto-Fill button.
1. The “Selected Questions” list is immediately populated with appropriate questions and
2. The “Remaining Questions” indicator displays there 0 questions to be chosen.
3. Except for the first and second questions, any questions can still be removed and replaced by clicking the red button next to it.
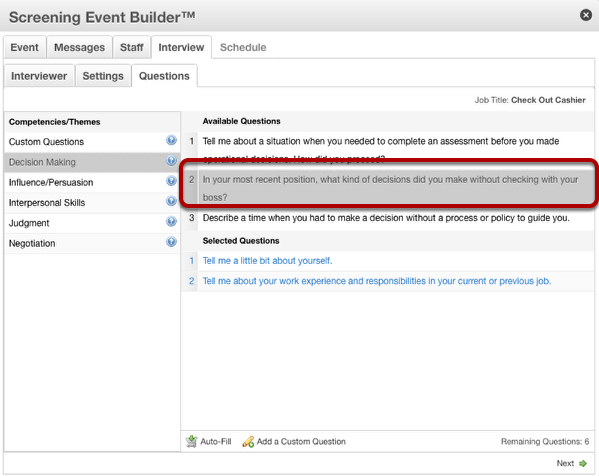
2. Manually Selecting Interview Questions

Manually selecting questions for your interview is easy.
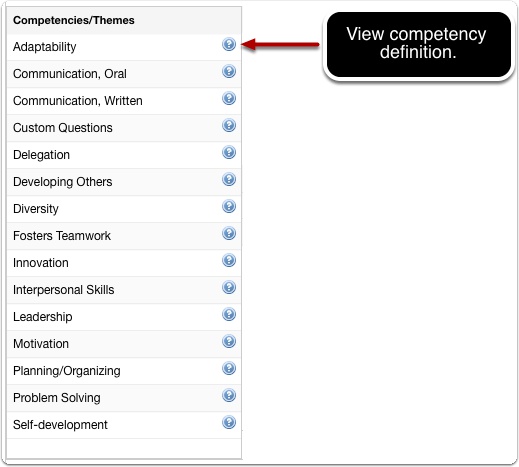
1. Begin by choosing a competency and clicking on it. To see the definition of any competency, click the blue question mark icon next to it. (See next step).
2. Questions associated with the selected competency appear in the “Available Questions” list.
2.1 View Competency Definition

A dialogue box appears displaying the competency definition. Click “OK” or the small “X” in the top right corner of the dialogue box to close it.
2.2 Select a question from the list.
Select a question from the list by clicking on it.
2.3 Drag and Drop selected questions

1. Click and drag the selected question to the “Selected Questions” list.
2. Notice the “Remaining Questions” indicator is displaying five remaining questions to be chosen.
2.4 Select another competency.
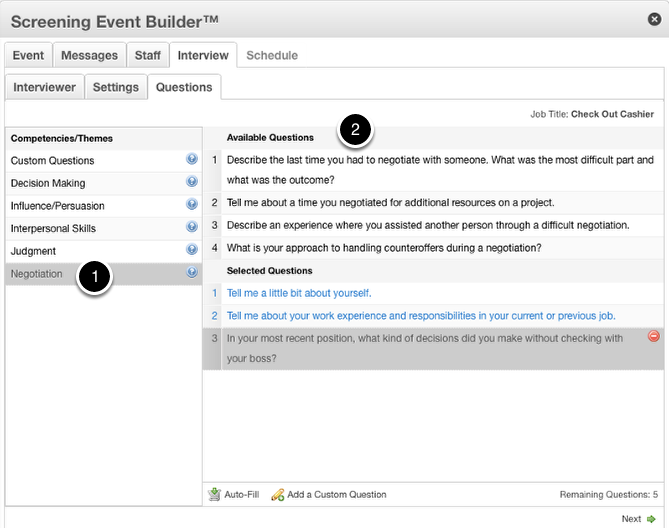
1. Select another competency, and
2. view its questions in the “Available Questions” list.
2.5 Repeat the process.
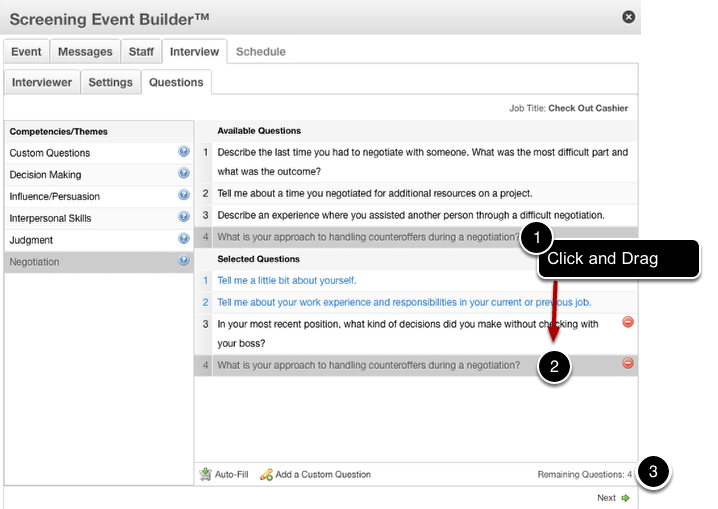
1. Select a question by clicking on it and
2. dragging it to the “Selected Questions” list.
3. Notice 4 selections are remaining.
3. Adding Custom Questions
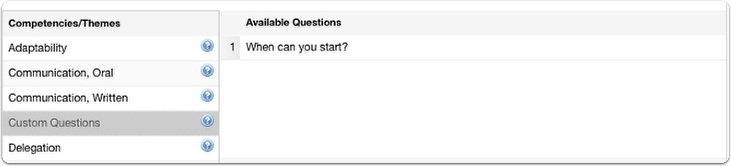
When a user creates a question that’s not in our database, we refer to it as a “Custom Question.” Custom questions can be created, saved, and added to any screening interview. Previously created custom questions can be added to interviews by selecting “Custom Questions” from the “Competencies” list and adding them to the “Selected Questions” list as previously described.
Note: Custom questions are linked to the job-title for which they were created. For example, if you create a custom question for an “Accountant” position, it will not appear as an available custom question for a “Cashier” position. Custom questions must be added and saved separately for each job title.
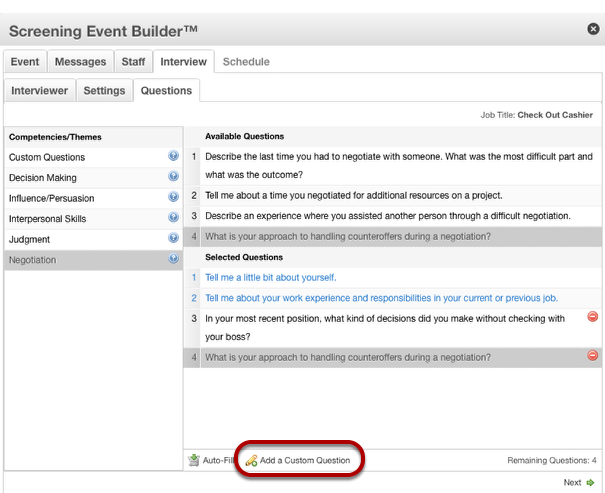
To begin, click the “Add a Custom Question” button as illustrated above.
3.1 Adding Custom Questions
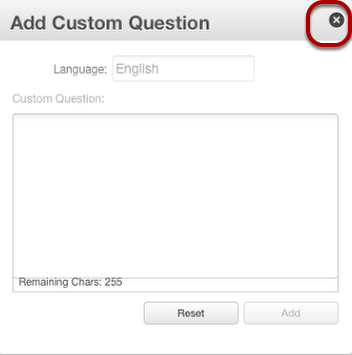
The “Add Custom Question” dialogue box appears. To cancel adding a custom question, click the small “X” in the dialogue box’s top right corner.
3.2 Custom Question Settings
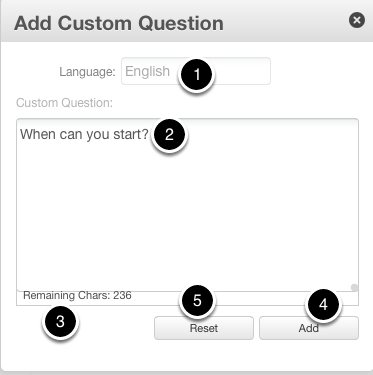
1. English is the default language for all custom interview questions.
2. Type your question here.
3. If you make a mistake or want to start over, click the “Reset” button.
4. Note the character limit indicator. Questions cannot exceed the character limit.
5. Click the “Add” button to add this question to your Pointe Savant® custom question database.
3.3 Saving a Custom Question
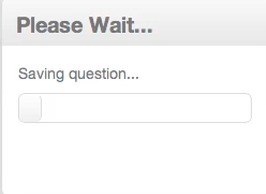
Pointe Savant® saves your question in the custom question database.
3.4 English-only custom questions are displayed in black text.
The question appears in the “Custom Question” theme in BLACK TEXT and is available to be added to the interview.
To add this question to another interview, select “Custom Question” in the “Competencies/Themes” list, select the question in the “Available Questions” list, then drag and drop the question in the “Selected Questions” list as previously described.
3.5 Adding a Translation to a Custom Question
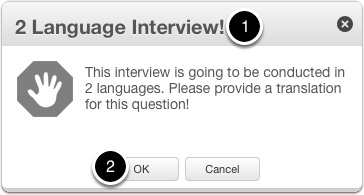
If an interview does not have a secondary language, custom questions are saved in English. But what if a user wants to use the question in a 2-language interview later? With Pointe Savant®, adding translations of your saved custom questions is easy. Let’s assume that you want to make being bilingual a requirement for this position, and we want to use the custom question we created last time.
1. If an English custom question is added to a 2-language interview and needs a translation, the prompt in the photo above appears.
2. To add a translation, click the “OK” button.
3.6 Add Custom Question Translation Window
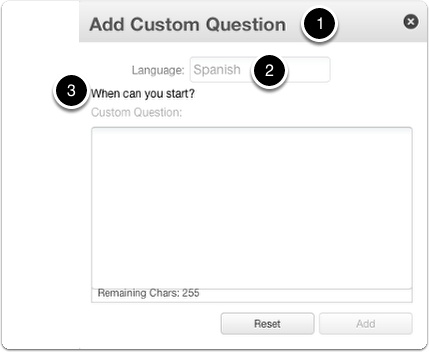
1. The “Add Custom Question” dialog box appears.
2. The language of the needed translation is indicated in the language field.
3. The English version of the question is shown here and can be copied to your clipboard for pasting into a translation program like Google Translate or a similar preferred program.
3.7 Using a Translation Program For Custom Questions
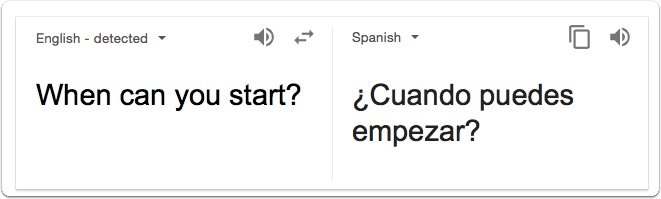
For this example, we copied the question to the clipboard and pasted it in Google Translate.
Note: While simple questions can be easily translated this way, it should be noted that translation programs are not perfect and do not always offer the best word choice or nuance for every situation. I strongly recommend having translations reviewed by a professional before including them in your interviews.
3.8 Save your Custom Question Translation
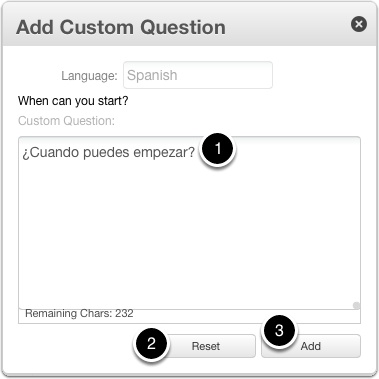
1. Type or paste the translation in this field. As previously stated, your question cannot exceed the 255 character limit.
2. If you make a mistake, you can click “Reset” or close the window by clicking the “X” in the top right corner.
3. After your translation is entered in the field, click “Add” to save it.
3.9 2-Language custom questions are displayed in green text.
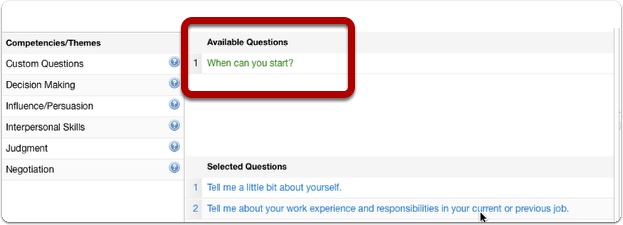
Your custom question and its translation are now saved in the database. Dual language custom questions are indicated in GREEN TEXT.
Note: The “black or green” text color only applies to your custom questions. All of the Pointe Savant® library questions have been professionally translated and are ready to be added to your 2-language interviews.
4. Remaining Questions Indicator
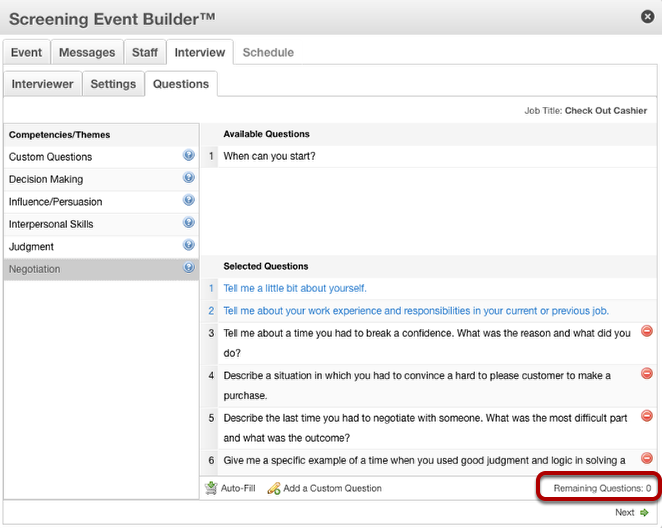
When the Remaining questions indicator is at “0”, no more selections can be made. To change any questions, one or more selections must be deleted from the selected question list first.
4.1 Maximum Allowed
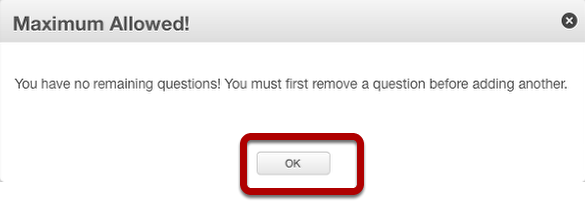
Attempting to exceed the maximum number of questions will prompt the following alert message. Click OK to close the window. Let’s move on to scheduling our screening event.
Scheduling Screening Events
Pointe Savant® makes scheduling your screening events easy.
1. Scheduling Your Screening Event
The last tab in the Screening Event Builder™ is the “Scheduling” tab. Here is where the closing date and time for your screening event will be selected.
2. Select a Closing Date
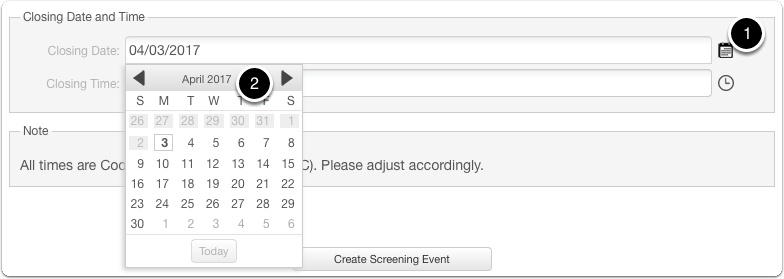
1. Click the calendar next to the “Closing Date” field.
2. A calendar appears. Click to select a closing date.
3. Maximum Screening Event Length is 30 Days
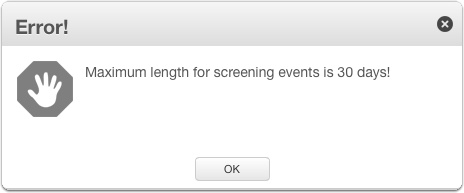
The maximum length for screening events is 30 days. Choosing a closing date more than 30 days later will result in the error illustrated above.
4. Select Closing Time.
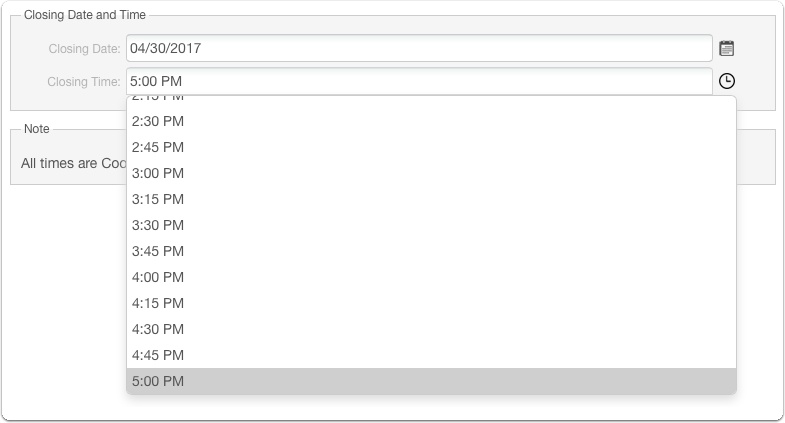
Click the clock next to the “Closing Time” field. A drop-down menu appears. Click to select the closing time of your event.
4.1 All Times are UTC

To avoid scheduling problems caused by different time zones and daylight savings time, All times indicated are Coordinated Universal Time, also known as UTC. Connexion Pointe facilitates global screening, which requires a world standard – not a time zone. To learn more about UTC, guide your browser to:
https://www.timeanddate.com/time/aboututc.html
4.2 UTC and Various Timezones
Many smartphones include a UTC feature that makes it easy to see the difference between your local time and UTC. For example, the photo above is a screenshot from my iPhone. The “Clock” app has a world clock feature that includes UTC.
5. Create the Screening Event
Once you’re satisfied with all of your choices, click the “Create Screening Event” button.
6. Verify your choices
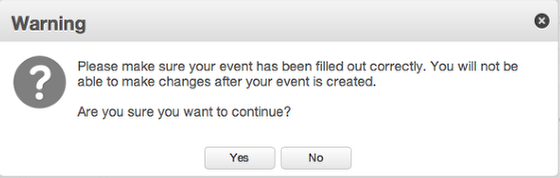
This is an excellent time to use the Events, Messages, Staff, Interview, and Schedule tabs to review all of the choices for this event and make changes as desired. After the “Create Screening Event” button is clicked, the dialogue above appears. To review and edit choices further, click “No” or click the small “X” in the dialog box’s top right corner. If you are satisfied with your choices, click “Yes.”
7. Event is Ready
Your screening event appears on the Screening Event List.
8. Event Details Display

Right next to the Screening Event List is the Screening Event Workspace. It displays the details of your screening event as entered in the Screening Event Builder™ form. This information is for your organization’s internal use and is not shown outside of the application (except for the BYOI submission selection window).
Now let’s take a look at the Screening Event Workspace and get ready to screen some candidates!
The Candidate's View
Taking Your Interview: The Candidate’s View
1. When an interested candidate clicks your interview link, they’ll be directed here – The Pointe Savant® Interview Gateway.
1 – If the candidate is already a Pointe Profile® user, they can sign in.
2 – If the candidate is not a Pointe Profile® user, they can sign up for an account.
3 – If the candidate has no idea what to do, they can scroll down and find more information and instructions to guide them.
The guide has full step-by-instructions for testing their sound, webcam, and microphone.
2. Non-members who sign up are taken straight to the interview.
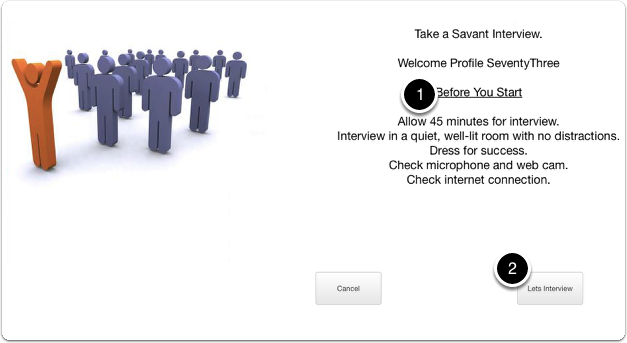
1. A welcome page offers some tips for success.
2. When they’re ready, they click “Let’s Interview.”
2.1 Not Accepting Pointe Profile® Interviews
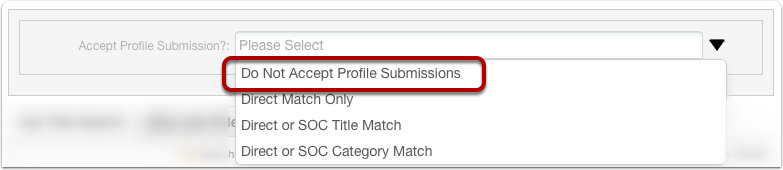
Remember those “Accept Profile Settings”? This is where they come into play. If you selected “Do Not Accept Profile Submissions,” The next ten steps apply.
2.2 Pointe Savant® Interview Welcome page.
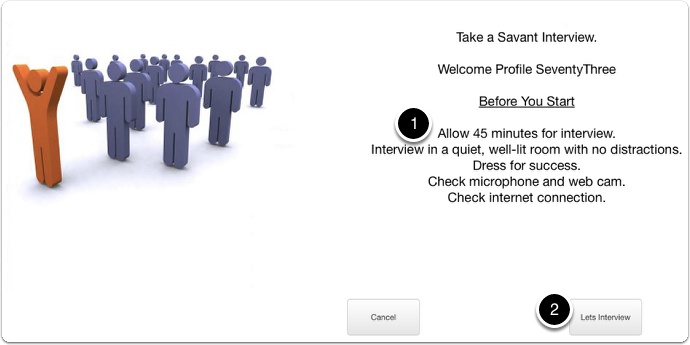
EVERY candidate is taken directly to the interview.
1. The welcome page offers some tips for success.
2. When they’re ready, they click “Let’s Interview.”
2.3 Pointe Savant® Interview
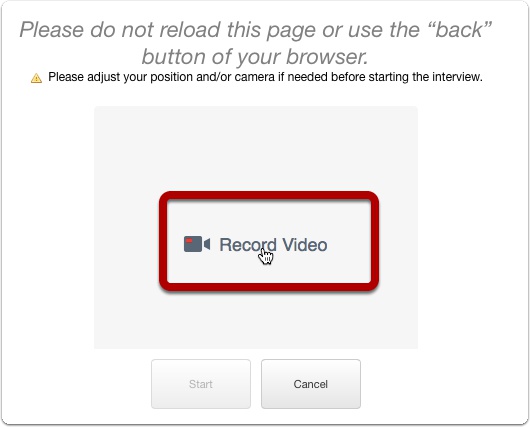
The Pointe Savant® Interview application opens. The candidate clicks “Record Video” to get started.
2.4 Grant Permission to Access
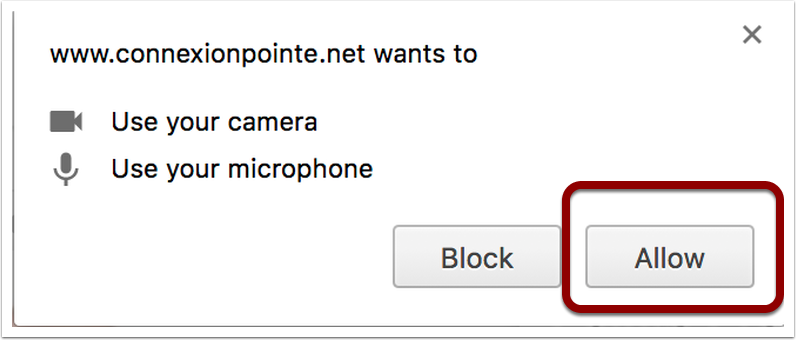
The Google Chrome browser requests access to the candidate’s microphone and webcam.
The candidate clicks the “Allow” button to grant access.
2.5 All set!
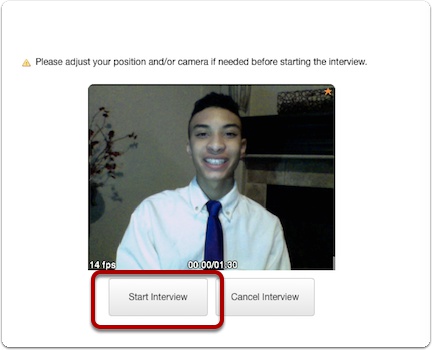
After making any necessary adjustments, the candidate clicks “Start Interview.”
2.6 Meet Suzy Scott, your virtual interviewer.
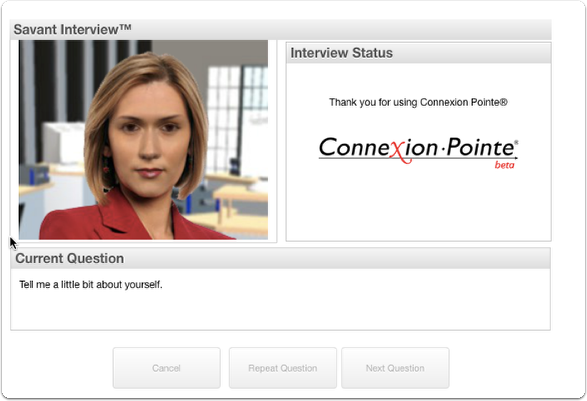
The virtual interviewer appears. After a brief introduction, asks the first question, then a timer counts down 5 seconds.
2.7 Recording responses. Green dot for 40 seconds.
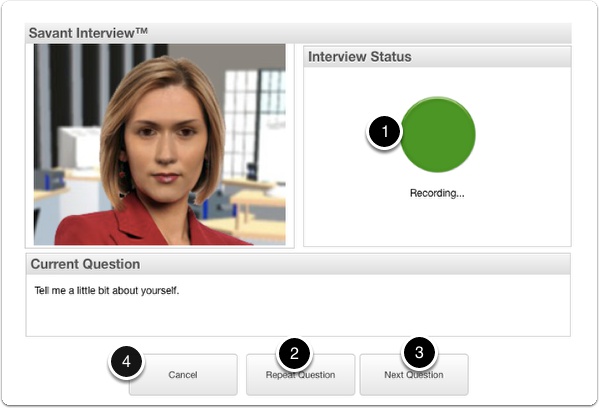
The recording begins.
1. The candidate has 2 minutes to answer the question. For the first 40 seconds, the interview status is indicated by a green dot.
2. The candidate can repeat the question twice during an interview by clicking “Repeat Question.” After two uses, the “Repeat Question becomes unavailable for the interview duration.
3. If the candidate does not need or use the entire 2 minutes, they can advance to the next question by clicking the “Next Question” button. The minimum response to any question is 30 seconds.
4. Important: Candidates can cancel the interview before the third question and still be eligible to take the interview later. If the candidate clicks the “cancel” button on or after the 3rd question, The candidate is disqualified from taking the interview.
2.8 Yellow dot happens at 40 seconds
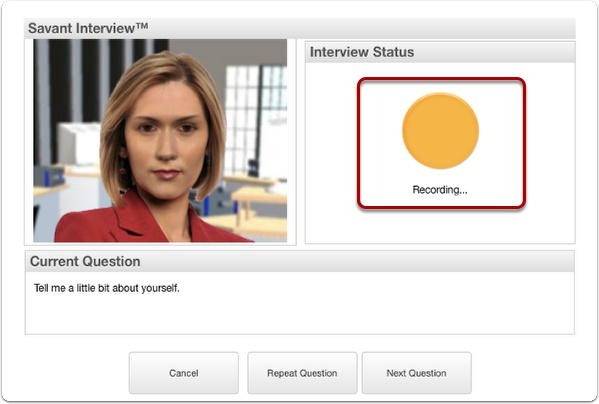
After 40 seconds, the interview status is indicated by a yellow dot.
2.9 Red dot happens for the final 40 seconds.
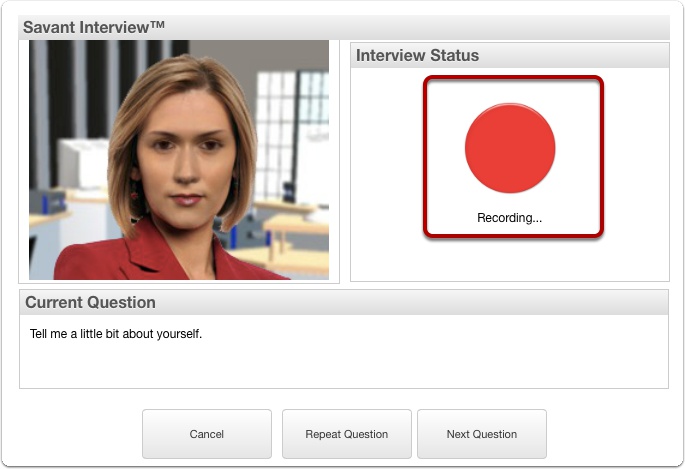
When the red dot appears, the candidate has 40 seconds to wrap up their answer. This process repeats until all eight questions have been asked.
2.10 Interview Conclusion.
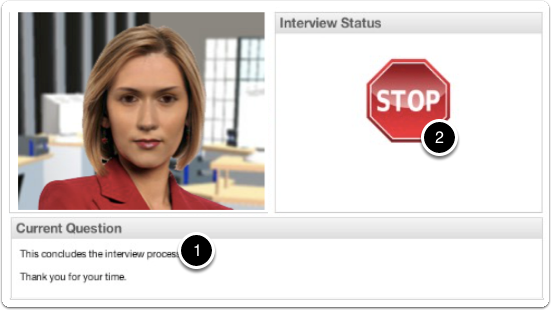
After all, 8 of the questions have been answered,
1. the interviewer announces the conclusion of the interview and thanks the candidate for their time.
2.11 System Verifies Responses
The system will verify that all of the responses were recorded correctly. If any responses failed to be recorded, the system would ask those questions again. This process repeats until there’s a response for all eight interview questions.
2.12 Candidate Engagements

Your account is charged for 1 Candidate Engagement. You have 30 free engagements when your account is opened. After this interview, there would be 29 remaining. Purchasing more engagements is easy and inexpensive.
3. Accepting Pointe Profile® Submissions.
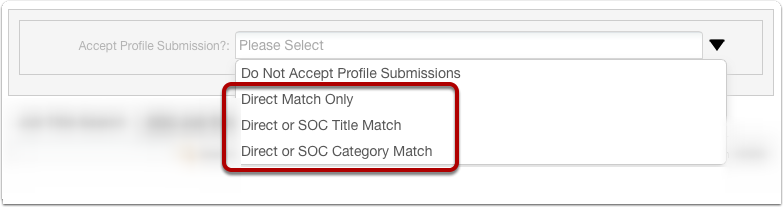
If you chose to accept Pointe Profile® submissions, you’d choose one of these settings. Be sure to check out the video at the top of this page for a visual description and the full section devoted to this topic. This is just a quick review of accepting profile submissions.
3.1 Bring Your Own Interview (BYOI) Welcome page.
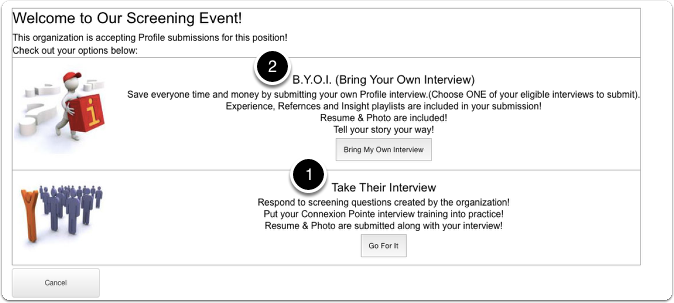
1. If the candidate does not have an appropriate Pointe Profile® interview, they can elect to take the interview prepared by the Pointe Savant® user (at the Pointe Savant® users’ expense) by clicking the “Go For It” button. (see step 17).
-OR-
2. The candidate can submit an interview that they’ve already created in the Pointe Profile® application by clicking the “Bring My Own Interview” button.
3.2 Using the Bring Your Own Interview (BYOI) button.
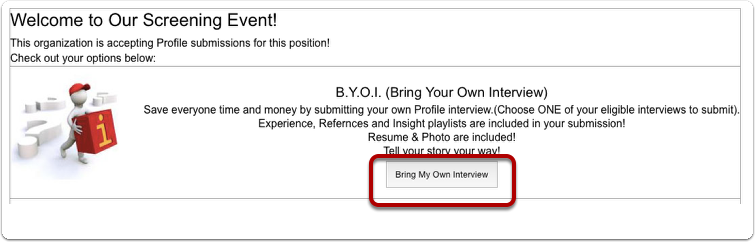
This happens when the candidate chooses to submit an eligible interview to a Pointe Savant® screening event. Let’s assume you’re screening candidates for a “Ceramic Designer” position, and you’ve chosen to accept Pointe Profile® submissions that have a direct matching job title. An interested candidate named Profile Eighty sees your posting and clicks the interview link. Profile Eighty is a Pointe Profile® user and has already created an interview for this exact position, and clicks the “Bring My Own Interview” button.
3.3 Selecting an eligible interview
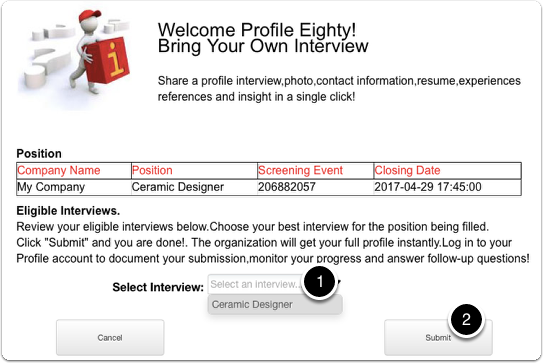
1. Profile Eighty selects an eligible interview for submission and
2. clicks the “Submit.”
Note: Only eligible interviews are displayed for selection and submission. Candidates are prevented from submitting interviews that don’t match job criteria.
3.4 Confirm submission.
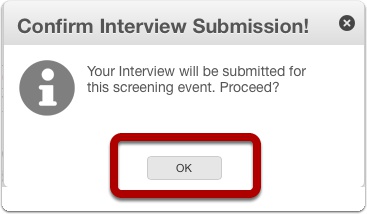
Profile Eighty confirms the submission by clicking “OK.”
3.5 Submission accepted.

That’s it. Profile Eighty’s submission is added to your screening event!
3.6 No effect on Candidate Engagements.
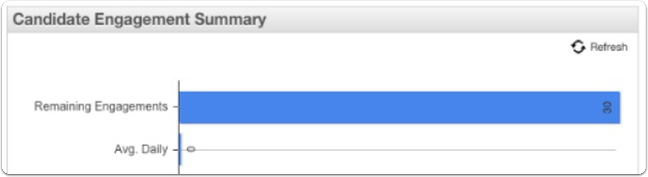
By the way, this submission does not cost one of your Candidate Engagements!
Evaluating Candidates
It’s time to evaluate the candidates that participated in your screening event! This magic happens in the Screening Event Workspace of the Pointe Savant® dashboard.
1. The Screening Event Workspace
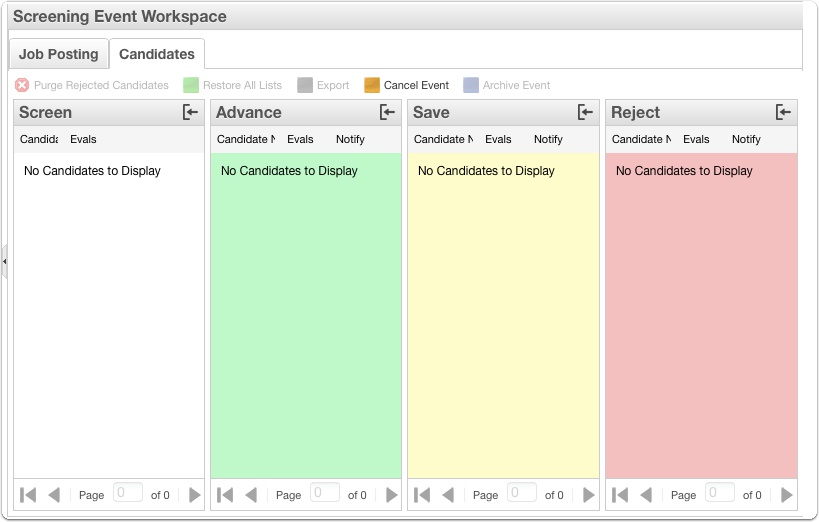
1.1 Adjusting the Workspace
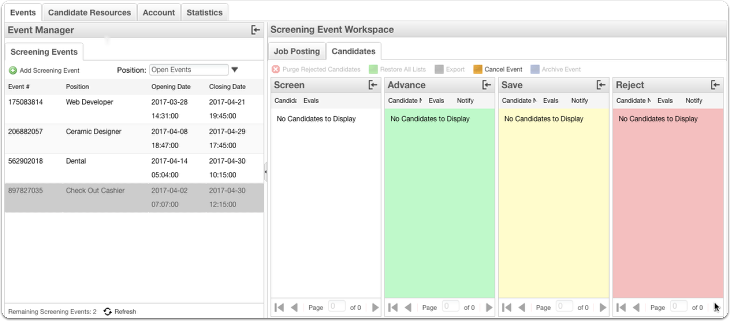
With Pointe Savant®, we can adjust the workspace for more comfortable viewing and make more room to work. Your screen should be similar to the photo above.
1.2 Hide Event Manager Column
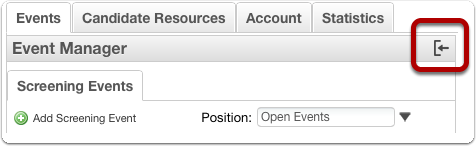
Some areas not in use can be hidden to make the Screening Event Workspace easier to use and view. We don’t need to see the list of current screening events, so let’s move it out of the way for now. Locate the “Event Manager” pane and click the bracket/arrow icon in the top right corner to hide it.
1.3 Event Manager Hidden
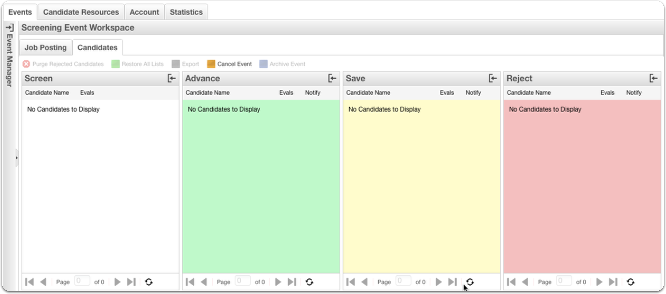
Your screen should look similar to the photo above now. Notice that all of the columns in the Screening Event Workspace have the bracket/arrow icon and can also be hidden from view if necessary.
2. Screening Event Workflow
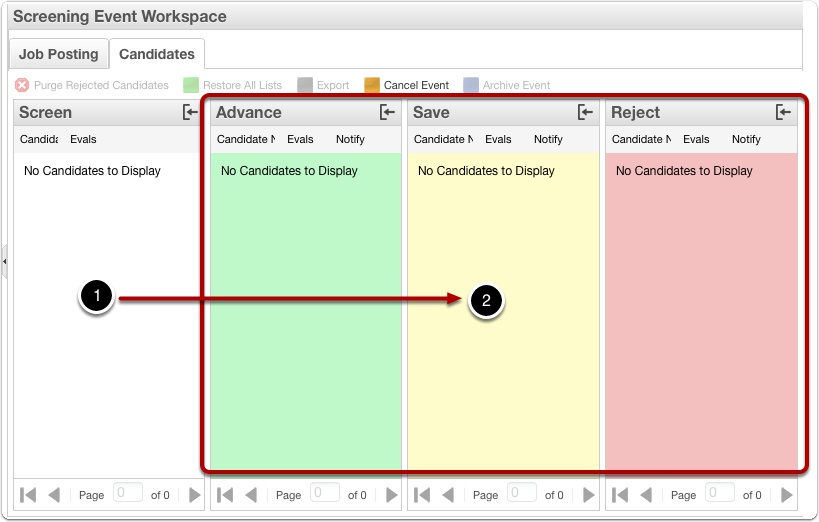
Here’s the workflow for screening candidates in Pointe Savant®:
1. After taking an interview or submitting an interview at the Pointe savant® Gateway, participating candidate names appear in the Candidate Screening List. Regular Staff assigned to the event will evaluate the candidates here.
2. After evaluations, the Lead Staff assigned to the event makes the final decision for each candidate by moving them to one of the three lists.
3. Candidate Screening List
1. When a candidate takes your interview or submits one of their own, their name appears here in the Candidate Screening List. Candidates taking the interview or submitting their Pointe Profile® interview can be identified by text color.
3.1 Candidate Screening List (Black Text – Additional Fee)
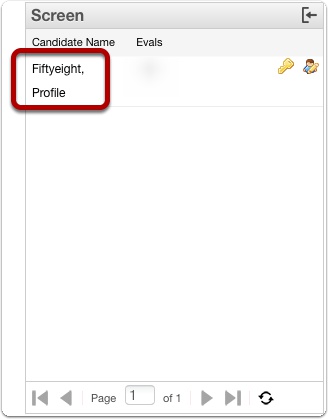
The names of Non-members who signed up for Pointe Profile® and members who opted to take your interview appear in BLACK TEXT. The black text indicates that this candidate responded to the questions chosen by the Pointe Savant® user.
3.2 Candidate Screening List (Blue Text – No Additional Fee)
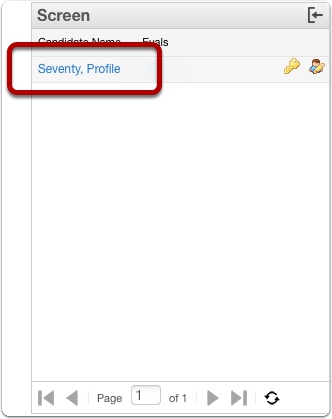
Candidates that submitted their own interviews appear in BLUE TEXT.
3.3 Candidate Screening List (Blue Text – No Additional Fee)

Notice that each name in the Candidate Screening List has two icons next to it. These are the Lead Staff Evaluation (Gold Key) and the Regular Staff Evaluation icons. The Lead Staff can’t do anything until a Regular Staff evaluation has been completed with a recommendation and notes.
4. Regular Staff Candidate Evaluation icon.
The Regular Staff Candidate Evaluation icon is visible to everyone assigned to the screening event. The Regular Staff begins their evaluation of each candidate by clicking the Regular Staff Candidate Evaluation icon.
5. The Candidate Evaluation Window.
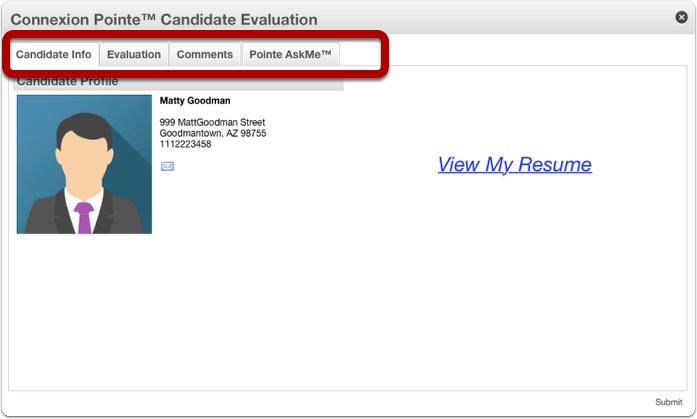
The Candidate Evaluation window opens. It has four tabs, Candidate Info, Evaluation, Comments, and Pointe AskMe™.
6. Candidate Evaluation Window.
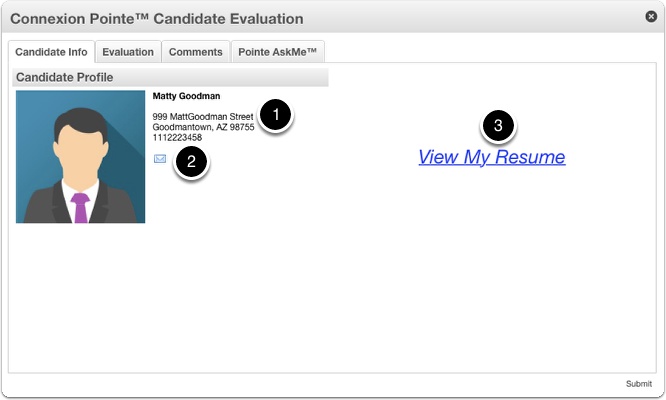
1. The “Candidate Info” tab has basic contact information,
2. An email link to the candidate. (Note: This email function will be emailed from the email client on your computer – It is not sent, saved, or stored by our server).
3. a link to view or print the candidate’s resume. Some recruiters prefer viewing a candidate’s PDF resume before looking at any other candidate attributes. With Pointe Savant®, viewing a candidate’s resume is easy. Click the “Resume” tab, and the resume opens in a new tab or window, where it can be viewed, printed, and shared.
6.1 Candidate Evaluation Window.
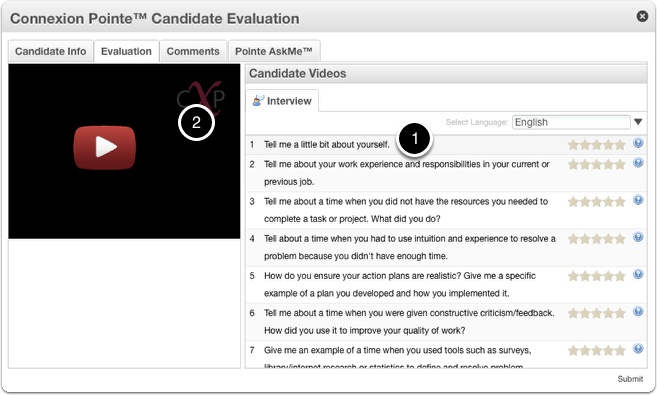
The next tab is the “Evaluation” tab, where the candidates’ interview responses can be reviewed and assigned a rating of 1 to 5 stars.
1. Select a question by clicking it.
2. The candidate’s response to the question appears in the video player. Controls are available for full-screen video display.
6.2 Rate the Candidate’s Response
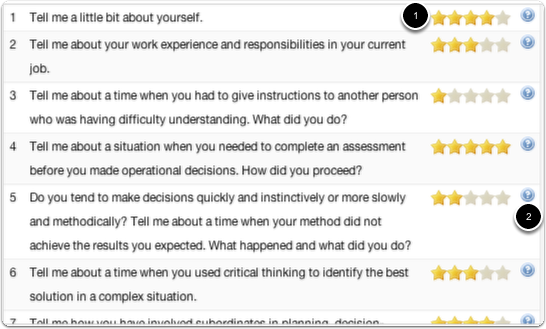
1. Rate the candidate’s answer by clicking a star. Higher scores are better.
2. If the staff member is unsure of what the interview question is seeking competency/ behavioral information, click the blue question mark to display the competency definition
6.3 View Competency Definition
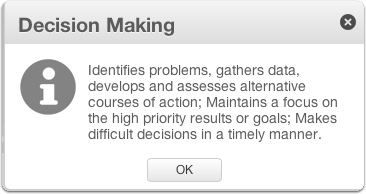
When a staff member clicks the blue question mark next to each interview question, the competency definition is displayed.
6.4 Candidate Videos. Interview, Experience, References, Insight Sub-Tabs

If the candidate submitted their own interview for your screening event, the optional Experience, References, Insight playlists might have additional content available. Each tab has the video playlist’s name and indicates how many videos are contained in the list.
NOTE: The Experience, Reference, and Insight tabs are entirely optional at the candidate’s discretion. Content for these lists is only available Pointe Profile® submitted interviews. This content can’t be scored or rated and is provided as additional information only. The staff is not restricted from entering notes about the video content.
1. Experience – previous work experience can be presented in video format.
2. References – video testimonials of coworkers, bosses, networking contacts, and clients past or present.
3. Insight – unique or unrelated professional characteristics in video format. This candidate might be a cashier by day and an experienced helicopter pilot on the weekends or a highly energetic Zumba instructor three times per week.
7. Asking follow-up questions.
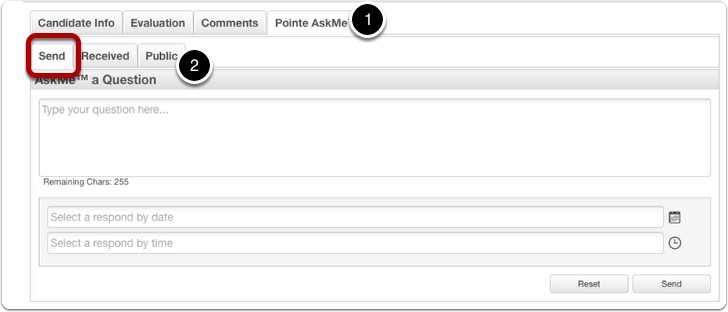
1. The Connexion Pointe® platform offers a staggering amount of screening information in an easy-to-use and intuitive format. However, it is impossible to predict what questions may arise as a result of the information presented. This is why we created Pointe AskMe™. Pointe AskMe™ is similar to a built-in email client. It’s a great way to ask candidate follow-up questions without incurring additional expenses or scheduling an in-person or telephone interview. Pointe AskMe™ is also a fantastic way to catch a glimpse of a candidate’s written communication skills and response habits.
2. The Pointe AskMe™ tab has three sub-tabs: “Send,” “Received,” and “Public.”
“Send”- (pictured above) is where new follow-up questions can be sent to the candidate. Enter your question, select a deadline time and date, and click send. The candidate receives a notification in their Pointe Profile® dashboard. If the candidate does not meet the deadline, the system deletes the question from the candidate’s dashboard, and a response is not accepted.
7.1 Pointe AskMe@ question sent indicator.

A red “A” appears next to the candidate’s name, indicating a question has been sent.
7.2 Pointe AskMe@ response received indicator.

When a candidate responds to your question, a blue “R” appears next to the candidates’ name.
7.3 Receiving responses to follow-up questions.
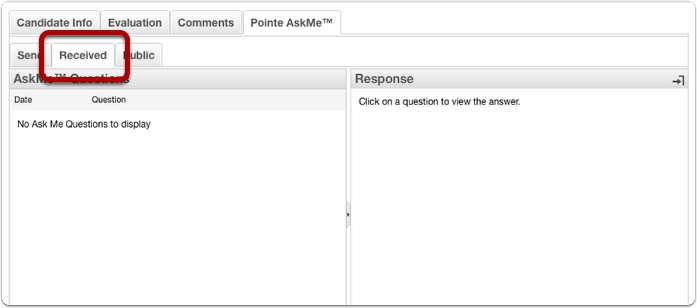
The response to your follow-up question will appear on the “Received” sub-tab. This is also where questions from others in your organization are aggregated.
7.4 Asking follow-up questions.
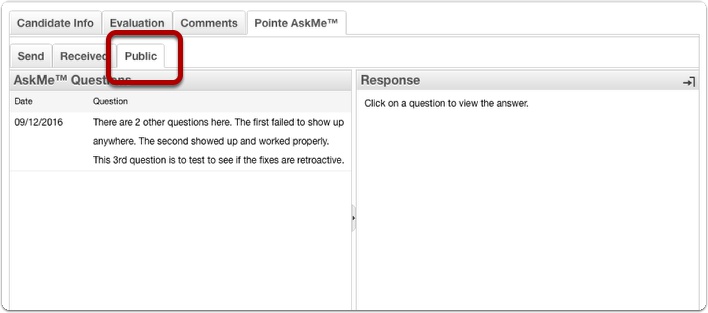
Since it is possible a candidate was previously asked a similar question, the Connexion Pointe® platform offers candidates the ability to make previous Pointe AskMe™ questions and their responses available to recruiters. – If the candidate previously responded to questions from other organizations and wants to share those responses, they will appear here on the “Public” tab.
7.5 Candidate Evaluation Window.
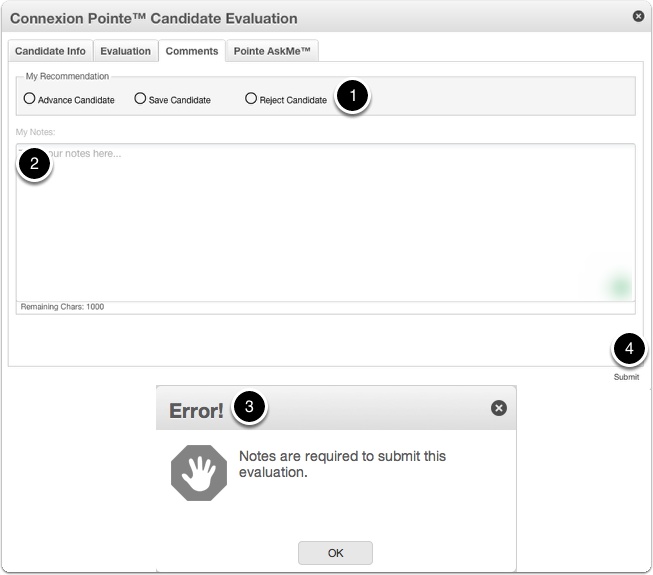
When the Regular Staffers have reviewed all of the available screening information,
1. It’s time to submit a recommendation to a Lead Staff member by selecting one of the radial checkboxes in the “My Recommendation” pane.
2. Savant encourages accurate record-keeping concerning candidate contacts. Copious notes are not only good business; they are the law.
3. If notes are not entered for a candidate, an alert dialogue box will inform the user of the error.
Close the dialogue box by clicking “OK” or clicking the “X” in the top right corner
4. Once a selection is made, the staff member clicks the “Submit” button at the bottom right corner. The “Submit” button appears only on the “Recommendation/Notes” tab.
Note: There is no limit to how many times a candidate can be screened. Once a recommendation is submitted, the notes and recommendations are permanently recorded and can not be altered, edited, or deleted.
The Lead Staff member also has access to the Regular Staff functions and can also enter notes with a recommendation.
8. Lead Staff Candidate Evaluation icon.
After staff members submit recommendations, a Lead Staff member can review them and make a final decision on whether to “Advance,” “Save,” or “Reject” each candidate. This process is done using the “Lead Staff Evaluation” function. The Lead Staff Evaluation icon is only visible to the account owner and the one person assigned as the Lead Staff person on the screening event. This icon is never visible to Regular Staff. After Regular Staffers have made recommendations for each candidate, the Lead Staff member begins reviewing the ratings and recommendations by clicking the Lead Staff Evaluation icon.
9. Lead-Staff Review window.
The Lead Staff Review window opens.
1. The Lead Staffer can see the date of the evaluation,
2. The Regular Staff member’s name.
3. The green dot indicates a recommendation to advance the candidate to the next step in the screening process. (A yellow dot indicates saving the candidate for later, and a red dot indicates a recommendation to reject the candidate.)
4. Ratings of the candidates’ responses. On the first question (“Tell me a little about yourself.”), the rating was 5 stars, which is the highest rating possible. On question 6, regarding resources, a lower score of 2 stars was given.
9.1 Lead-Staff evaluation.
1. The Lead Staffer can review notes entered by the Regular Staffer by clicking the “Notes” tab.
2. Finally, the Lead Staffer makes the final decision to Advance, Save, or Reject the candidate by clicking on the icons. The candidate’s name is moved to the list chosen.
9.2 Screening is complete!
When all of the candidates have been moved to a list, the Screening Event Workspace might look similar to this. Let’s take a quick look at what each list represents.
9.3 The Advance List
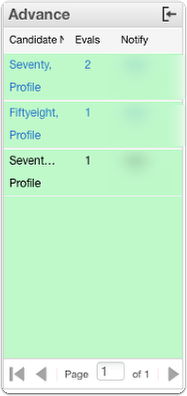
This list is reserved for exceptional candidates that have an excellent chance of being offered the position. When the event concludes, they will receive the “Candidate Advancing Message,” we composed when creating the screening event.
9.4 The Save List
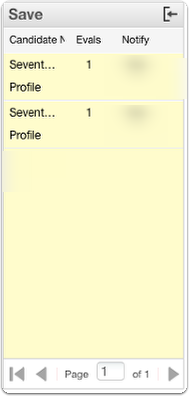
This list is reserved for candidates who will not be offered this position but have made a good impression and may be suitable for future positions. Expect the majority of your screened candidates will be on this list. When the event concludes, they will receive the “Candidate Save-For-Later Message,” we composed when creating the screening event.
9.5 The Reject List
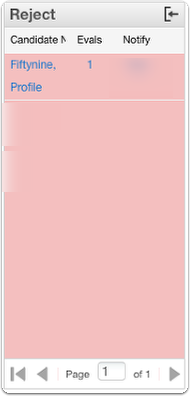
This list is reserved for candidates that have made a poor impression and should be avoided at all costs for current or future positions. When the event concludes, they will receive the “Candidate Non-Acceptance Message,” we composed when creating the screening event.
9.6 Purge Rejected Candidates button

The Reject List works in conjunction with the Purge Rejected Candidates button. The effectiveness of this function is increased as your database grows over time. Before screening candidates, staff members can click this button, and any candidates that were previously rejected will be moved to the “Reject” list automatically. This helps prevent repeated re-screening of unsuitable candidates. Lead staff members can review everyone on the “Reject ” list and potentially change their status, offering a mechanism to avoid an organization’s automatic or perpetual rejection. Candidates on the “Advance” and “Save” lists are also eligible for review.
9.7 Confirm Purge Rejected Candidates
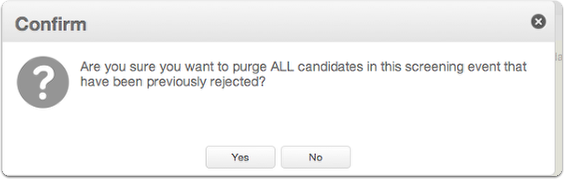
When the “Purge Rejected Candidates” button is clicked, an alert box opens to confirm your selection.
10. Screening Event expires.

Archiving Events
When your event is canceled or expires, candidates can no longer take your interview or make submissions to your event. If a candidate clicks the link to an expired event, they’ll be allowed to sign in or sign up and then be redirected to a screen similar to this one:

16. Archive your event

Now it’s time to wrap up the event with the”Archive Event” button. When your event expires, the blue “Archive Event” button becomes available.
With this function,
A. candidates will be tagged and entered into the Evaluated Candidate database,
B. Automatically notified of their status about the screening event (via Advance, Save-for-Later, Non-Acceptance messages)
C. documents can be created for the screening event in PDF format for printing or digital storage.
16.1 All candidates must be evaluated to archive.
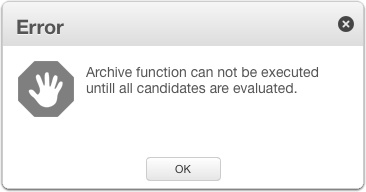
It’s important to note that the function can not be executed until all candidates have been evaluated.
16.2 Confirm Archive
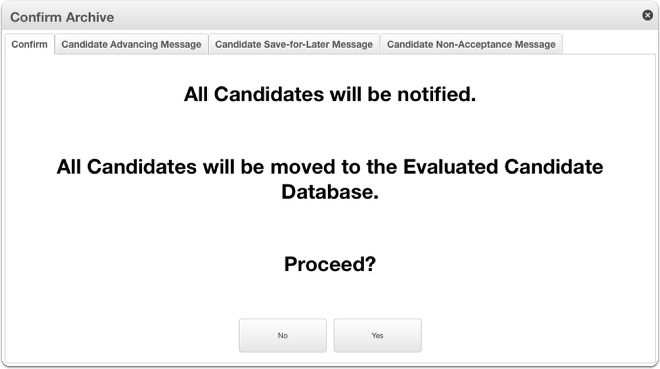
The “Confirm Archive” window opens.
16.3 View Messages

The Lead Staffer can view the outgoing messages by selecting one of the tabs at the top of the window.
Note: The messages only be viewed! They can not be edited here!
16.4 Confirm Archive
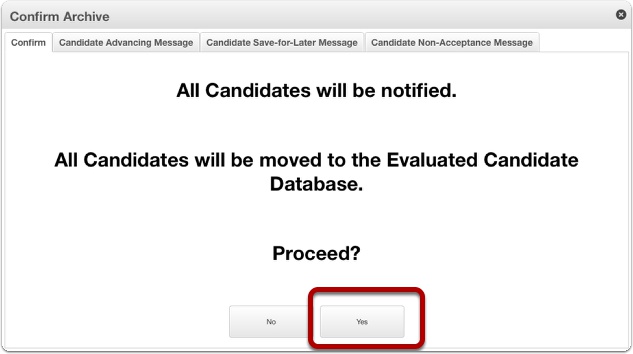
The Lead Staffer can archive the event by clicking the “Yes” button.
17. Evaluated Candidates database.
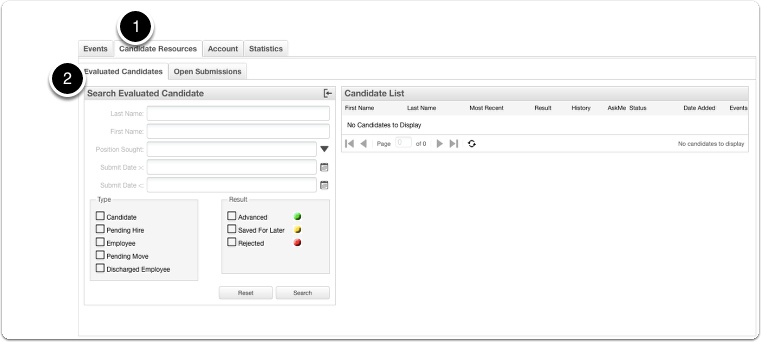
The candidates and their screening event details are now saved in the “Evaluated Candidates” database. To view them, select the “Candidate Resources” tab and then select the “Evaluated Candidates” sub-tab.
17.1 Search and review candidates at a glance.
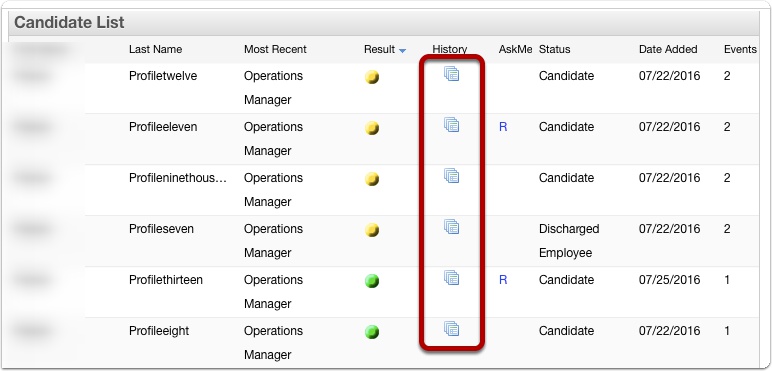
In the Evaluated Candidate database, you have quick access to review the relevant information on everyone you’ve screened. Let’s take a look at one of our candidates’ Candidate History. Each Candidate History can be accessed by clicking the “Candidate History” icon next to their name.
17.2 Candidate History – Candidate Info tab.
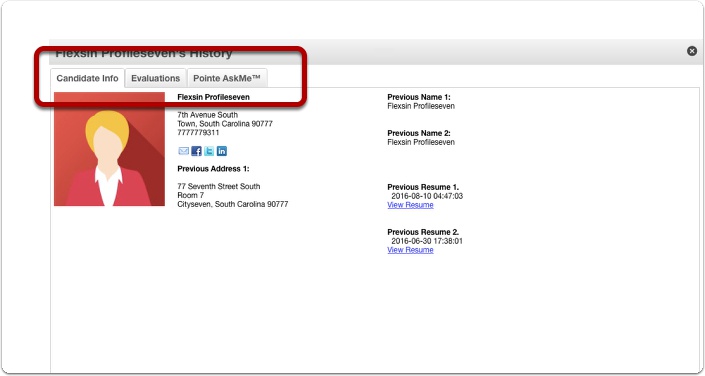
The Candidate History window has three tabs. The first tab is the “Candidate Info” tab, which contains all of the candidates’ most recent contact information. If the candidate has submitted multiple resumes, those documents are aggregated here.
17.3 Candidate History Window – Evaluations tab.
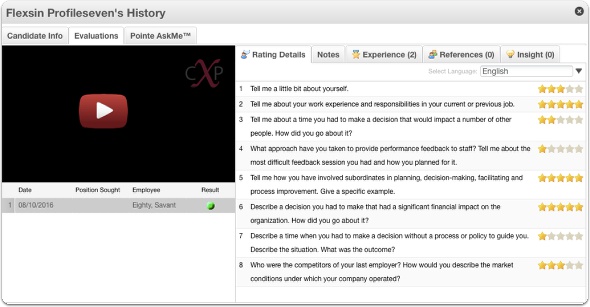
All of the candidates’ evaluations are aggregated on the “Evaluations” tab and can be sorted by date, result, or by the staff member who screened them.
17.4 Candidate History Window – Pointe AskMe™ tab
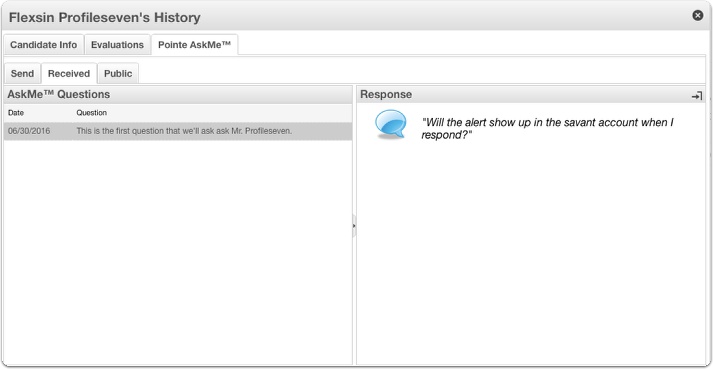
All of the candidates’ Pointe AskMe™ questions are aggregated on the “Pointe Ask Me™” tab. An important feature is that new questions can be initiated from here, making it simple to reconnect with previously screened candidates for further considerations.
17.5 Adjust candidate status.
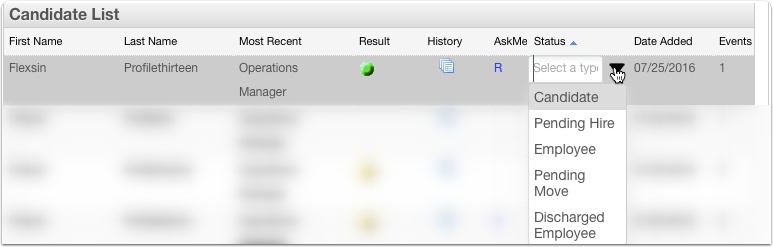
You can easily change any candidate’s status in your database to keep your team in the know!
18. Pointe Savant® makes it easy.

That’s it! Pointe Savant® makes managing your screening events, creating interviews, evaluating candidates, and keeping excellent records easy!
This full help guide contains in-depth information about all of the functions. Please review it if you have questions or feel free to contact us!
16. Archive your event
Now it’s time to wrap up the event with the”Archive Event” button. When your event expires, the blue “Archive Event” button becomes available.
With this function,
1. candidates will be tagged and entered into the Evaluated Candidate database,
2. Automatically notified of their status about the screening event (via Advance, Save-for-Later, Non-Acceptance messages)
3. documents can be created for the screening event in PDF format for printing or digital storage.
16.1 All candidates must be evaluated to archive.
It’s important to note that the function can not be executed until all candidates have been evaluated.
16.2 Confirm Archive
The “Confirm Archive” window opens.
16.3 View Messages
The Lead Staffer can view the outgoing messages by selecting one of the tabs at the top of the window.
Note: The messages only be viewed! They can not be edited here!
16.4 Confirm Archive
The Lead Staffer can archive the event by clicking the “Yes” button.
Canceling a Screening Event
Sometimes it may be necessary to stop an event before it expires. This tutorial will illustrate how to cancel an open screening event when all the participating candidates have been evaluated and when they have not.
Note: Candidates may or may not have scores on their responses to interview questions, staff notes, or recommendations. Notes or recommendations cannot be added later! It’s strongly recommended that notes and recommendations be entered for each candidate before canceling the event!
1. Cancel Event Overview

Start by clicking the “Cancel” button.
1.1 Cancel Event Example 2 – All candidates have not been evaluated.
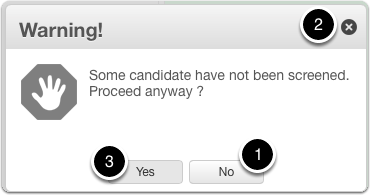
If candidates are remaining on the Candidate Screening List, The dialog box warns you that there are still unscreened candidates.
1. To cancel the operation, click “No” or
2. click the “X” in the top right corner of the dialog box.
3. To proceed with canceling the event, click “Yes.”
1.2 Cancel Event Overview
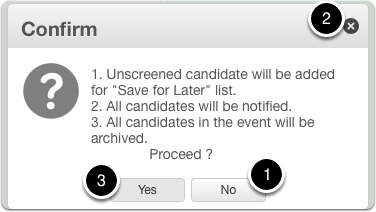
A new dialog box will inform you of what’s going to happen.
1. To cancel the operation, click “No” or
2. click the “X” in the top right corner of the dialog box.
3. To proceed with canceling the event, click “Yes.”
I’ll briefly explain the three items on the list presented here.
1.3 Cancel Event Overview
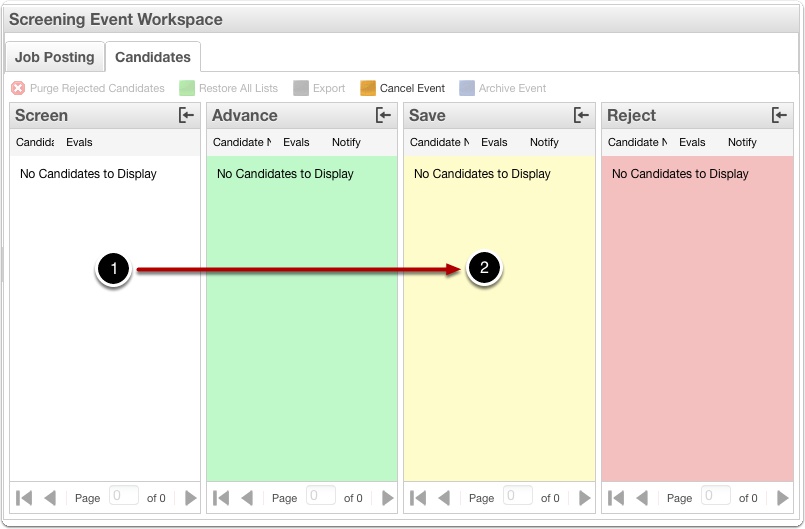
Any candidates still on the Candidate Screening List (whether they have been evaluated or not) will be automatically moved to the Save-for-Later list.
1.4 Cancel Event Overview
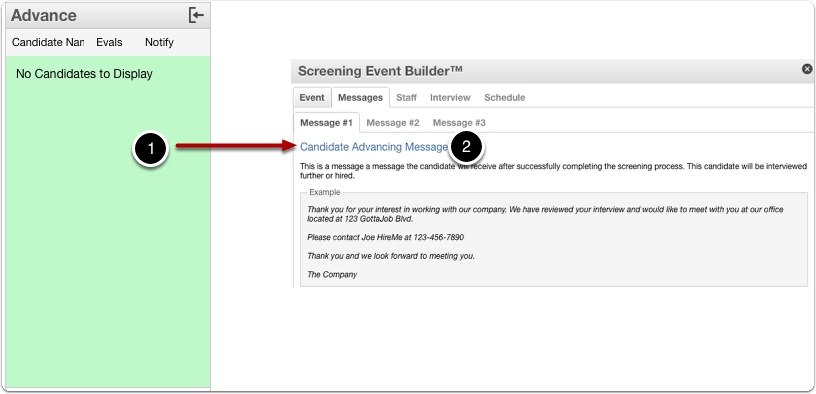
1. Candidates on the “Advance” list
2. will receive the “Candidate Advancing Message” added when we created the screening event.
This message appears in candidates’ Pointe Profile® account under “Notifications.”
1.5 Cancel Event Overview
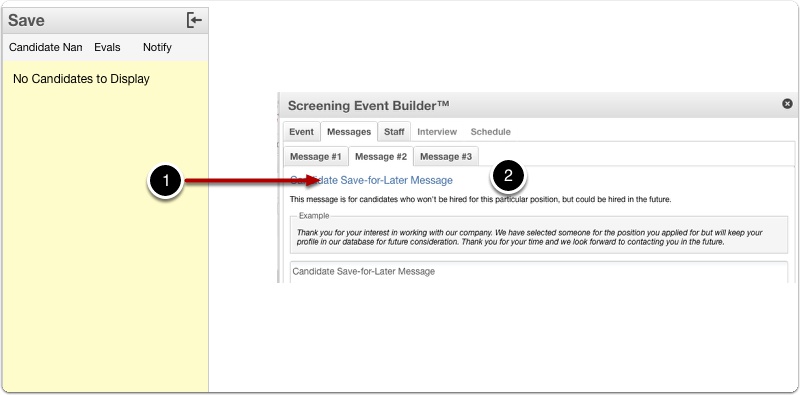
1. Candidates on the “Save” list
2. will receive the “Candidate Save-for-Later Message” added when we created the screening event.
This message appears in candidates’ Pointe Profile® account under “Notifications.”
1.6 Cancel Event Overview
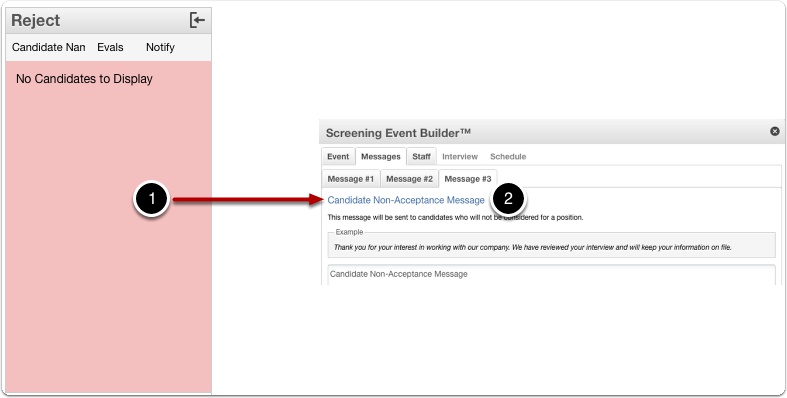
1. Candidates on the “Reject” list
2. will receive the “Candidate Non-Acceptance Message” added when we created the screening event.
This message appears in candidates’ Pointe Profile® account under “Notifications.”
1.7 Cancel Event Overview
All of the candidates that participated in the screening event will be moved and archived in the Evaluated Candidates database. When displayed in this database, the list that the candidate was on when they were moved here is shown in the “Results” column.
Now I’ll show you some real-life examples.
2. Cancel Event Example 1 – All candidates have been evaluated.
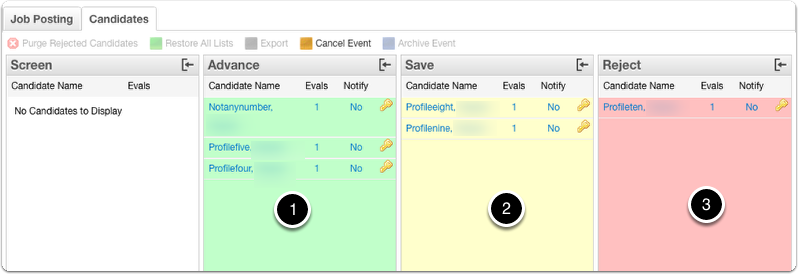
Let’s assume that we’d like to cancel an open screening event, and our Screening Event Workspace looks like the photo above. All of the candidates have been evaluated and placed on the “Advance,” “Save,” and “Reject” lists.
1. Notmynumber, Profilefive, and Profilefour will receive the “Candidate Advancing Message.”
2. Profileeight and Profilenine will receive the “Save-for-Later” message.
3. Profileten will receive the “Candidate Non-Acceptance Message.”
2.1 Cancel Event Example 1 – All candidates have been evaluated.

Start by clicking the “Cancel” button.
2.2 Cancel Event Example 1 – All candidates have been evaluated.
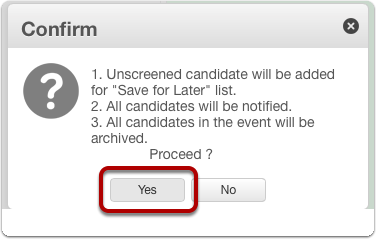
Click “Yes” to proceed with canceling the screening event. Since there no “Unscreened” (unevaluated) candidates, the system will execute #2 (notifying all candidates) and #3 (archiving candidates).
2.3 Cancel Event Example 1 – All candidates have been evaluated.
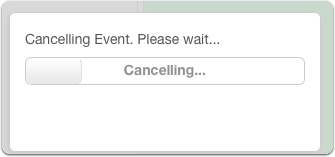
A progress bar informs you of the cancellation status.
2.4 Cancel Event Example 1 – All candidates have been evaluated.
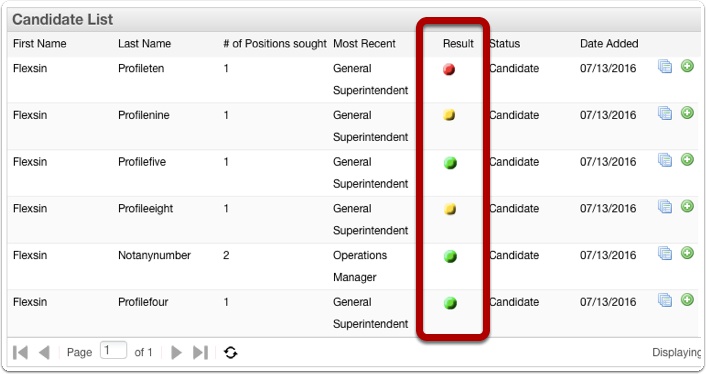
The candidates are moved to the Evaluated Candidates database. Their final placement on the lists during the screening event is indicated in the “Result” column of the Evaluated Candidates database display.
2.5 Cancel Event Example 1 – All candidates have been evaluated.

The screening event shows “Cancelled” as the closing date
3. Cancel Event Example 2 – All candidates have not been evaluated.

This process is the same as before. Start by clicking the “Cancel” button.
3.1 Cancel Event Example 2 – All candidates have not been evaluated.

The dialog box warns you that there are still unscreened candidates on the Candidate Screening List,
1. To cancel the operation, click “No” or
2. click the “X” in the top right corner of the dialog box.
3. To proceed with canceling the event, click “Yes.”
3.2 Cancel Event Example 2 – All candidates have not been evaluated.
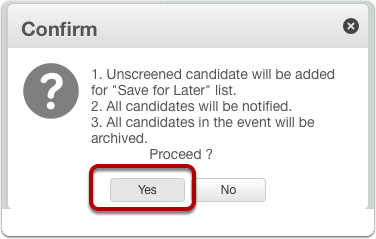
Click “Yes” to proceed with canceling the screening event.
3.3 Cancel Event Example 2 – All candidates have not been evaluated.

A progress bar informs you of the cancellation status.
3.4 Cancel Event Example 2 – All candidates have not been evaluated.
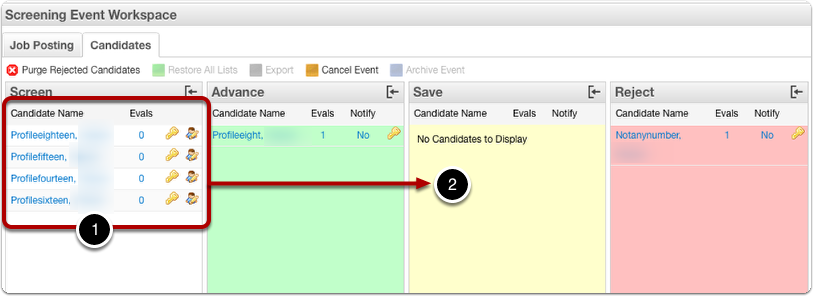
Notice that in the photo above:
Profileeight will receive the “Candidate Advancing Message.”
Profileeighteen, Profilesixteen, Profilefifteen, and Profilefourteen are on the Candidate Screening List. When the screening event is canceled, they are automatically moved to the “Save” list and will receive the “Save-for-Later” message.
Notmynumber will receive the “Candidate Non-Acceptance Message.”
3.5 Cancel Event Example 2 – All candidates have not been evaluated.

The candidates are moved to the Evaluated Candidates database. Their final placement on the lists during the screening event is indicated in the “Result” column of the Evaluated Candidates database display.
3.6 Cancel Event Example 2 – All candidates have not been evaluated.

The screening event shows “Cancelled” as the closing date
The Evaluated Candidates Database
17. Evaluated Candidates database.
The candidates and their screening event details are now saved in the “Evaluated Candidates” database. To view them, select the “Candidate Resources” tab and then select the “Evaluated Candidates” sub-tab.
17.1 Search and review candidates at a glance.
In the Evaluated Candidate database, you have quick access to review the relevant information on everyone you’ve screened. Let’s take a look at one of our candidates’ Candidate History. Each Candidate History can be accessed by clicking the “Candidate History” icon next to their name.
17.2 Candidate History – Candidate Info tab.
The Candidate History window has three tabs. The first tab is the “Candidate Info” tab, which contains all of the candidates’ most recent contact information. If the candidate has submitted multiple resumes, those documents are aggregated here.
17.3 Candidate History Window – Evaluations tab.
All of the candidates’ evaluations are aggregated on the “Evaluations” tab and can be sorted by date, result, or by the staff member who screened them.
17.4 Candidate History Window – Pointe AskMe™ tab
All of the candidates’ Pointe AskMe™ questions are aggregated on the “Pointe Ask Me™” tab. An important feature is that new questions can be initiated from here, making it simple to reconnect with previously screened candidates for further considerations.
17.5 Adjust candidate status.
You can easily change any candidate’s status in your database to keep your team in the know!
18. Pointe Savant® makes it easy.
That’s it! Pointe Savant® makes managing your screening events, creating interviews, evaluating candidates, and keeping excellent records easy!
This full help guide contains in-depth information about all of the functions. Please review it if you have questions or feel free to contact us!
Sorting and Finding Screening Events
After a screening event concludes, it may be necessary to review candidates, notes, recommendations, and outcomes later. Pointe Savant® has a “Restore All Lists” function that allows you to reconstruct your screening event lists to their last state before canceling or archiving the event.
1. Navigating to different screening events.
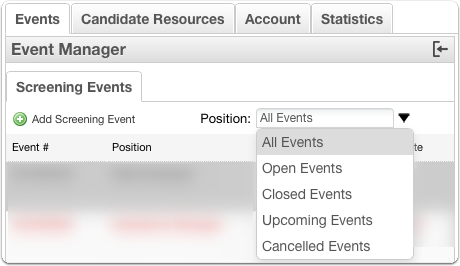
Navigating to your current or past screening events in Pointe Savant® is easy. Under the “Events” tab and the “Screening Events,” sub-tab is the “Screening Event List Filter” for the screening event list. You can use this drop-down menu to display one of the five choices exclusively.
1.1 Screening Event List Columns.

You can also sort your screening events by event number, position, opening date, or closing date.
1.2 Sort by event number.
Clicking the “Event #” label will toggle your events’ order by the screening event number. The blue triangle indicates
1. Sorting by descending screening event numbers.
2. Sorting by ascending screening event numbers.
1.3 Sort by position.
Clicking the “Position” label will toggle your events’ order by the name of the job title sought for the event. The blue triangle indicates
1. Sorting descending alphabetically (Z – A).
2. Sorting ascending alphabetically (A – Z).
1.4 Sort events by position sought.
Clicking the “Opening Date” label will toggle the order of your events by the opening date. The blue triangle indicates
1. Sorting by descending opening date (oldest screening events first).
2. Sorting by ascending opening date (newest screening events first).
1.5 Sort events by the closing date.
Clicking the “Closing Date” label will toggle the order of your events by the opening date. The blue triangle indicates
1. Sorting by descending opening date (oldest screening events first).
2. Sorting by ascending opening date (newest screening events first).
Restore All Lists and Exporting Screening Event Records
After a screening event concludes, it may be necessary to review candidates, notes, recommendations, and outcomes later. Pointe Savant® has a “Restore All Lists” function that allows you to reconstruct your screening event lists to their last state before canceling or archiving the event.
1. Restore All Lists
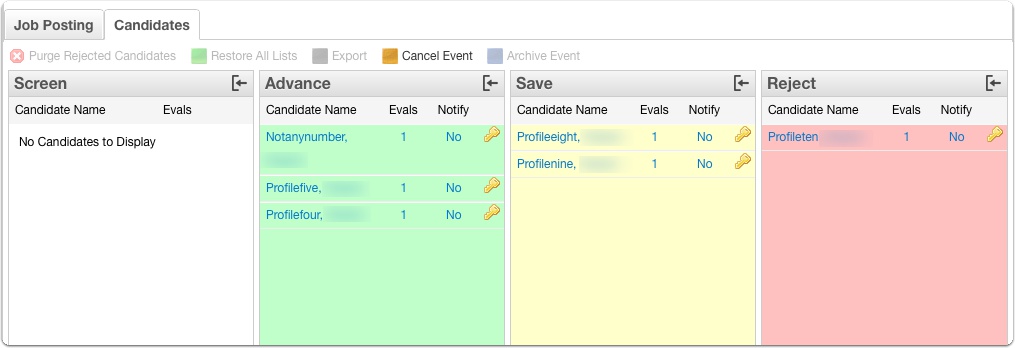
For this example, let’s use the screening event from our canceling event tutorial. The last state of our three lists before archiving or canceling the screening event is illustrated in the photo above.
1.1 Restore All Lists
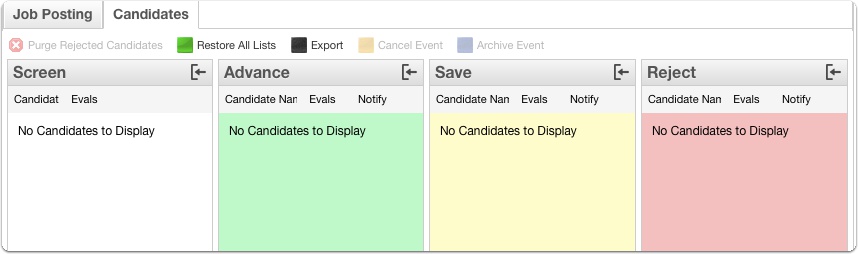
After the screening event has been canceled or archived, all participating candidates are moved to the Evaluated Candidates database.
If we select the event, all of the lists will be empty. We can restore the lists to their last state before canceling or archiving the event using the “Restore All Lists” function.
1.2 Restore All Lists

First, click the “Restore All Lists” button.
Note: This button/function is not available until a screening event has been canceled or archived.
1.3 Restore All Lists
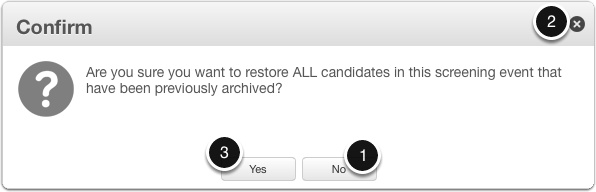
Confirm the “Restore All Lists” action.
1. To cancel, click “No” or
2. Click the “X” in the top right corner of the box.
1.4 Restore All Lists
The system retrieves the records from the event and loads the lists.
1.5 Restore All Lists
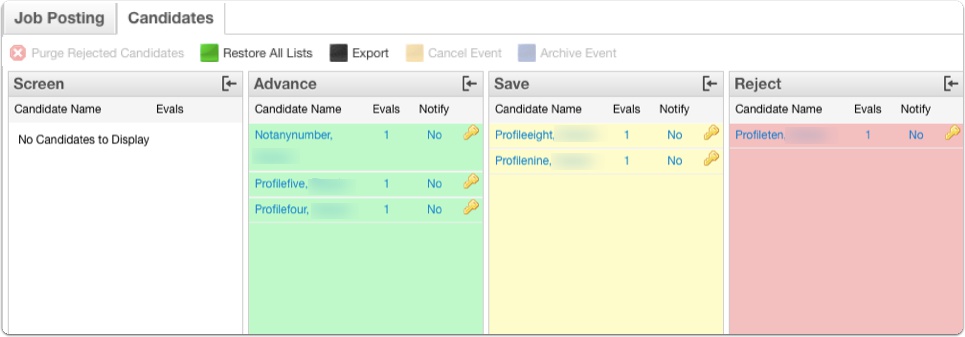
2. Exporting Screening Event Records
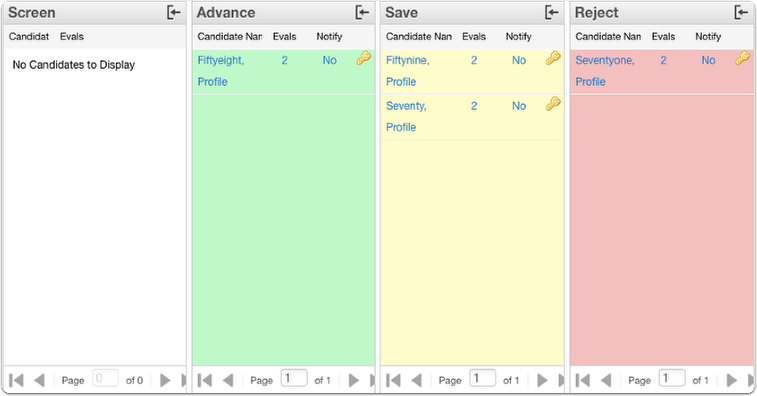
Generating a PDF document for each screening event in Pointe Savant® is easy. For this tutorial, we’ll use the final state of a screening event in the photo above.
2.1 Restore All Lists

First, click the “Export” button.
Note: This button/function is not available until a screening event has been canceled or archived.
2.2 Exporting Screening Event Records
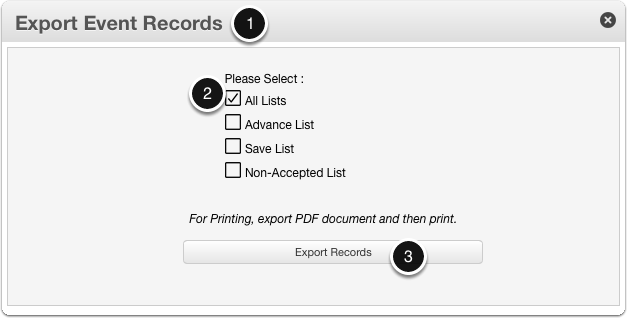
1. The “Export Event Records” window opens. Here, you can select which list(s) from the screening event for which you would like to generate a PDF document.
2. In this example, we’ll generate a PDF document containing all of the lists. We make our selection and
3. Click the “Export Records” button.
2.3 Exporting Screening Event Records
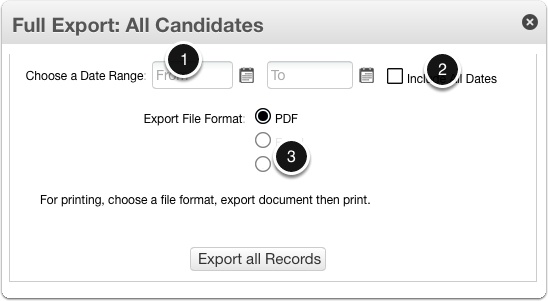
The export date selector window opens.
1. You can select a range of dates (within the 30 day period the screening event was open) or
2. you can include all of the files for all of the dates of your event.
3. PDF is currently the only export format (others will be coming soon)
2.4 Exporting Screening Event Records
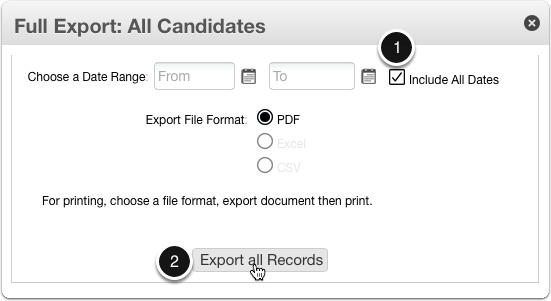
1. For this example, we’ll select “Include All Dates” and
2. click the “Export all Records” button.
2.5 Exporting Screening Event Records
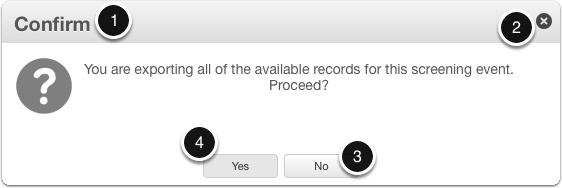
1. A “Confirm” dialog box opens.
2. To cancel the export click the “X” in the top right corner of the box or
3. click the “No” button.
4. To proceed with the export, click “Yes.”
2.6 Exporting Screening Event Records
A new tab or window opens, displaying a PDF file of the screening event. The first page will look similar to the photo above. It contains all of the screening event details as entered, including the messages created for the automated notifications.
2.7 Exporting Screening Event Records
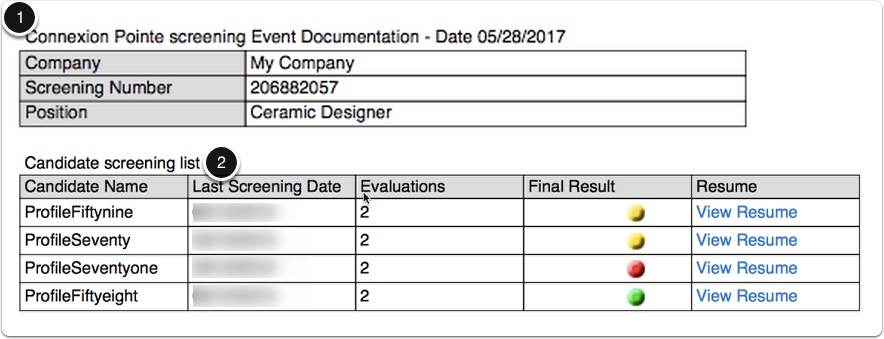
The next page will contain
1. a summary description of the event – the company name, screening event number, and the position.
2. A list of all of the participating candidates on the candidate screening list, the final result of their screening, and a link to view their resume in a new tab or window.
2.8 Exporting Screening Event Records
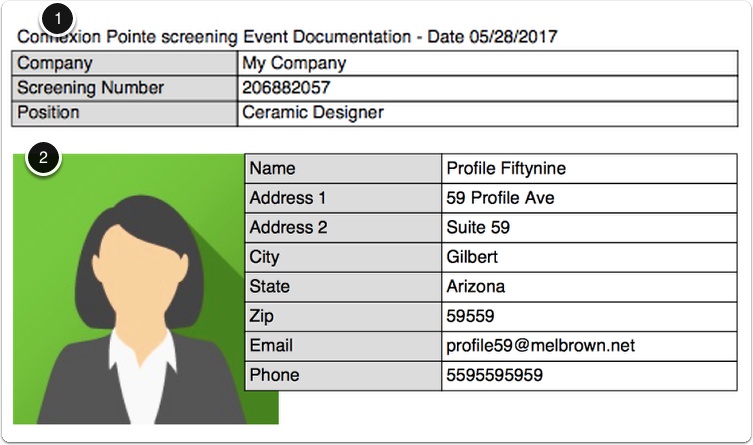
The next page will also contain
1. the screening event summary at the top,
2. and it will have the primary contact information of the first candidate on the Candidate Screening List.
2.9 Exporting Screening Event Records
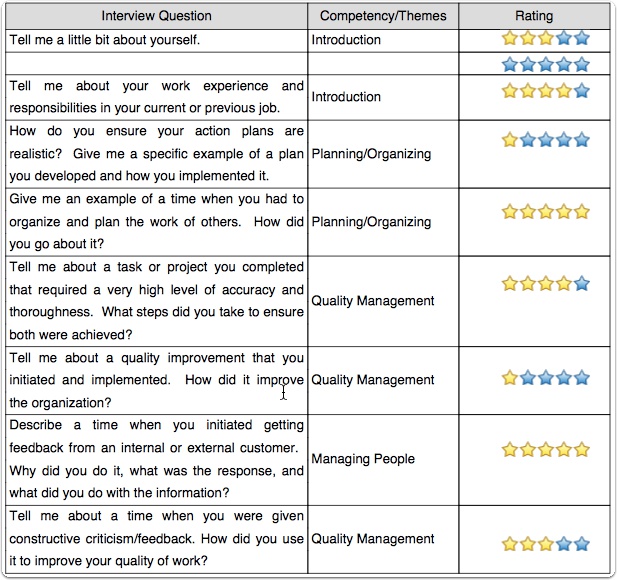
Following the candidate’s basic contact information, there will be a separate page for each evaluation of that candidate made during the event.
2.10 Exporting Screening Event Records
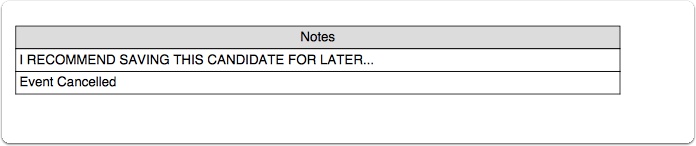
Following the evaluations, pages are displaying all of the notes entered regarding the candidate. This process repeats to show all of the candidates participating in the screening event.
2.11 Exporting Screening Event Records
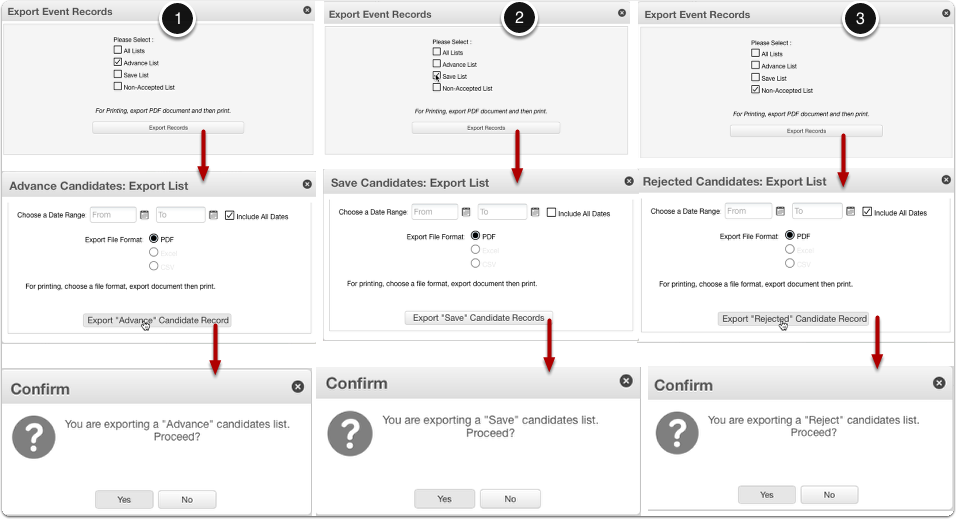
Files can be exported to illustrate each list individually. The steps are the same as exporting all lists.
1. Illustrates the selections to be made to export a PDF of the Advance list.
2. Illustrates the selections to be made to export a PDF of the Save list.
3. Illustrates the selections to be made to export a PDF file of the “Reject” list.
The resulting file will follow the same format as exporting all lists, except that the summary of candidates’ results and candidates displayed will be limited to the list selected.
Open Submissions Database
The Connexion Pointe® platform offers candidates the ability to create job-related screening interviews that can be shared with organizations. We’ve demonstrated how candidates can submit their interviews for screening events; now, we’ll cover how you can accept Pointe Profile® interviews – even if you’re not currently screening. When a candidate sends you a link that’s not related to a current screening event, we refer to it as an “Open Submission.”
1. Step-by-Step: Open Submissions

An interested candidate sends you a Pointe Profile® link. It could be via email, text, or in a resume, etc. (If you are already logged in to your Pointe Savant® account, go to step 1.5)
1.1 Pointe Profile® Gateway | Sign IN
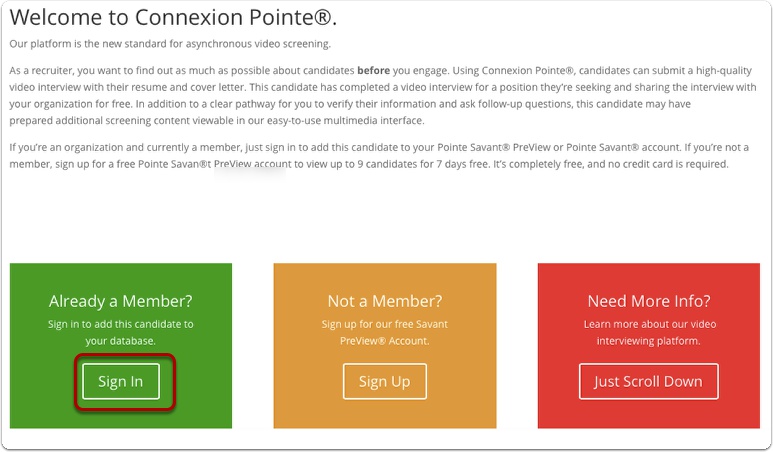
If you are already logged in, please skip to step 1.5 and follow the steps from there. If you are not logged in when you click the link (or copy it into your browser), you’ll be directed to the Pointe Profile® Gateway. Since you already have a Pointe Savant® account, you’ll click the “Sign In” button in the green square.
1.2 Pointe Profile® Gateway | Sign IN
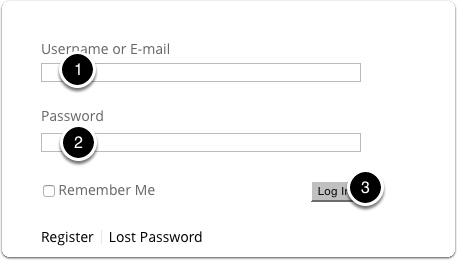
1. Enter your username.
2. Enter your password.
1.3 Pointe Savant Login | Launch Application

1.4 Pointe Savant® Business Dashboard
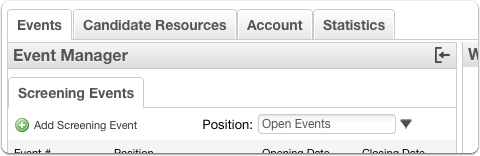
The main Pointe Savant® window opens.
1.5 Candidate Resources Tab
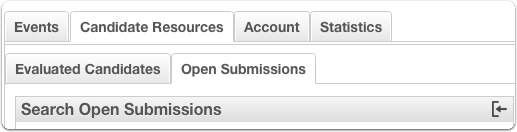
Click the “Candidate Resources” tab, and then click the “Open Submissions” sub-tab.
1.6 Open Submissions Database
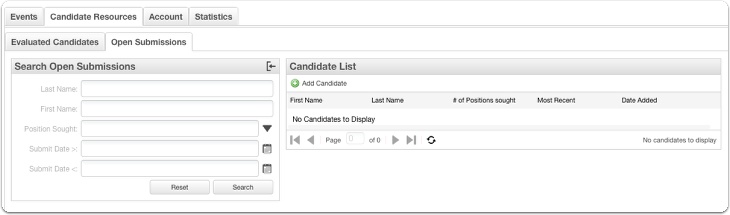
This is the “Open Submissions” database. Here is where you’ll be able to store all the Pointe Profile® links you collect between your active screening events. I’ll show you how to add a candidate to this database now.
1.7 Pointe Savant® PreView Submissions are here.

Note: If you upgrade to Pointe Savant® from Pointe Savant® PreView, the candidates you added to your Pointe Savant® PreView dashboard will be found here in the Open Submissions database.
2. “Add Candidate” button.
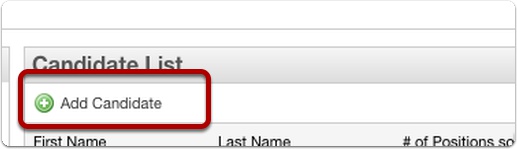
Just below the “Candidate List” window label, you’ll see the “Add Candidate” button. Click it.
2.1 Add Candidate Window
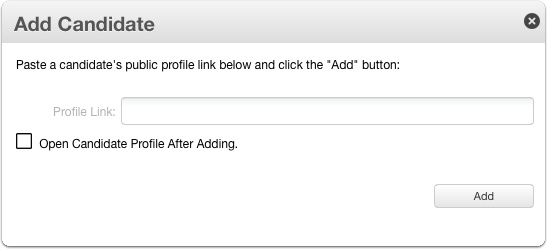
The “Add Candidate” window opens with on-screen instructions.
2.2 Add Candidate Window
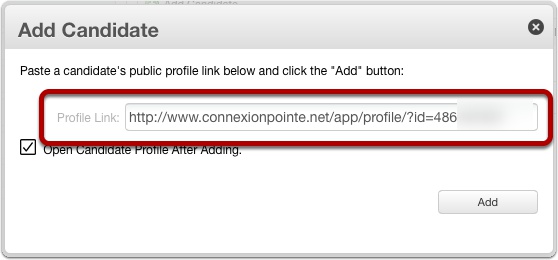
Paste the Pointe Profile® link in the field.
2.3 Add Candidate Window
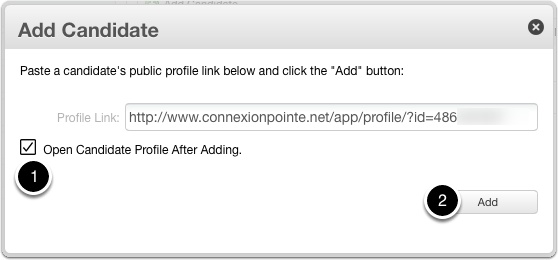
1. If your database has many candidates, you may want to click the “Open Candidate Profile After Adding” checkbox. This will save you the time of searching for the candidate’s name.
2.4 Add Candidate Window
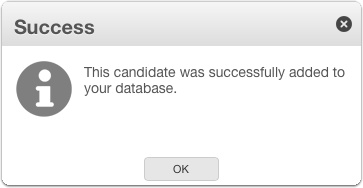
The system confirms that your new candidate has been added.
2.5 Add Candidate Window
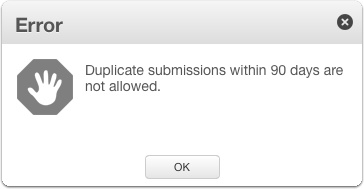
At Connexion Pointe®, we know how easy it for candidates to go online and click their way into your workload. Pointe Savant® monitors your open submissions and doesn’t allow duplicate submissions for 90 days.
2.6 Add Candidate Window
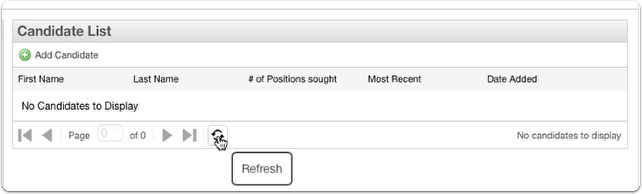
The “Add Candidate” window closes. To update the candidate list, click “Refresh.”
3. Open submissions candidate list.

The candidate’s name will appear in the list.
3.1 Open submissions candidate list.
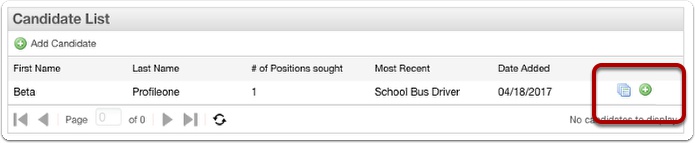
There are two icons next to each candidate on your list.
3.2 View Candidate’s Open Submission Records

The first icon is the “View Candidate Submission Records” button. Go ahead and click it now.
3.3 Open Submissions Candidate History
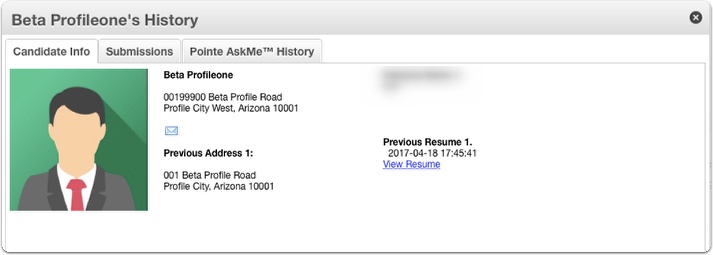
The Open Submissions Candidate History window opens. It has three tabs – “Candidate Info,” “Submissions,” and Pointe AskMe™ History.
The first tab is the candidate’s primary contact info, and a link to view open their resume in a new browser tab or window.
3.4 Open Submissions Candidate History
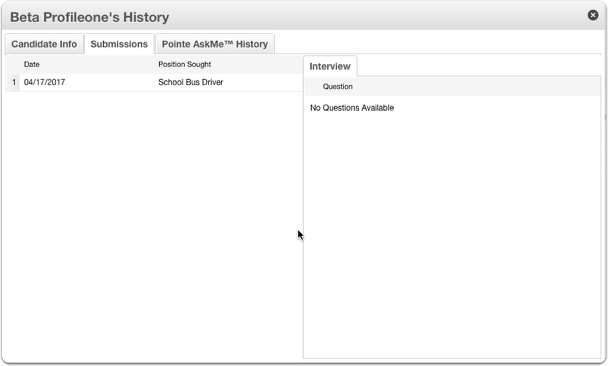
The second tab is a list of the candidate’s open submissions added to your database. In the photo above, this candidate has made one open submission for a School Bus Driver position.
3.5 Open Submissions Candidate History

Click on one of the submissions to view which interview questions the candidate answered.
Note: You must add the candidates to an open screening event to view their video responses to the interview questions. I’ll show you how to do that now.
4. Add Candidate to Open Screening
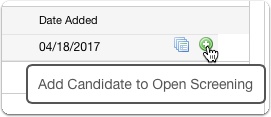
The second icon next to each candidate’s name in the open submissions candidate list is the “Add Candidate to Open Screening” button. Here’s how it works.
4.1 Add Candidate to Open Screening
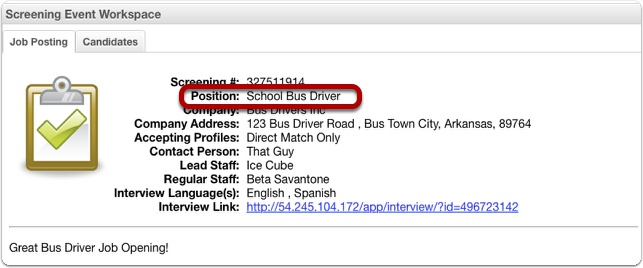
Let’s assume that your company decides to hire a school bus driver. You create the screening event in Pointe Savant®
4.2 Add Candidate to Open Screening
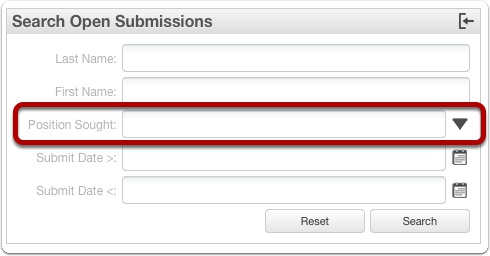
You’d like to leverage your previous screening activity against your current workload for this screening event. To do this, you can search the “Open Submissions” database (before you distribute your link) to see if any suitable candidates have previously contacted you about this position.
4.3 Add Candidate to Open Screening
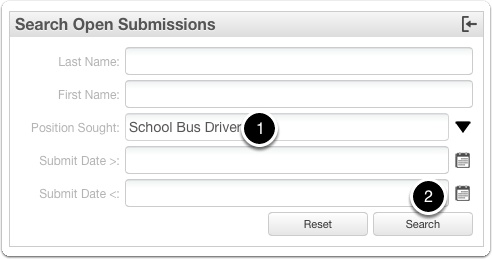
1. You could start by entering the job title in the “Position Sought” field
4.4 Add Candidate from Open Submissions
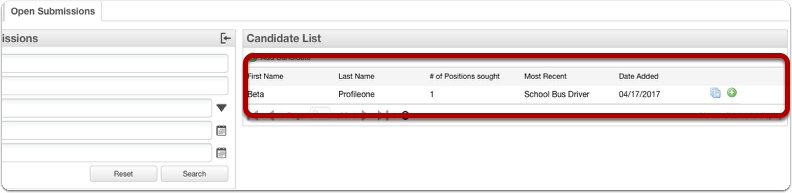
Any candidates looking for this position would appear on the list.
4.5 Add Candidate from Open Submissions
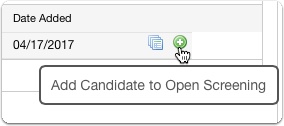
Now we’ll need to add the candidate to the open screening event for “School Bus Driver.”
Click the “Add Candidate to Open Screening” button next to the candidates’ name.
4.6 Add Candidate from Open Submissions
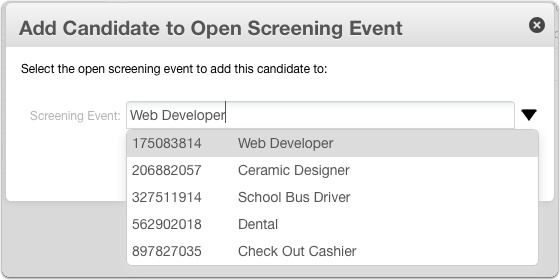
A list of your currently open screening events appears.
4.7 Add Candidate from Open Submissions
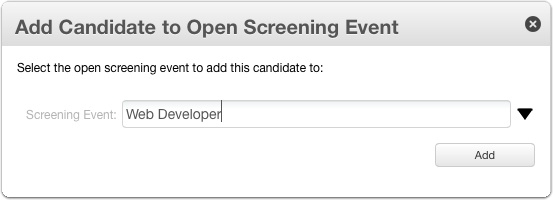
Candidates must be eligible to be added to any particular screening event. For example, if you tried to add our bus driver to the open screening event for “Web Developer” by clicking “Add,”
4.8 Add Candidate from Open Submissions
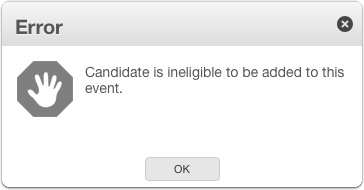
Pointe Savant® will alert you that the candidate is ineligible to be added to this event.
Note: To understand the eligibility criteria, please review the”Accept Profile Settings” section.
4.9 Add Candidate from Open Submissions

1. Select “School Bus Driver” from the drop-down list.
4.10 Add Candidate from Open Submissions
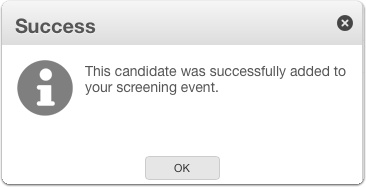
The system confirms that your candidate was successfully added to the open screening event.
4.11 Add Candidate from Open Submissions

Since the candidate’s open submission was added to a screening event, the candidate’s open submission for the position is removed from the Open Submissions database.
4.12 Add Candidate from Open Submissions
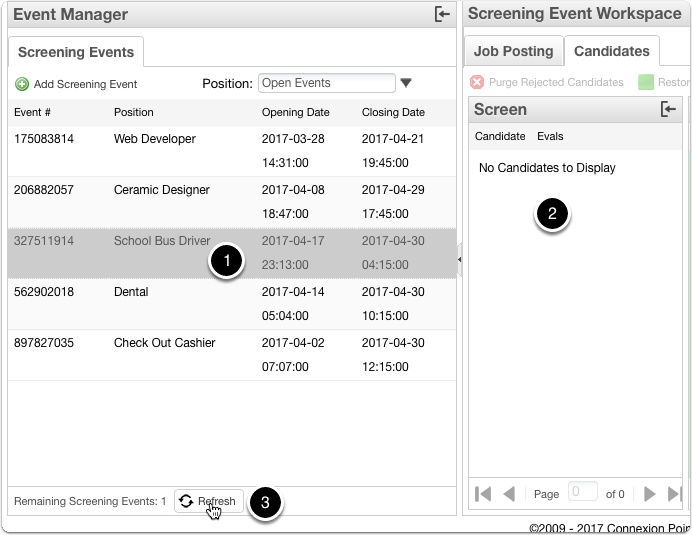
1. To evaluate this candidate, navigate to the “Events” tab and select your screening event.
2. The candidates’ names should appear in the Candidate Screening List for the event.
3. If it does not appear, click the “Refresh” button at the bottom of the window.
4.13 Add Candidate from Open Submissions
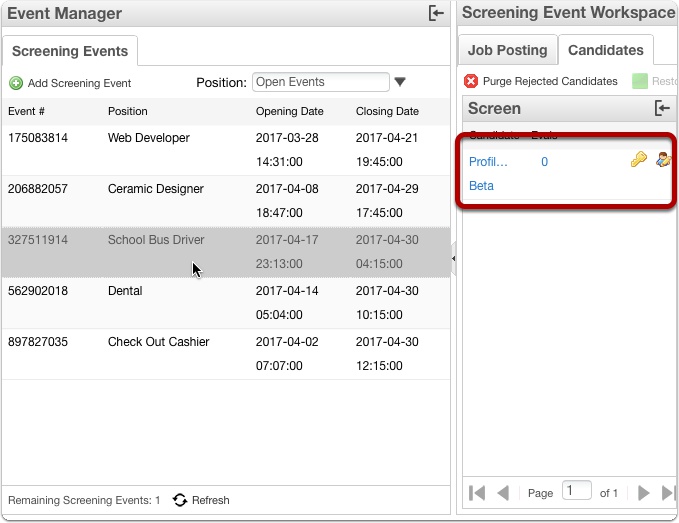
The candidates’ name appears. An “Open Submission” is treated the same as a BYOI from the candidate, so the candidates’ name appears in the BLUE text.
4.14 Add Candidate from Open Submissions
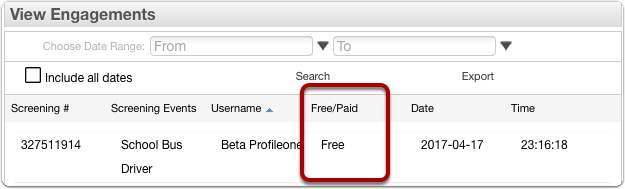
The system also records the submission as “Free” in the View Engagements window.
4.15 Add Candidate from Open Submissions
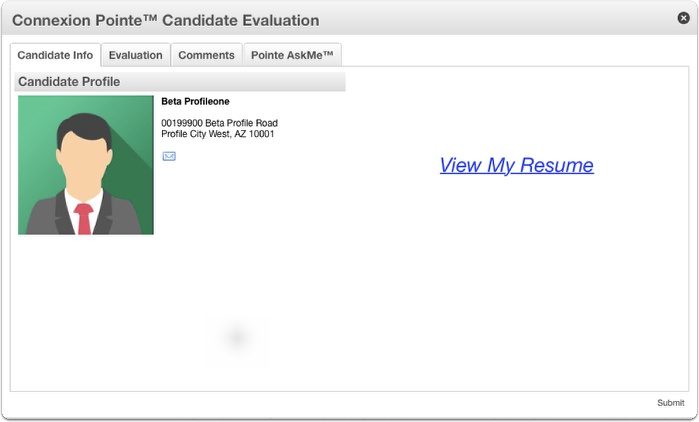
From this point, the candidate can be evaluated just like every other participant in your screening event.
Pausing Your Pointe Savant® Subscription
Quite often, there are many businesses not needing to screen new candidates continually. They may screen once per quarter, or twice a year, etc. Pointe Savant® allows you to pause your subscription to fit your screening calendar and keep costs down. While the subscription is paused, no monthly fees are charged. When you’re ready for screening again, just log in, pay the current fee for the month, and start screening again. All of your previous records are saved and still available for use.
1. Staff can not manage your account.

It should be noted that staff members added to your account do not have access to account information or payment methods. The added staff does not have access to any of the Manage Account functions, so the account owner must handle these activities.
2. Pausing your Pointe Savant® subscription.

To pause your account, log in and click the “Manage Account” link.
2.1 Pausing your Pointe Savant® subscription.
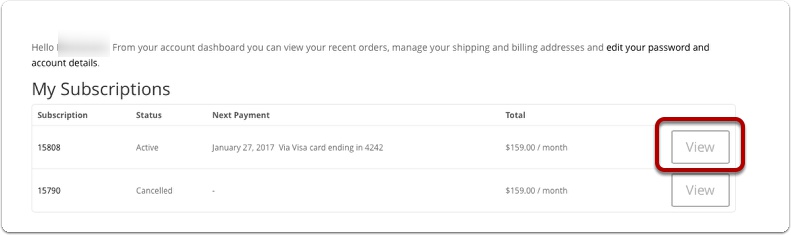
You’ll be directed to the “My Subscriptions” page, where you can view the details of your subscription and your past invoices.
Click the “View” button next to your most recent invoice.
2.2 Pausing your Pointe Savant® subscription.

The account status page opens. There are three buttons on the “Actions” line.
2.3 Pausing your Pointe Savant® subscription.
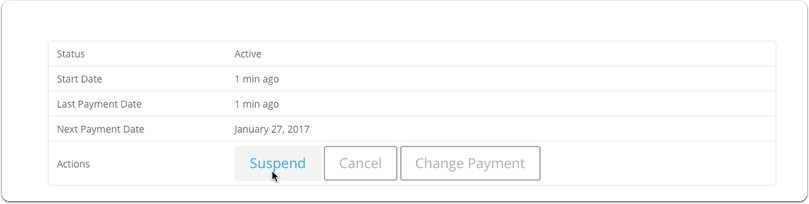
Click the “Suspend” button to suspend your account.
2.4 My Account | On Hold
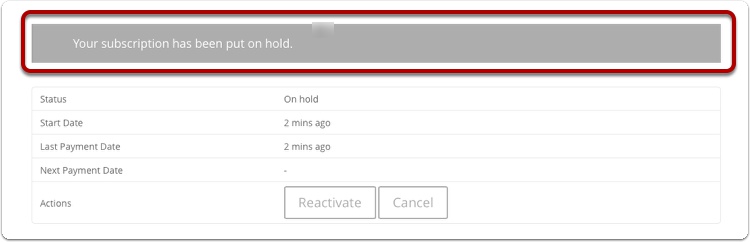
You’ll see a message that your account has been placed on hold. As long as the account is on hold, you will not be automatically charged a subscription fee on your next billing date or after that. You can reactivate the account BEFORE your next billing date for no additional fee, and then you will be billed on your billing date as usual.
3. Reactivating your Pointe Savant® account.
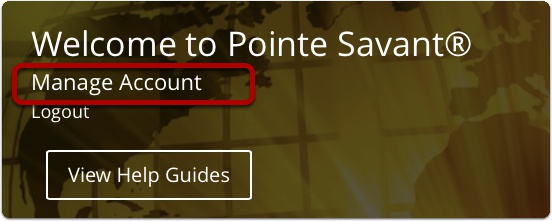
The next time you log in, you’ll notice that the “Launch App” button is no longer available. To gain access to the application again, you must reactivate your account. Again, click the “Manage Account” link.
3.1 Reactivating your Pointe Savant® account.
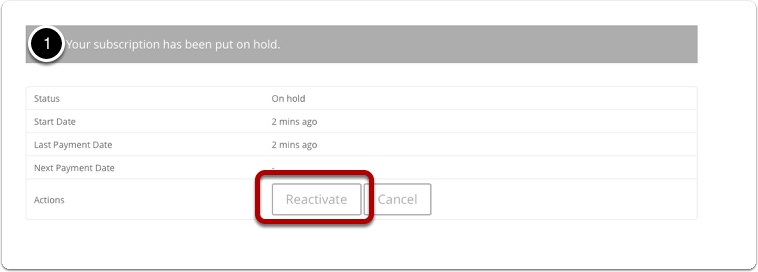
The account status page opens. There are now two buttons on the “Actions” line.
1. You’ll see the notice that you’re account has been put on hold.
2. Click the “Reactivate” button to make your subscription active again.
3.2 Reactivating your Pointe Savant® account.
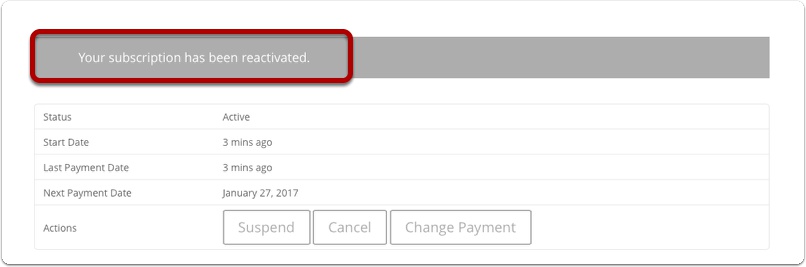
If your account were on hold when your billing date passed, you’d be prompted to pay the current monthly subscription fee – no fee is assessed for the time the account was on hold.
Note: Monthly subscription fees will not be prorated for paused accounts.
4. Canceling your Pointe Savant® subscription.

Pointe Savant® users can cancel their account by logging in and clicking the “Manage Account” button
4.1 Cancelling your Pointe Savant® subscription.

The account status page opens. There are three buttons on the “Actions” line.
4.2 Cancelling your Pointe Savant® subscription.
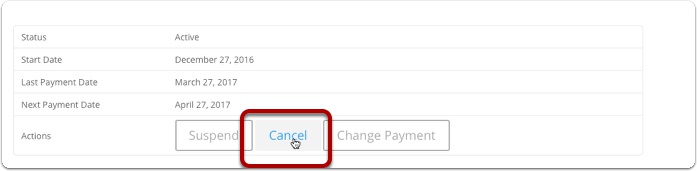
To cancel your Pointe Savant® account, click the “Cancel” button.
Video interviews from your account are available by request for a fee. You must provide a suitable hard drive for the transfer.
4.3 Pending Cancellation
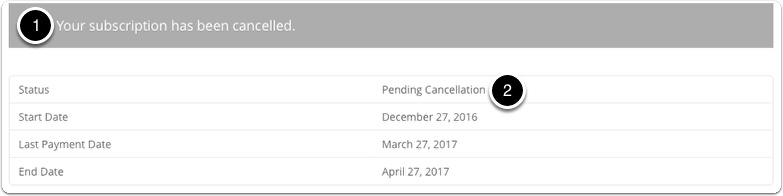
1. The notice of your action is displayed here.
2. The status of your account is changed to “Pending Cancellation.” This means that you’ll still have access to the Pointe Savant® application until the end of your current billing period.
4.4 Pointe Savant® account canceled.
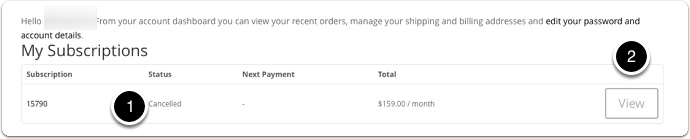
1. At the end of your current billing period, you will not be charged a subscription fee, and your account status will change to “Cancelled.” After this time, you will no longer have access to the Pointe Savant® application. To resubscribe, click the “View” button next to your most recent invoice.
5. Resubscribing to your Pointe Savant® account.
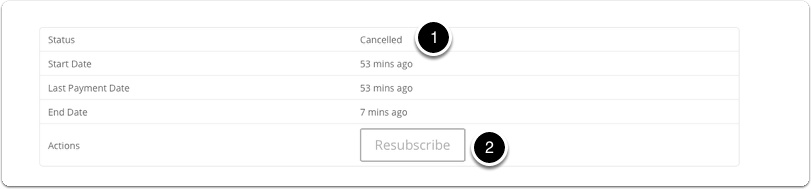
1. The account status window opens, indicating your account is canceled.
2. You can resubscribe to the same account by logging in and clicking the “Resubscribe” button.
5.1 Resubscribing to your Pointe Savant® account.
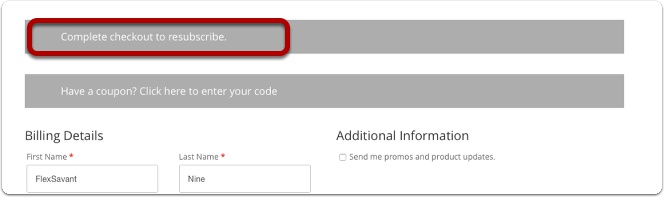
You’ll be prompted to update your billing details and complete the checkout to reinstate the subscription.
5.2 Resubscribing to your Pointe Savant® account.
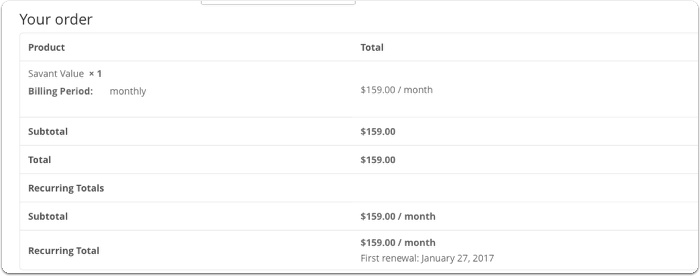
The description of your order can be viewed before finalizing the purchase.
5.3 Resubscribing to your Pointe Savant® account.

Accept the terms and conditions, and click the “Continue to payment” button.
5.4 Welcome to Pointe Savant™ | Connexion Pointe®
After a successful transaction, The Welcome to Pointe Savant® page appears, and then you’re redirected to the login page.