Connexion Pointe® Online Help
Pointe Savant® PreView User’s Guide

What is Connexion Pointe®
So what is Connexion Pointe®? How does it work? Why should candidates use it? Why should organizations use it? Here is an overview.
1. What is Connexion Pointe®?

Welcome to the new standard in cloud-based video screening. Connexion Pointe® is a cloud-based video screening tool for recruiters that also features a self-service video interviewing tool for candidates. Our platform has two coordinated applications: Pointe Savant® is for recruiters, and Pointe Profile® is for candidates.
Experts suggest that 70-85% of positions are filled through networking. Connexion Pointe® is designed to support fast screening from networking activity. This is why both of our applications feature a tool for creating and sharing asynchronous video interviews. Recruiters or candidates can initiate the screening process, recruiters can follow up, and everyone can get to a decision quickly.
1.1 Pointe Profile® is for candidates.

Pointe Profile® is our self-serve interviewing tool for candidates. In addition to creating and sharing asynchronous video interviews, Pointe Profile® features tools for candidate self-development with an emphasis on behavioral and video interviewing, delivering other screening-related video content to Pointe Savant® users, and responding to their follow-up questions. Pointe Profile® provides candidates the best answer for automated Applicant Tracking Systems – networking and connecting with decision makers!
Pointe Profile® has a $1 sign-up fee and is otherwise free for life. The $1 fee is waived when candidates are invited to take an interview created by a Pointe Savant® user.
1.2 Pointe Savant® is for recruiters, businesses, and organizations.

Pointe Savant® is our recruiter/organizational application. In addition to creating and sharing asynchronous video interviews, Pointe Savant® features tools for managing online screening events, candidate evaluation, asking follow-up questions, and a robust database for managing video interviews submitted by Pointe Profile® users.
Pointe Savant® requires a monthly subscription for access to the service. An additional per-interview charge can be mitigated by allowing candidates to create and submit their own interviews.
Note: Pointe Savant® is not an automated-candidate-selection device! It does not contain a resume parser or technology to rank candidates via keyword-search or algorithm automatically, and it is not a replacement for real recruiters and hiring managers! Instead, Pointe Savant® is explicitly designed to help them maximize their valuable experience to screen a lot more candidates quickly.
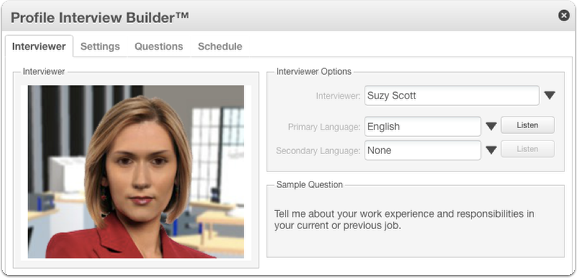
1.3 Meet our virtual characters.
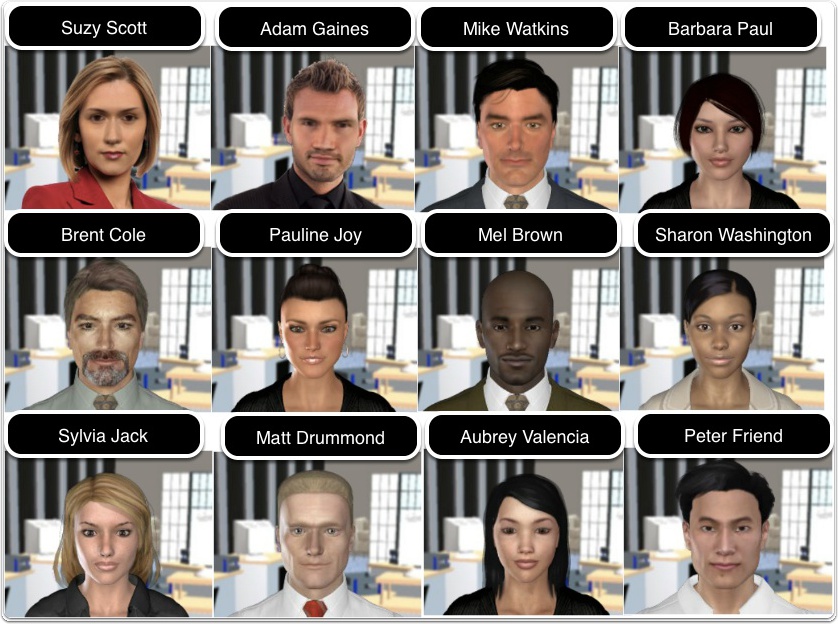
Our platform features multi-lingual virtual interviewers that are available 24/7/365 to simulate face-to-face interviews, keeping decision makers free to focus on evaluating excellent candidate content.
1.4 How does it work?

Our system generates a link for each screening interview created. The link can be shared via email, resume or even posted on a job board.
Recruiter or candidate functionality is activated depending on the application used to create the interview.
2. Why should candidates use it?

With Pointe Profile®, candidates no longer have to wait for recruiters to start the screening process. Candidates can begin the screening process by interviewing themselves, sharing their interview with targeted recruiters users and providing a clear pathway for verifying the screening content presented. This creates a unique opportunity to stand out by lowering recruiters’ workload and costs without sacrificing quality. This also creates a strong incentive for recruiters to take a look.
3. Why should recruiters use it?

Until now, the screening process was a one-way street that began with organizational outreach or recruiters screening for talent. Organizations paid most of the costs associated with screening and faced the logistical challenges of screening growing online candidate pools. With Pointe Savant®, recruiters can deploy asynchronous video interviews using our virtual army of multi-lingual interviewers capable of screening hundreds of candidates per hour and delivering the content to an easy-to-use online interface designed to help hiring teams make decisions quickly. Furthermore, inbound candidates can present themselves with excellent video screening interviews already done, efficiently leveraging their ambition to lower recruiters’ workload and screening costs.
As previously stated, Pointe savant® requires a monthly subscription for access to the service, and there is an additional per-interview charge. Mitigating the per-interview cost is easy because Pointe Savant® features the ability to accept candidate generated interviews and information.
3.1 What do you mean by “accept candidate generated interviews”?
Candidate generated interviews are interviews created by candidates at in the Pointe Profile® application. The interviews are created at candidates’ discretion and not always at the behest of recruiters. The candidate chooses the questions and can support the interview with additional video-based content.
4. How can Pointe Profile® interviews be useful if recruiters are not selecting the questions?

An excellent question!
The key is in how the interviews are created. The 800+ job titles in our Pointe Savant® Screening Event Builder™ and Pointe Profile® Interview Builder™ applications are based on the United States Standard Occupational Code. We’ve created recommendations for soft skills for many of these job titles (and we’re building more as you read this).
This is important for a few reasons:
1. It gives everyone a similar starting point for building screening interviews,
2. It standardizes an organizationally acceptable format for the exchange of screening information,
3. It provides an easy-to-use automated framework for expanding your candidate pool to include similar job titles.
4.1 Competency-Based Interviews
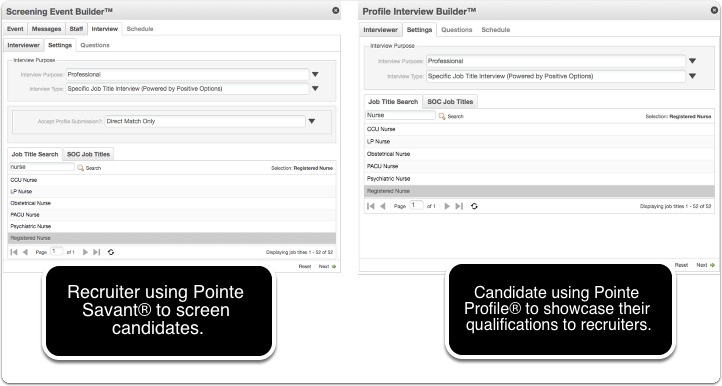
For this example, let’s use the job title of Registered Nurse. In the photo above, the Pointe Savant® user (on the left) is a hospital/recruiter looking to hire a Registered Nurse. The Pointe Profile® user (on the right) is a Registered Nurse looking for a position. They both log in to their respective applications and begin creating a screening interview for the Registered Nurse position.
4.2 Same starting point: everyone answers the same introductory questions.

The first two questions of the interview are the same, regardless of which application created the interview. These questions cannot be re-ordered, removed, revised or replaced. Each question offers every candidate an equal 2-minute opportunity to introduce themselves and lay claim to their desired position while giving hiring managers complete control over how much of the interview they review.
4.3 Standardized format: Competency-based behavioral interview questions
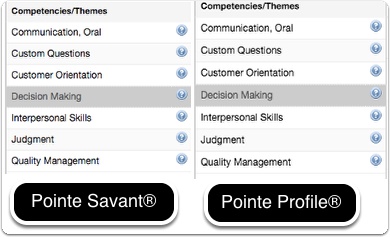
After selecting a job title, both of our interview builders present the same list of Competencies/Themes to each user.
4.4 Competency/Themes Definitions
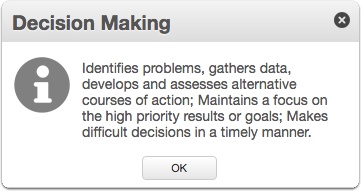
Each of these Competencies/Themes defines a job-relevant “soft-skill” for the position. Let’s use “Decision Making” for our example.
4.5 Question selections.
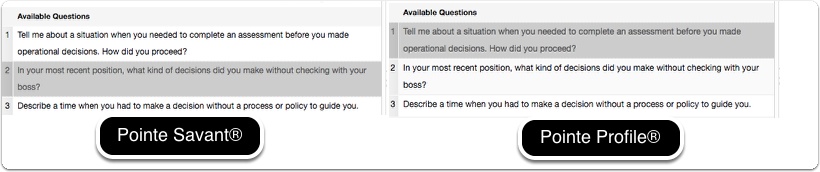
Even if the Pointe Savant® user chooses question #2 in this category, but the Pointe Profile® prefers question #1, both questions are job-related and directly relevant to an essential soft skill (Decision Making) for the position. The Pointe Savant® users’ time is not wasted, and they can still ask their preferred question as a follow-up using Pointe AskMe™.
4.6 An easy-to-use automated framework for expanding your candidate pool.
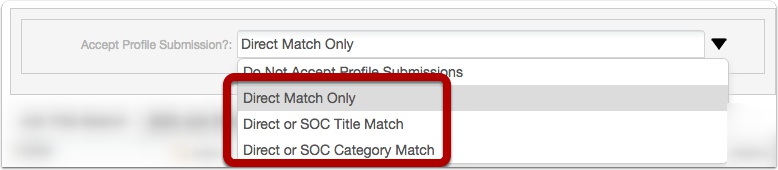
In addition to matching Competency/Themes, Pointe Savant® Screening Event Builder™ features an easy-to-use tool that allows recruiters to expand the candidate pool by accepting similar job titles from other SOC categories. (Using this feature is easy, and there is a full step-by-step tutorial in our help guide).
4.7 Different job titles may have similar competencies/themes.
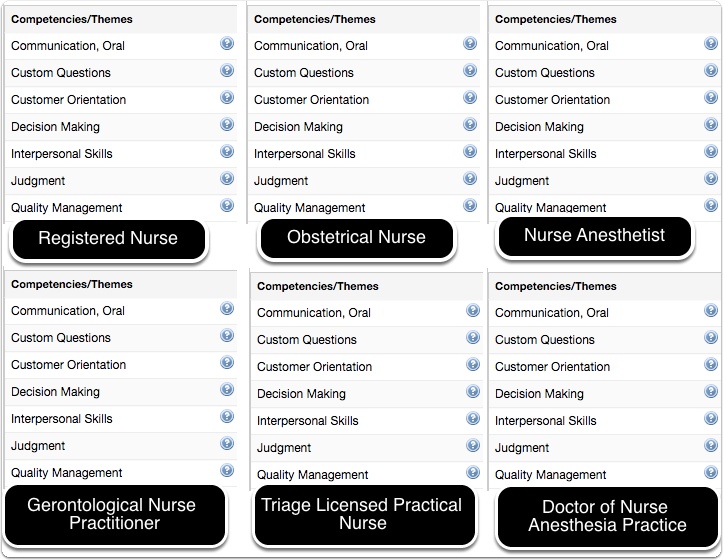
Even though some Pointe Profile® users in the expanded candidate pool will have different job titles, the overall Competencies/Themes for screening are remarkably similar. This gives Pointe Profile® users the ability to be considered for multiple positions with the same interview while hiring managers can increase their candidate pool without changing the specific focus of their screening event.
For many recruiters, screening questions become more organizationally specific as candidates advance through screening processes. Connexion Pointe® platforms natively support this practice. Everybody is on the same page before the first contact is made.
I’ll show you how the system works now 🙂
Getting Started
Getting started with Pointe Savant® PreView is easy!
1. Pointe Profile® Interview Link

Everything starts when a candidate includes a link like this one in their resume or cover letter. They may also forward this link to you in an email or include it in their online application.
2. Pointe Profile® Gateway
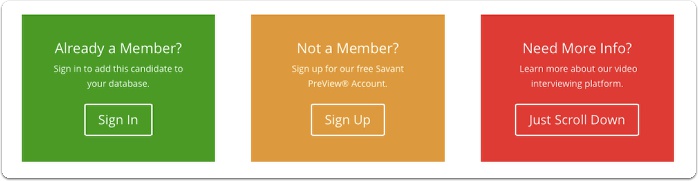
Clicking the link directs you to the Pointe Profile Gateway®, where you can sign in, sign up, or learn more.
3. Pointe Savant® PreView sign up page
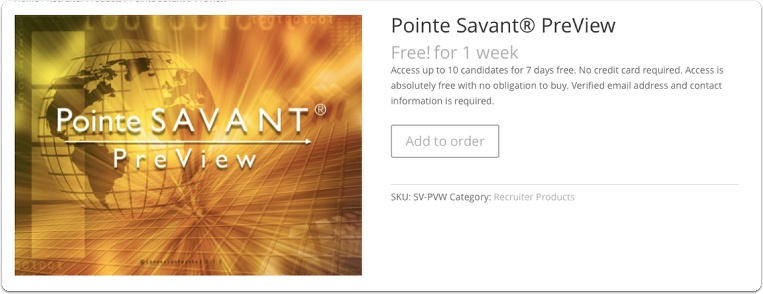
When you sign up, you’ll gain access to our free Pointe Savant® PreView application. Here, you can add up to 9 candidates to your account to screen for up to 7 days. Get started by clicking the “Add to order” button, fill out the form, and accept the Terms & conditions. No credit card is necessary.
3.1 Welcome to Pointe Savant® PreView | Connexion Pointe®

After you sign up, you’ll see this welcome page.
3.2 Welcome to Pointe Savant® PreView | Connexion Pointe®
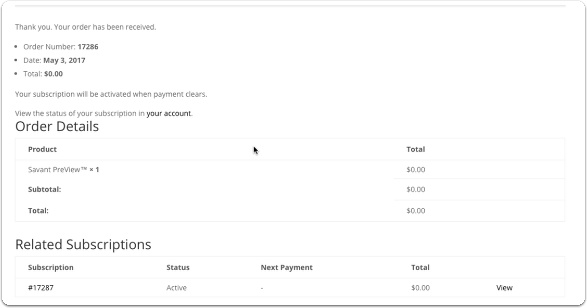
Your order details will appear at the bottom of the welcome page. These details are also sent to the email address provided.
3.3 Welcome to Pointe Savant® PreView | Connexion Pointe®
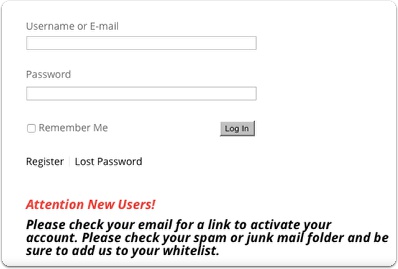
After 20 seconds, you’ll automatically be redirected to the login page.
4. Activate your account.

To access the application, you’ll need to activate your account. Check your email and find the message with “Activate your Connexion Pointe® account” in the subject line.
4.1 Activate your account.
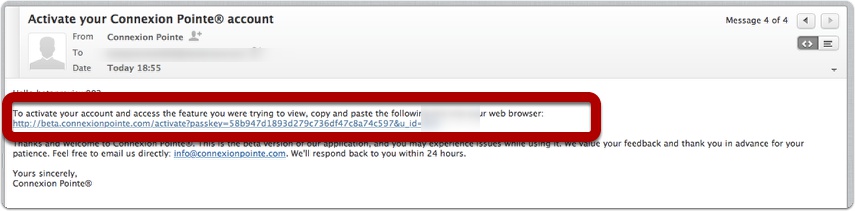
Locate and click the activation link.
4.2 Activate your account.

5. Add Candidate Window

When the application launches, you’ll be prompted to add a Pointe Profile® interview link to the Pointe Savant® PreView dashboard.
Adding Candidates and Viewing Candidate Data
1. Add Candidate Window
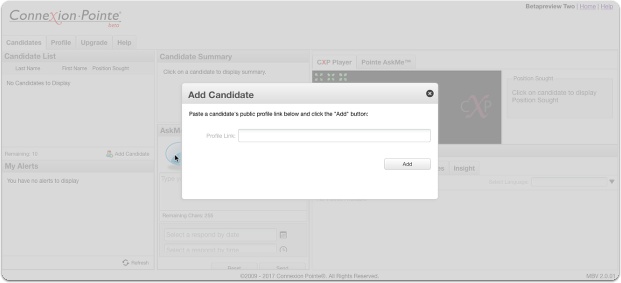
When the application launches, you’ll be prompted to add a Pointe Profile® interview link to the Pointe Savant® PreView dashboard. This prompt will return every 15 seconds.
1.1 Adding a candidate.
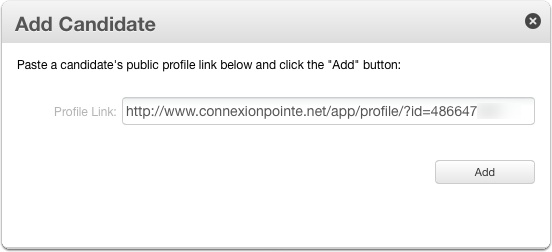
1. Copy and paste the Pointe Profile® interview link into the field provided, and
1.2 Adding a candidate.
If the link is still active, access is granted to the Pointe Savant® PreView dashboard.
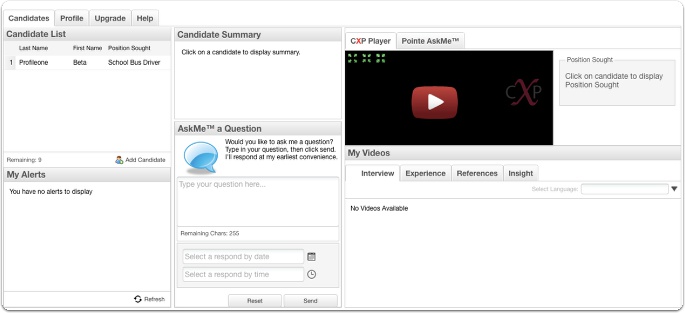
1.3 Pointe Savant® PreView Dashboard.
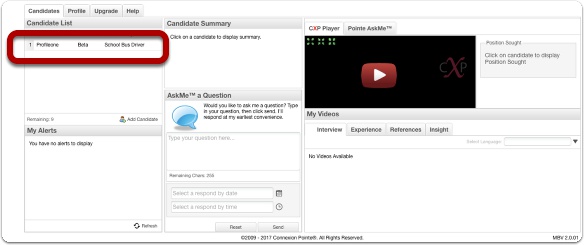
The Candidate List pane appears in the upper left corner of the central dashboard, and this is where the added candidate’s name appears.
1.4 Viewing Candidate Data
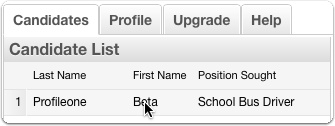
To view candidate data, click the candidate’s name in the Candidate List pane.
1.5 Viewing Candidate Data
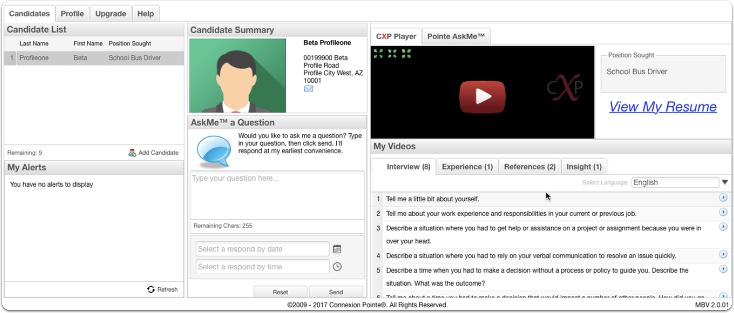
The dashboard loads and displays the candidate’s data. Let’s take a look at what’s displayed and some of the other functions available.
1.6 Candidate Contact Info
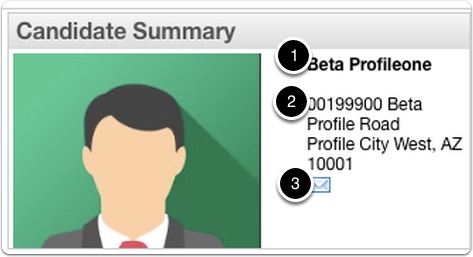
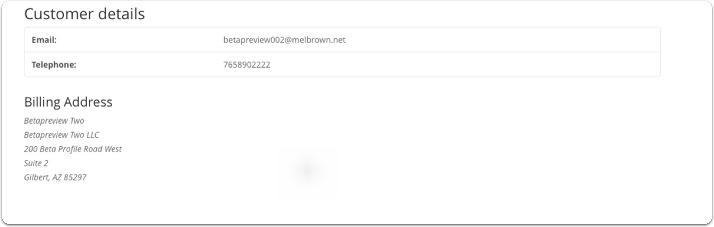
The “Candidate Summary” pane displays the candidate’s contact information:
1. Name and
2. address is presented
3. There’s an email button that can be used to send an email to the candidate.
Note: The email function calls the default email client on the host computer. Emails are not sent, nor are responses to those emails received on Connexion Pointe® servers.
1.7 CXP Player and Media Center
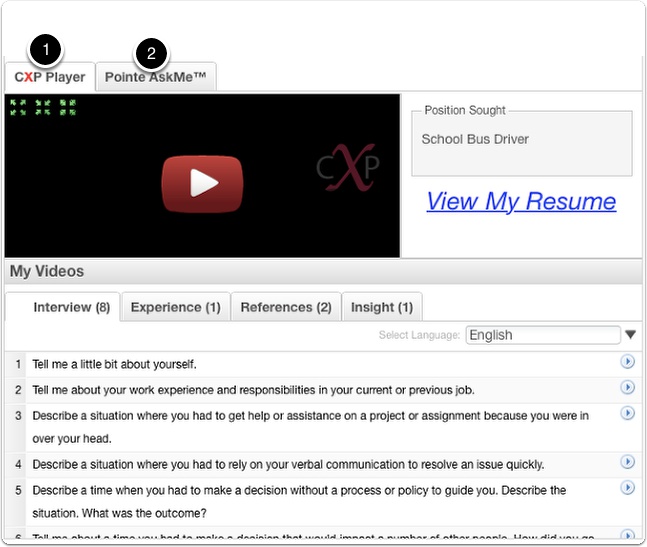
The two tabs pictured above are home to the limited but powerful screening functions of Pointe Savant® PreView.
1. The “CXP Player” tab is where video content submitted by the candidate can be viewed.
2. The “Pointe AskMe™” tab is where follow-up questions can be directed to the candidate, and their responses can be viewed without switching to an email client.
I’ll show you the CXP Player first.
1.8 Video Playlists
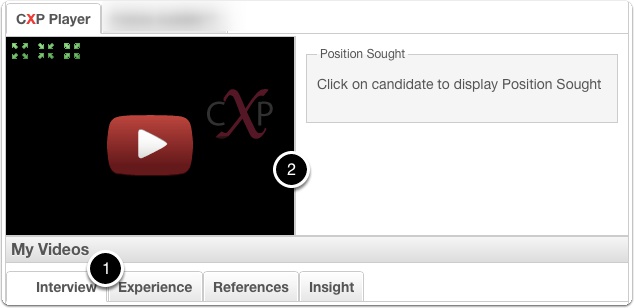
1. There are four video playlists in the CXP Player. To view any video in a playlist, click its’ title.
2. The video will load and begin playing in the video pane.
1.9 Video Playlists – Interview Playlist
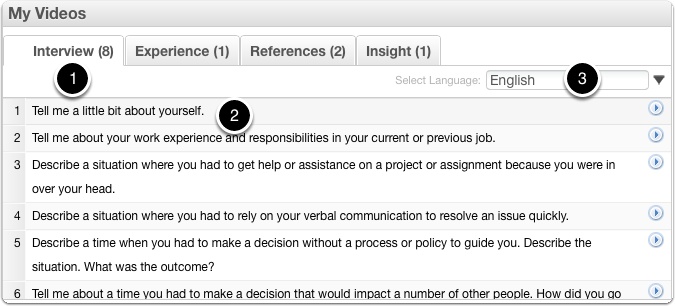
1. The first playlist is the Interview.
2. There are eight questions in the interview, and the candidate had up to 2 minutes to answer each one. The first two questions of every interview are always the same: “Tell me a little bit about yourself” and “Tell me about your work experience in your current or previous job.”
3. Interviews may be delivered in 2 languages (at the candidates’ discretion). Select the language to view the interview here.
1.10 Experience, References, Insight Playlists

The Experience, Reference, and Insight tabs are entirely optional at the candidate’s discretion. Each tab has the video playlist’s name and indicates how many videos are contained in the list. Candidates are encouraged to create or select relevant, job-related interview questions, then answer them using the S.T.A.R. (or similar) format and support the answer with multi-media materials and video.
1. Experience – previous work experience can be presented in video format.
2. References – video testimonials of coworkers, bosses, networking contacts, and clients past or present.
3. Insight – unique or unrelated professional characteristics in video format. This candidate might be a cashier by day and an experienced helicopter pilot on the weekends or a highly energetic Zumba instructor three times per week.
1.11 Viewing Candidate Resumes
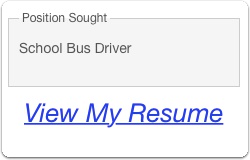
The view the candidates’ resume, click the “View My Resume” link.
1.12 Viewing Candidate Resumes
The resume is in PDF format and will open in a new tab or window.
Note: Please be sure that your browser is set to open links in a new tab or window and does not block pop-ups.
2. The Pointe AskMe@ tab.
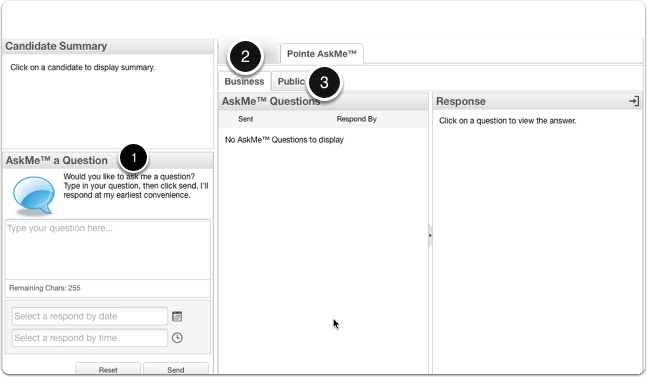
The next tab is the “Pointe AskMe™” tab, where follow-up questions can be directed to the candidate, and their responses can be viewed without switching to an email client.
The Connexion Pointe® platform offers a staggering amount of screening information in an easy-to-use and intuitive format. However, it is impossible to predict what questions may arise as a result of the information presented. This is why we created Pointe AskMe™. Pointe AskMe™ is similar to a built-in email client. It’s a great way to ask candidate follow-up questions without incurring additional expenses or scheduling an in-person or telephone interview. Pointe AskMe™ is also a fantastic way to catch a glimpse of a candidate’s written communication skills and response habits.
The Pointe AskMe™ tab has three components:
1. The AskMe a Question window,
2. the “Business” sub-tab is where responses to your follow-up questions are aggregated.
3. the “Public” sub-tab. The “Public” tab is where you can view the candidates’ responses to previous AskMe questions. The candidate makes these previous questions and responses available at their discretion.
2.1 The AskMe™ a Question window.
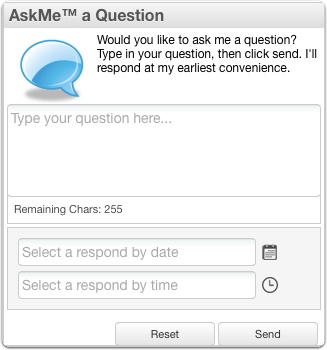
Sending a follow-up question to a candidate is easy. Just enter your question, select a deadline time and date, and click “Send.” The candidate receives a notification in their Pointe Profile® dashboard. If the candidate does not meet the deadline, the system deletes the question from the candidate’s dashboard, and a response is not accepted.
2.2 My Alerts tab.
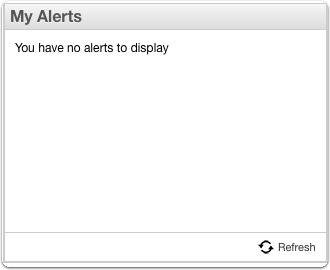
When a candidate responds to your AskMe question, you’ll get a notification in the “My Alerts” pane. Since the alerts are specific, you must select a candidates’ name to view their related alerts.
3. Add Candidate button.
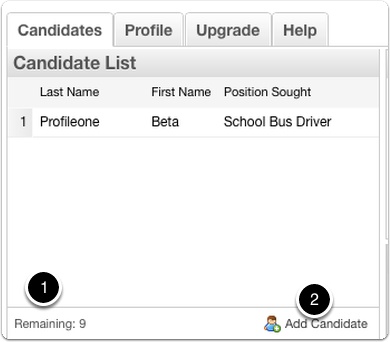
1. This number indicates how many more candidates can be added to the account.
2. To add more candidates, click the “Add Candidate” button, then copy and paste an active Pointe Profile® interview link in the window as described in the “Pointe Savant® PreView – Add Candidate Window” section.
4. The main Pointe Savant® PreView™ dashboard.

There are four tabs on the dashboard pictured above. The “Candidates” tab is selected by default.
Accessing the Help Guide
1. Accessing the Help Guide.
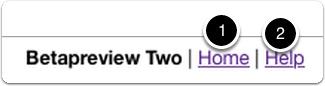
In the top right corner of the dashboard, you’ll see two links.
1.1 Accessing the Help Guide.

There are two ways to access the help guide. One way is to click the “Help” link in the top right corner of the dashboard. Clicking this link opens the “Help” tab.
1.2 Accessing the Help Guide.
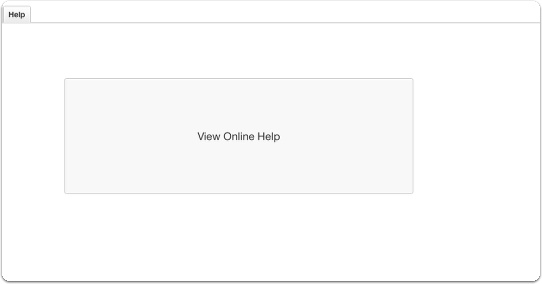
When the “Help” tab opens, click the large “View Online Help” button.
1.3 Accessing the Help Guide.

The help guide will open in a new tab or window.
Note: Please make sure your browser is set to open new tabs or windows and not block pop-ups.
1.4 View Help Guides Button

The other way to access the help guide is to click the “View Help Guides” button when you log in.
1.5 Accessing the Help Guide.

The help guide will open in a new tab or window.
Note: Please make sure your browser is set to open new tabs or windows and not block pop-ups.
Logging In and Out
1. Logging Out

When you’re ready to log out, click the “Home” link in the top right corner.
1.1 Confirm Log Out
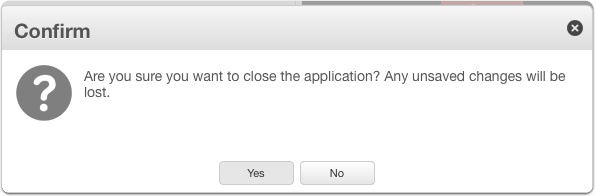
Confirm your decision to exit the application by clicking the “Yes” button. Click “No” or the “X” in the top right corner of the box to cancel the logout.
1.2 Log Out Link

You are redirected to this page, where you can click “Logout.”
1.3 Log out complete.

Finally, you’ll be brought to this page, and your log is complete.
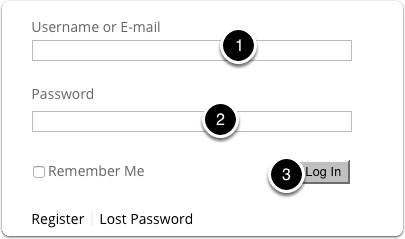
2. Log In | Connexion Pointe®

The next time you log in, you’ll have to follow a few more simple steps to access the application. Start by entering your credentials here and clicking the “Login” button.”
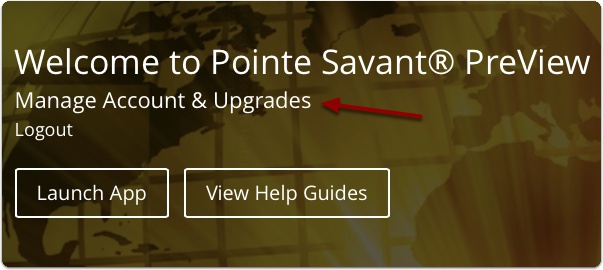
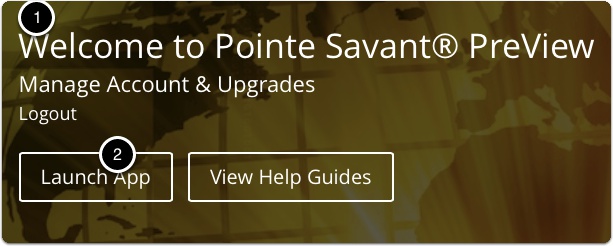
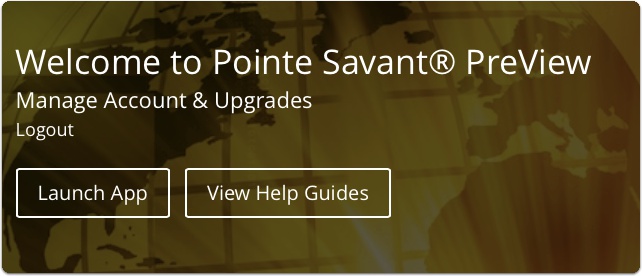
2.1 Launch App Button

This is your account home page. Once you’re in, you can
1. Access the application by clicking the “Launch App” button.
2. Manage your account by clicking the “Manage Account & Upgrades” link.
3. View the online guide. (It opens in a new tab or window, so be sure to adjust your browser settings accordingly).
4. Logout
Managing Your Password
1. Managing your password.
All account passwords can be changed on the login page, in the “Manage Account” area, or from within the Pointe Savant® PreView application while you’re logged in. I’ll show you how to use each method.
1.1 Forgot password?
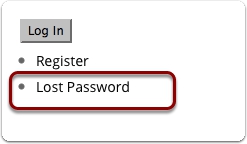
Changing your password often is a great way to keep your account secure. If you’d like to change your password or if you’ve misplaced or forgotten your password, Navigate to https://www.connexionpointe.com/login/ and click on “Lost Password.” Follow the on-screen instructions.
1.2 Password recovery
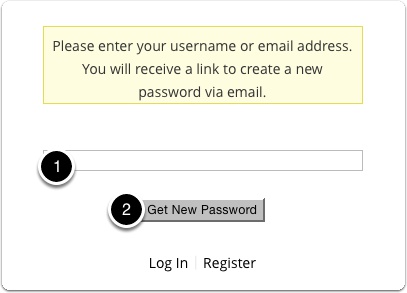
1 – Enter your email address or your username in the field and
2 – click the “Get New Password” button.
If your email address is in our system, an email will be sent immediately with a link to reset your password.
1.3 Check your email.
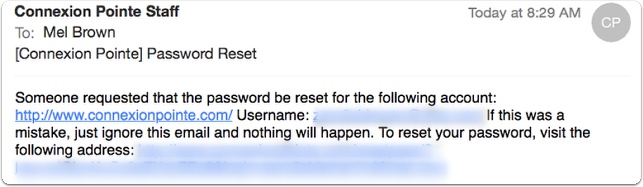
The email to reset your password will be similar to this. Click the reset password link provided.
1.4 Reset Password
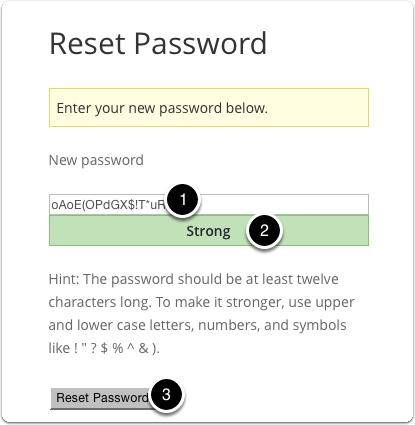
1 – The system will suggest a secure password for your account, which we recommend using. You can also create a new password by entering it in the field.
2 – When the indicator presents the word “Strong,”
3 – Click the “Reset Password” button.
Follow the on-screen instructions, and log in again.
Note: It’s recommended that you wait a moment or two to allow your new password to reset in the system.
1.5 Change Password in “Manage Account” Area
To change your password in the “Manage Account” area, navigate to https://www.connexionpointe.com/login/, enter your credentials, and click the “Log In” button.
1.6 Account Home Page
Once logged in, you should see a page similar to the photo above. Click the “Manage Account” link.
1.7 Edit Password and Account Details Link
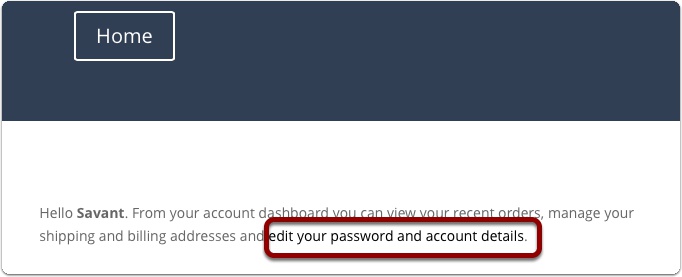
This the “My Account” page. To change your password, click the words edit your password and account details to access the account editing functions.
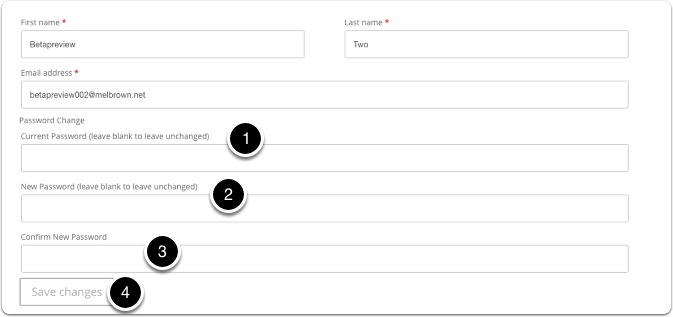
1.8 Edit Account Details page

Locate the Password change fields as pictured above.
1 – Enter your current password.
2 – Enter your new password
3 – Confirm your new password by entering it again. The new passwords MUST MATCH before the change is accepted.
4 – Click the “Save changes” button.
1.9 Password change successful

1 – The system will notify you that your update was successful and inform you of the change via email.
2 – To access the application or log out, click the “Home” button.
1.10 Account Homepage.
1 – You’ll be brought to the account homepage, where you can select your next action.
While we’re here, let’s take a look at changing the password from within the Pointe Pointe Savant®™ application.
2 – To do this, click the “Launch App” button.
1.11 Changing Your Password
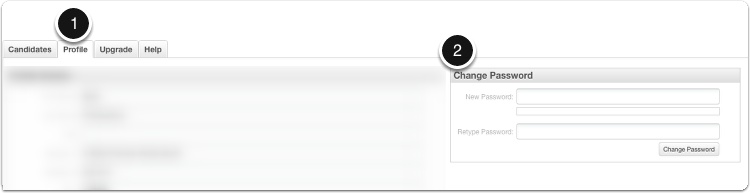
When the application opens,
1. Select the “Profile” tab
2. Locate the “Change Password” pane on the right side.
1.12 Change password.
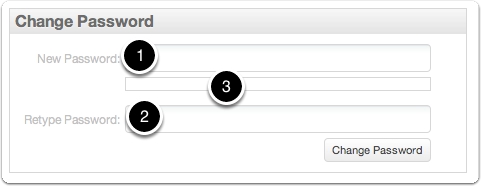
To change the account password,
1 – enter the new password in the required field,
2 – Confirm the new password by entering it again. The passwords MUST match to be accepted.
3 – Strong passwords are recommended. An indicator between the two fields evaluates password strength. Click “Change Password.”
1.13 Changing Your Password
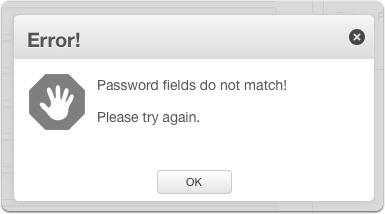
Remember, the passwords you type must match!
1.14 “Very Weak” Passwords.
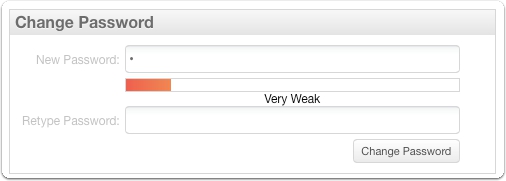
An indicator of password strength appears below the “New Password” field. “Very Weak” passwords are not recommended and can be strengthened by adding characters.
1.15 “Strong” Passwords.
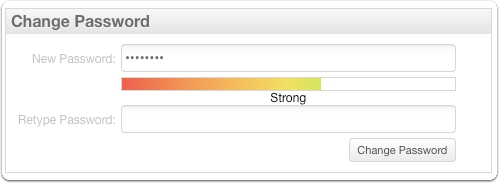
“Strong” passwords are much better and can be strengthened further by adding characters.
1.16 “Very Strong” Passwords.
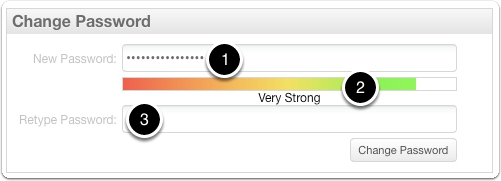
“Very Strong” passwords are highly desirable and recommended.
1 – Once you’re satisfied with your new password,
2 – and you’ve confirmed that it’s “Very Strong,”
3 – Confirm by retyping it and
4 – click the “Change Password” button, and you’re done!
NOTE – Be sure to make a note of your password and keep it in a safe place! The system will not confirm your password change via email using this method!
Account Management
1. Editing Your Account Data
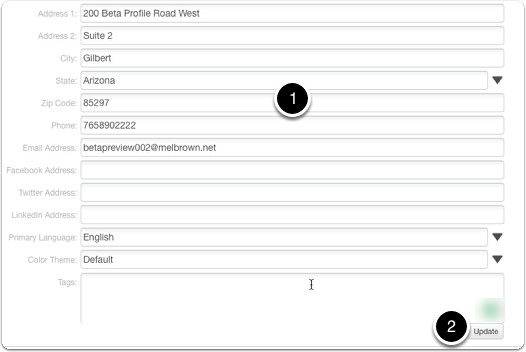
1. To change any of your data, click on the field you’d like to edit and start typing, and
2. click the “Update” button.
Note: Changes made in the application are not reflected in the contact or payment information provided at sign up!
1.1 Editing Your Data
The application confirms your edit with the dialog box above. To verify, click “Yes.” The page will reload, and you’ll need to navigate back to the “My Info” tab
2. Managing Your Account & Upgrades
Pointe Savant® PreView is available for free to view up to 9 candidates or for seven days (whichever comes first). To continue using Pointe Savant®, you must upgrade to one of our affordable subscription plans.
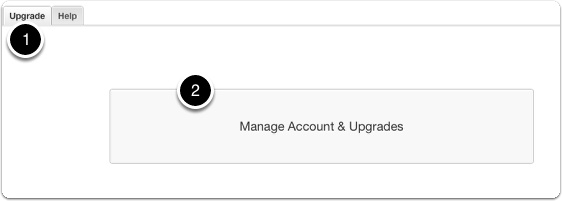
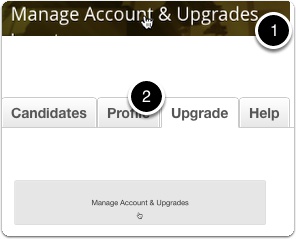
1. To view the available plans, select the “Upgrade” tab
2. Click the large “Manage Account & Upgrades” button
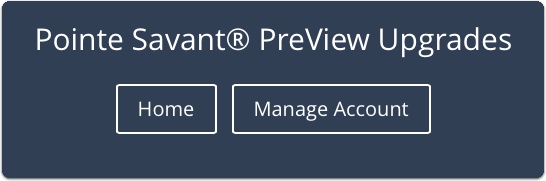
2.1 Pointe Savant® PreView Upgrades | Connexion Pointe®
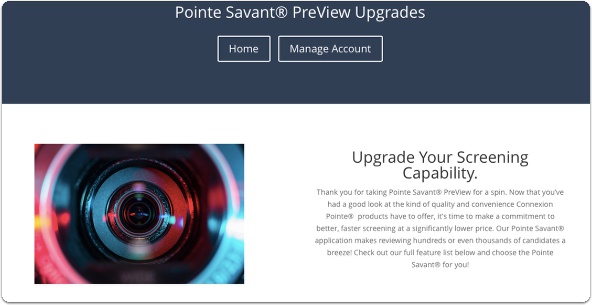
The Pointe Savant® “PreView Upgrades” page opens.
2.2 Manage Account
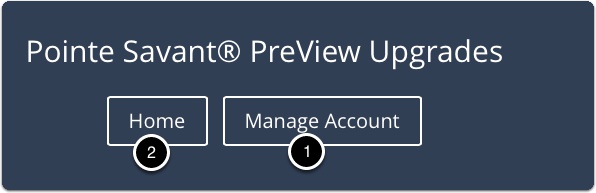
1. To view the manage account functions, click the “Manage Account” button.
2. To return to the home page, click the “Home” button.
2.3 My Account | Connexion Pointe®
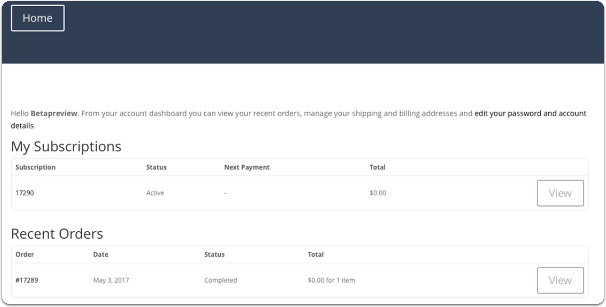
The “Manage Account” page opens. Each transaction is listed under “My Subscriptions” and “Recent Orders.”
3. Suspending and Reactivating Your Account
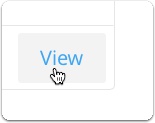
To view subscription details, click the “View” button next to any transaction in “My Subscriptions.”
3.1 Suspending and Reactivating Your Account
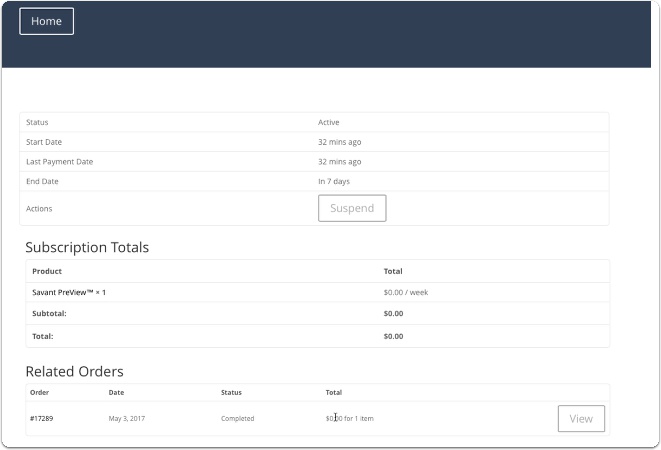
The Subscription transaction window opens. Here you can view your invoices, related orders, suspend, reactivate, or cancel your account.
3.2 Suspending and Reactivating Your Account
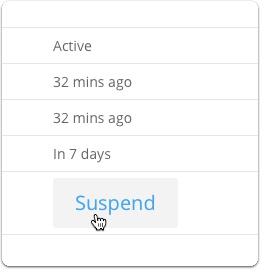
To suspend your account, click the “Suspend” button. Pointe Savant® accounts are free, so this will have no financial impact or benefit. Paid subscription accounts can be placed “On Hold” by suspending them between recruiting cycles to reduce costs.
3.3 Suspending and Reactivating Your Account
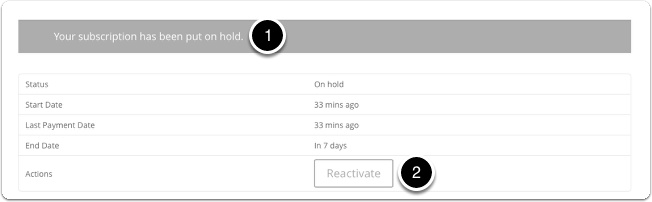
1. The suspension is confirmed.
2. The option to reactivate the account is available by clicking the “Reactivate button.
3.4 Suspending and Reactivating Your Account
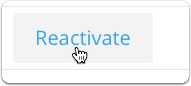
Click the “Reactivate” button to restart your subscription.
3.5 Suspending and Reactivating Your Account
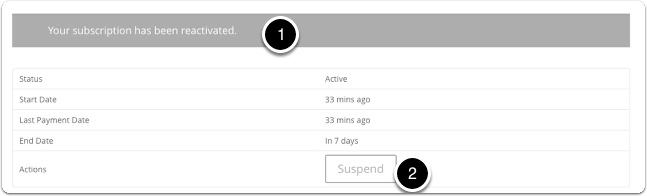
1. Reactivation of the subscription is confirmed.
2. The “suspend” button is available to place the subscription on hold at your convenience.
Note: Suspended Pointe Savant® accounts will still expire after seven days!
4. Managing account details

To manage your account, start by entering your credentials here and clicking the “Login” button.”
4.1 Managing account details
4.2 Managing account details
![]()
Click the “Manage Account & Upgrades” link.
4.3 Managing account details

The “Manage Account & Upgrades” page opens. Click the “Manage Account” button.
4.4 Managing account details

The “My Account” page opens. The words “edit your password and account details” is a link. Click the link to access your account details and change your password.
4.5 Managing account details

The “My Account” page opens. To edit details, click in an available field, and start typing.
4.6 Managing account details
To change your password here,
1. enter your current password.
2. Enter the new password.
3. Confirm the new password.
4.7 Managing account details
4.8 Managing account details

To exit the “My Account” page, click the “Home” button.
5. Changing Color Themes
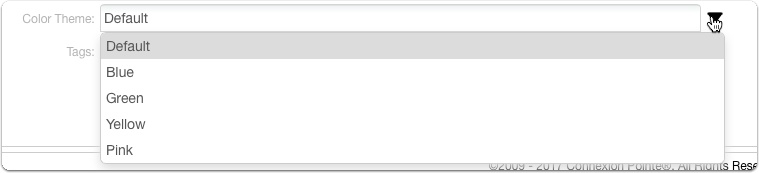
There are a few color themes available if you’d like to have a slightly different look. This theme is not visible to anyone except. To change the color theme, select a color from the drop-down menu.
5.1 Color Themes
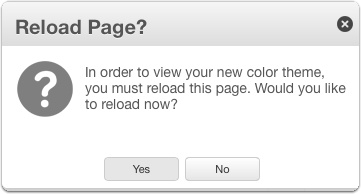
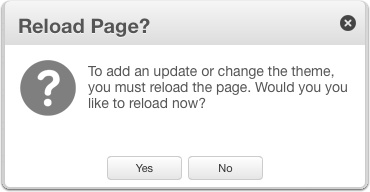
The application confirms your edit with the dialog box above. To confirm, click “Yes.”
5.2 Color Themes
The page will reload, and you’ll need to navigate back to the “My Info” tab
Upgrading To A Subscription Account
1. Upgrading To A Subscription Account
Upgrading to the full Points Savant® application is easy. To begin, login and
1. Click the “Manage Account & Upgrades” link.
2. If you are already logged into the application, select the “Upgrade” tab and
3. click the “Manage Account & Upgrades.”
1.1 Upgrading To A Subscription Account
The “Manage Account & Upgrades” page opens. Scroll down the page to view the available upgrade options.
1.2 Upgrading To A Subscription Account
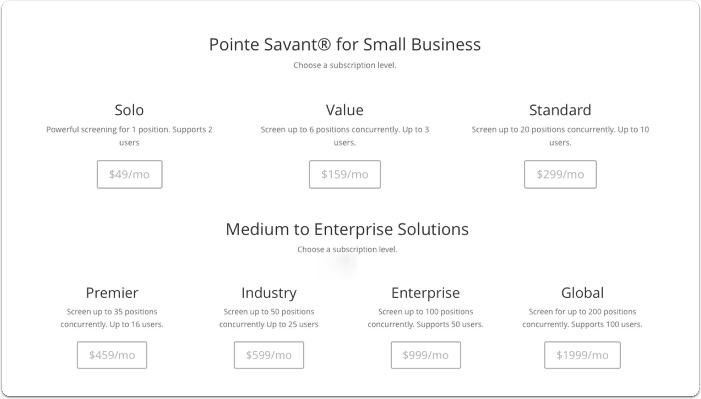
Choose the option that suits your organizational needs.
1.3 Upgrading To A Subscription Account
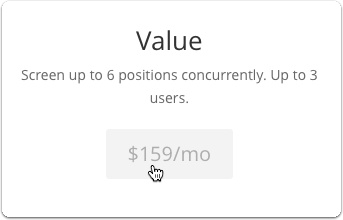
To place your order, click the price button of your choice.
1.4 Upgrading To A Subscription Account
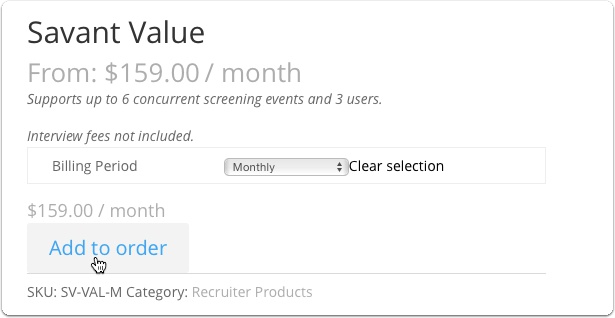
Click the “Add to order” button to add your purchase to the cart.
1.5 Upgrading To A Subscription Account

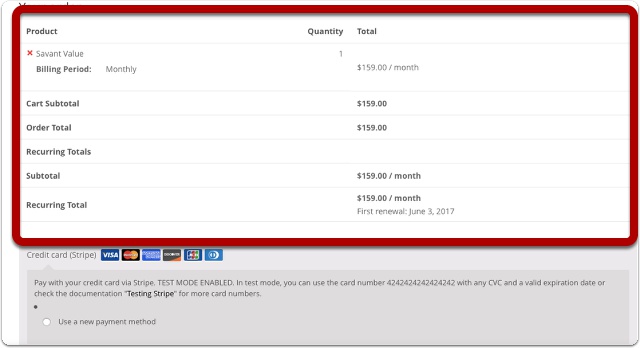
Follow the on-screen instructions to fill out the form.
1.6 Upgrading To A Subscription Account

Complete the form with your billing details.
1.7 Upgrading To A Subscription Account
1.8 Upgrading To A Subscription Account
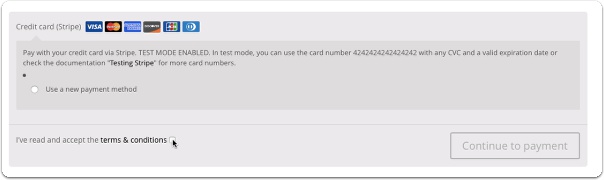
Find the Terms & conditions check box.
1.9 Upgrading To A Subscription Account

Click the box to accept the Terms & conditions.
1.10 Upgrading To A Subscription Account
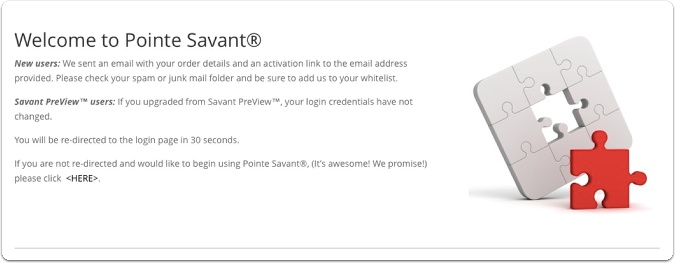
The Welcome to Pointe Savant® page opens. You order details will appear at the bottom of this page. This page will be visible for 30 seconds.
1.11 Upgrading To A Subscription Account
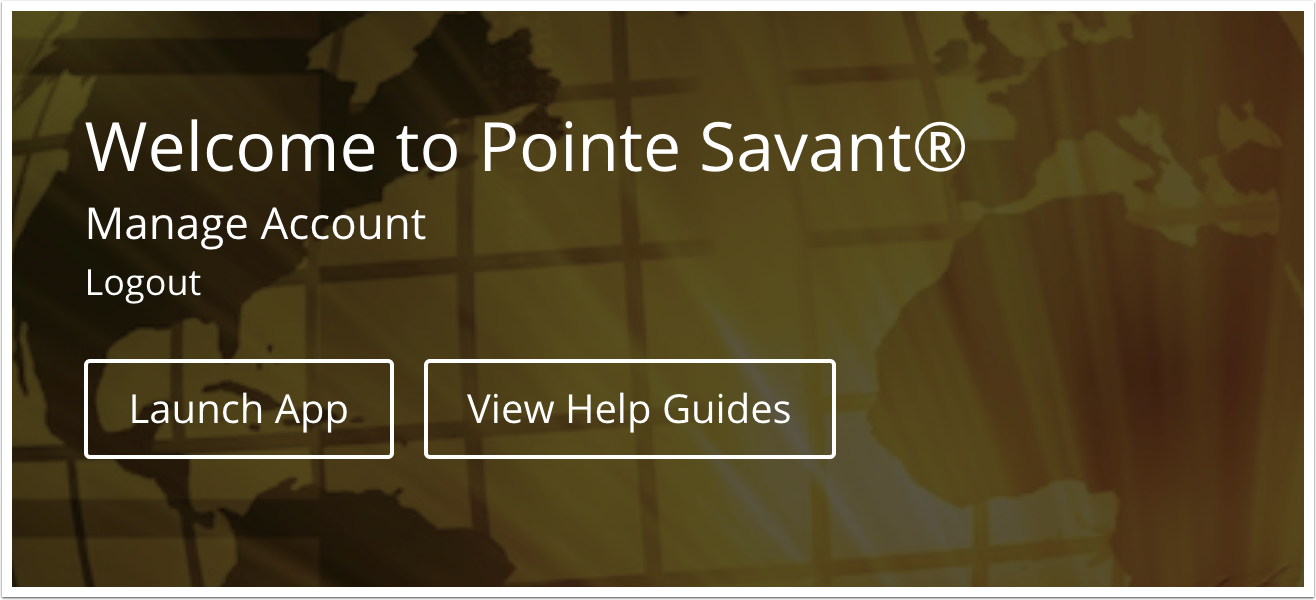
After 30 seconds you’ll be redirected to your new Pointe Savant® homepage where you can launch the full application by clicking the “Launch App” button.
1.12 Pointe Savant® Business Dashboard
1.13 Upgrading To A Subscription Account
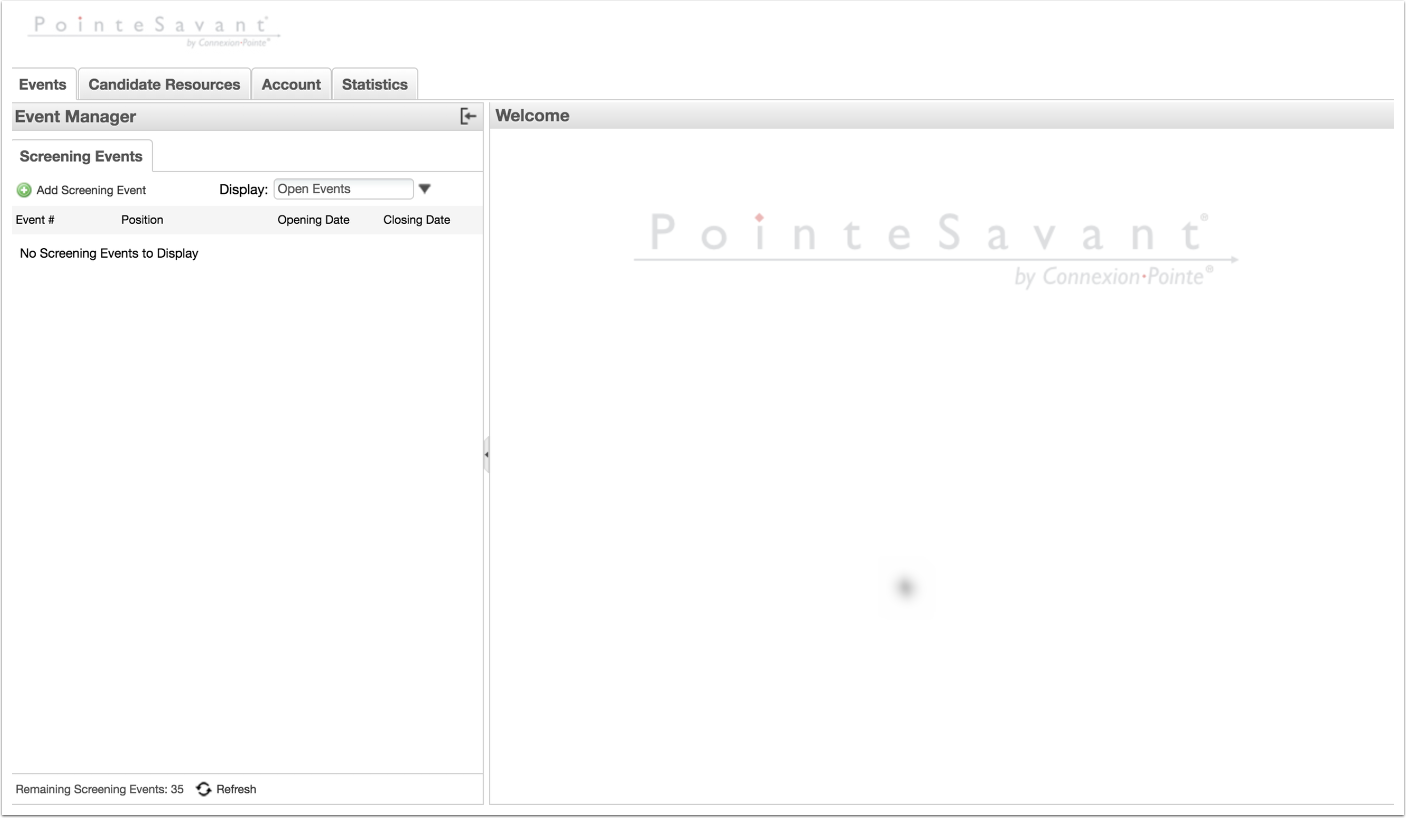
The Pointe Savant® dashboard opens, and it should be similar to the photo above.
1.14 Upgrading To A Subscription Account
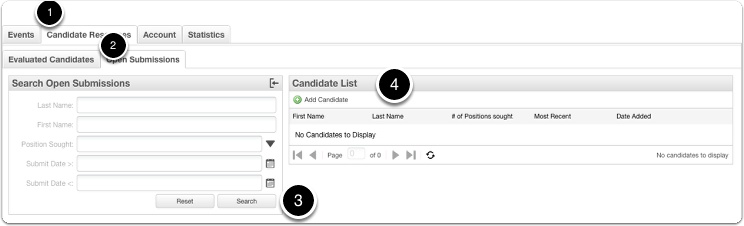
What about the candidates I added to my Pointe Savant Preview® Account?
The candidates that were in your Pointe Savant® PreView are carried over to your upgraded account. To view them:
1. Select the “Candidate Resources” tab
2. Select the “open Submissions” sub-tab
3. Click the “Search” button
4. The candidates appear in the “Candidate List.”